Quilting
Around the Block with Patchwork Posse: Block #11
 Did you think that I’d given up on the Patchwork Posse Around the Block Round Robin? No way! I just got a little bit waylaid by Quilt Market. I’ll be a bit late finishing up, but I’m going to do it!
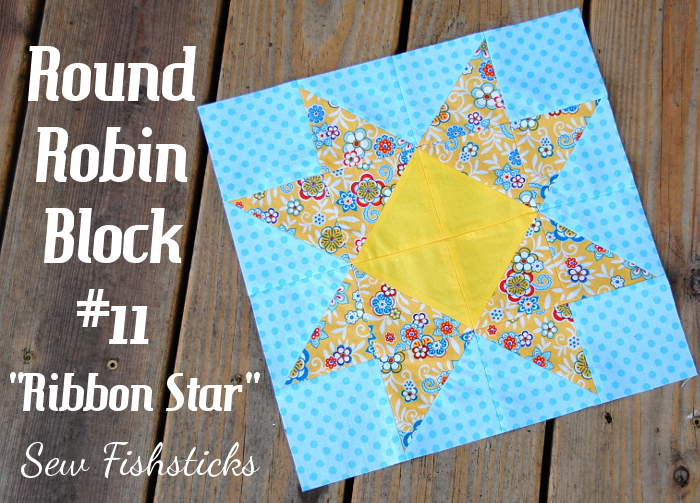
Block #11 is the Ribbon Star block from Jennifer at Ellison Lane. I’m so happy with how well this block came together! My points lined up so nicely, and all I did was follow Jennifer’s instructions very closely. My “need for speed” was very pleased by her directions for sewing four half-square triangles at once, too!
Around the Block with Patchwork Posse: Block #10
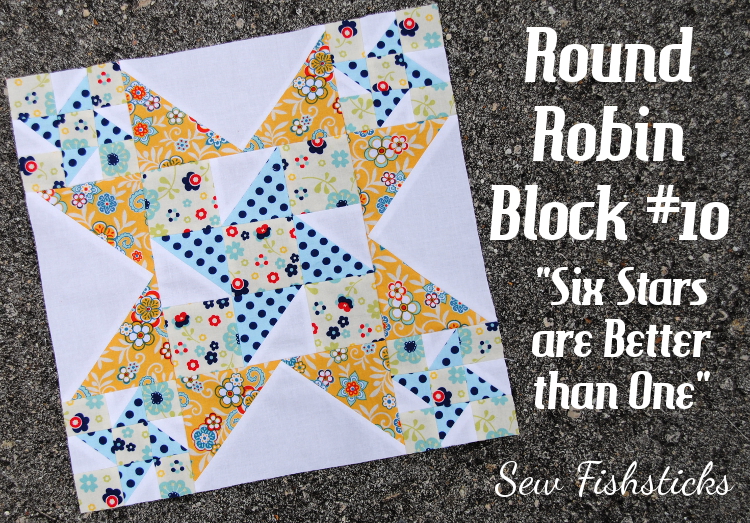 Wheeee! Only two more blocks to go! I think I’ve learned something new with every block in the Patchwork Posse Around the Block Round Robin, and this week was definitely not an exception. Remember how I said that last week’s block was a bit of a challenge? Well, this one was like climbing the quilting version of Mt. Everest! I’m only sort of kidding. Piecing together lots of tiny pieces stretches my attention span to its limits, and this block has 50 – five zero – pieces. I wondered aloud (meaning, I yelled from my sewing room), “Can you even fit 50 pieces into a 12″ block?!” But, look! I did it! AND, without a single seam rip! Isn’t it pretty?
The Six Stars are Better than One block was designed by Kate and Elizabeth from Seams Like a Dream, and while it is a challenging block, their instructions are really easy to follow. My favorite part is their Quick, No Waste Flying Geese method! It’s like magic!
Around the Block with Patchwork Posse: Block #9
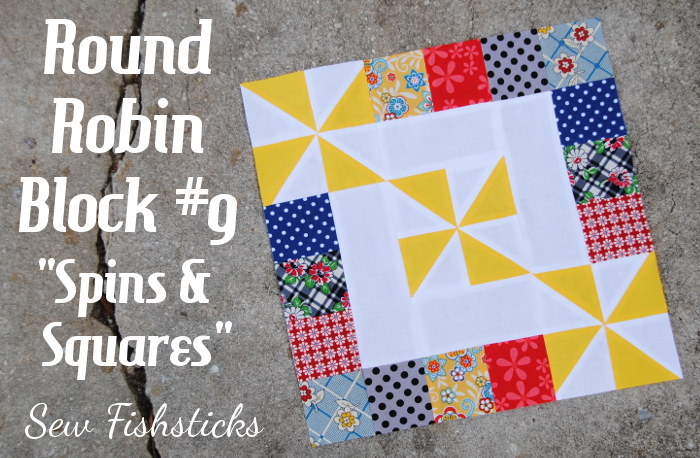 Quiet Sunday afternoons are perfect for catching up on sewing projects and prepping for others. I marked Block #9 in the Patchwork Posse Around the Block Round Robin off of my list this afternoon. This Spins & Squares Block from Crafty Tammie was a little more of a challenge than the last few blocks — a bit of seam-ripping was involved in getting those corners matched up. I’m really happy with the end result, though, and I loved being able to use up some tiny pieces. This is the first of these blocks that I incorporated some white into, and I really like it! I think I might have to mix some into the remaining blocks, too.
I’m also working on a few new patterns this weekend and cutting out some projects for Kids’ Clothes Week which starts tomorrow!
Around the Block with Patchwork Posse: Block #8
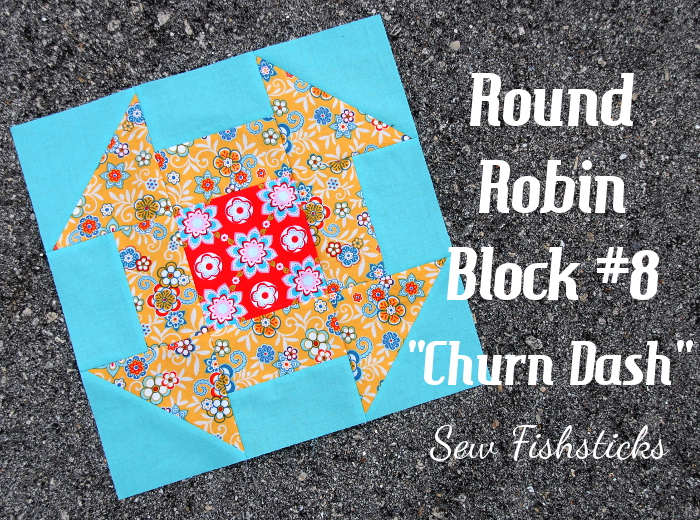 A whole week without blogging! It’s been quite a while since my blog posts were that far apart. I promise that I have been busy behind the scenes … working on PDF pattern updates, readying new patterns for testing, planning for Spring Quilt Market. I did find time for block #8 in the Patchwork Posse Around the Block Round Robin, though! This week’s block is a wonderful traditional one from A Quilting Life: the Churn Dash.
Around the Block with Patchwork Posse: Block #7
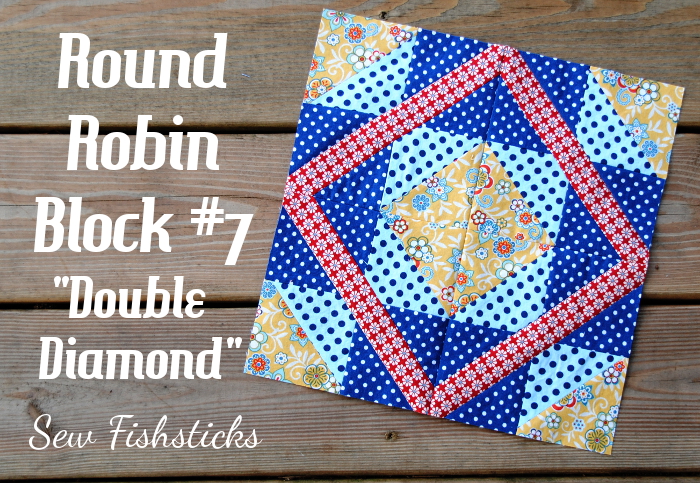 Yay! I’m over halfway through the Patchwork Posse Around the Block Round Robin. I think this is the longest that I’ve ever stuck with a quilt-block sew-along … only five more blocks to go!
This week’s block, The Double Diamond, was designed by Ellen of The Long Thread. This one was a bit of a challenge for me, but I made it through, and I adore how it turned out!

The Wonky House Quilt Block Tutorial
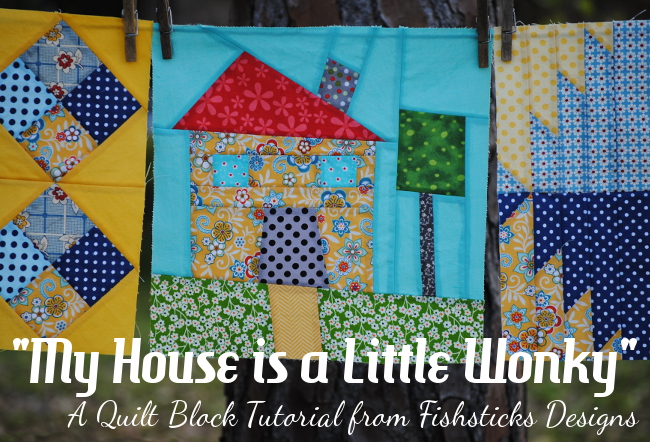 Welcome to the Fishsticks Designs Blog’s first quilt block tutorial! I am so excited about getting to be a part of the Around the Block Round Robin at Patchwork Posse! When Becky asked me if I’d like to join in by sharing my favorite quilt block, I knew right away what block that would be. I’m calling it the “My House is a Little Wonky” Block.
I love the whimsical nature of wonky house blocks, and the fact that they’re perfect in their imperfection. This block has no picky corners to be aligned perfectly, and it lets you use your imagination a bit. My husband retired from the Air Force about eight years ago after 20 (“and a half!” he would add) years, and we’ve lived in a lot of houses. With each move, I immediately started decorating to turn our house into our home. One of the things all of that decorating taught me, is that no house is ever perfectly straight . . . ever. It’s not really visible from the outside or with a casual glance, sometimes you even have to climb up into those dark corners to find out that the walls are slightly crooked, but they always are. I think there’s a little life lesson in that. In spite of how we might look from the outside or at a casual glance, we’re all a little wonky, just like our houses. It’s a good thing, too. If we weren’t, life would be far too boring!
Ready to get started? The tutorial for this freezer-paper-pieced block looks really long, but I promise this block is not hard to assemble at all. I’ll walk you through every step!
You’ll need a few things before you get started. First, you’ll want to print this color template for your house block: Color Template. Be sure when you print that you’ve chosen to print at full-size or 100%. You may have to save the file to your computer to print it. (There’s a black and white template shown below, too. Don’t worry about printing it right now, but you may need it later: Black & White Template.) In addition to your regular quilting supplies, since this is a freezer-paper-pieced block, you’ll need some freezer paper. (Iron Man is totally optional, however. When you live in a house with little boys, and you walk away from your supplies, you often come back to find tiny visitors.)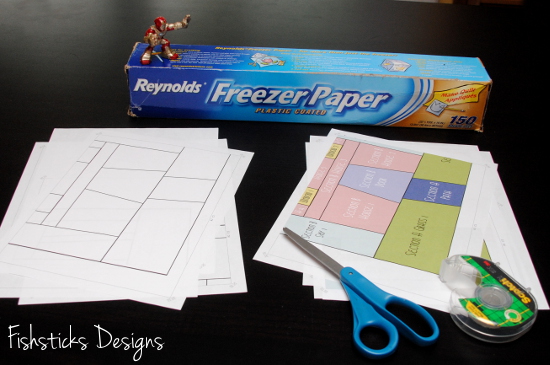 To assemble your color template, just trim the 1/2″ margin off of the left hand side of the bottom right corner page.
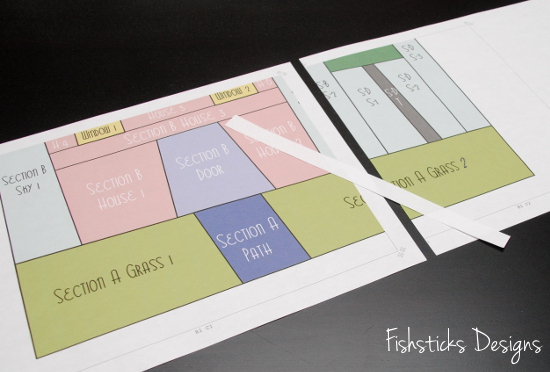 Overlap the bottom right corner page with the bottom left corner page. Line everything up and tape it in place.
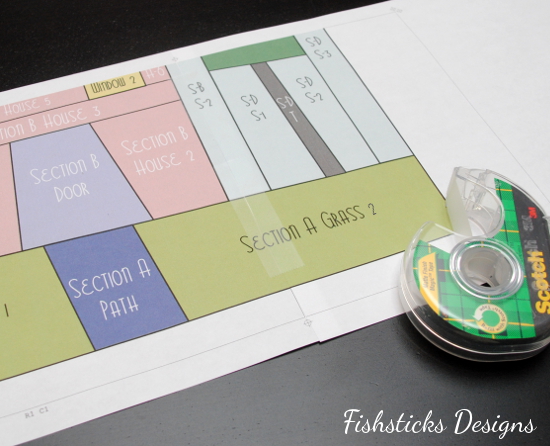 Piece the top two pages together in the same manner, and then tape all four pieces together.
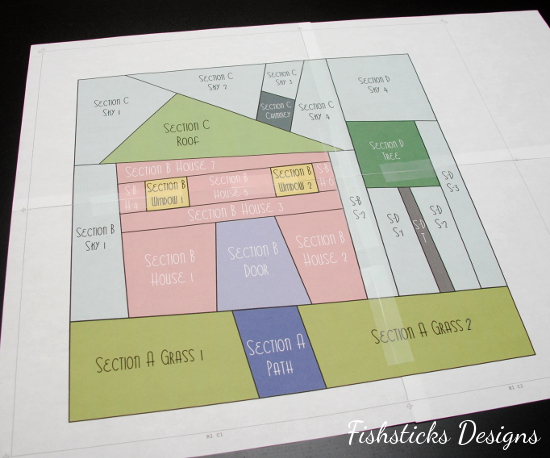 Check to make sure that your template measures 12 1/2″ square before moving on.
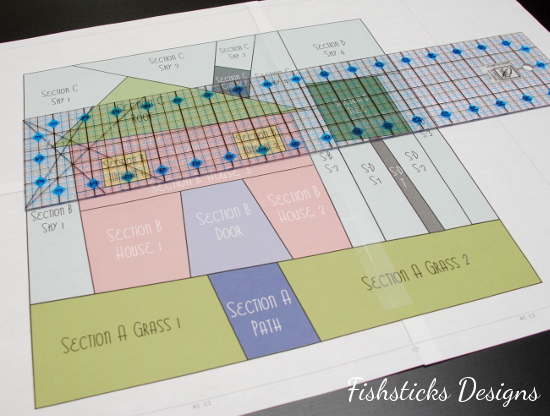 Cut a piece of freezer paper slightly bigger than your template and place it shiny side down/matte side up on top of your template. (If you find that it’s too difficult to see through the freezer paper, you can print the black and white template for tracing instead.)
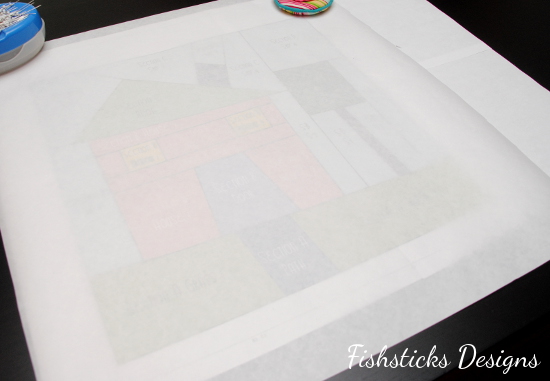 Using a pencil and straight edge, trace the template onto the matte side of the freezer paper.
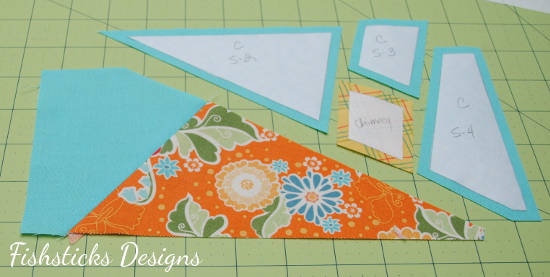
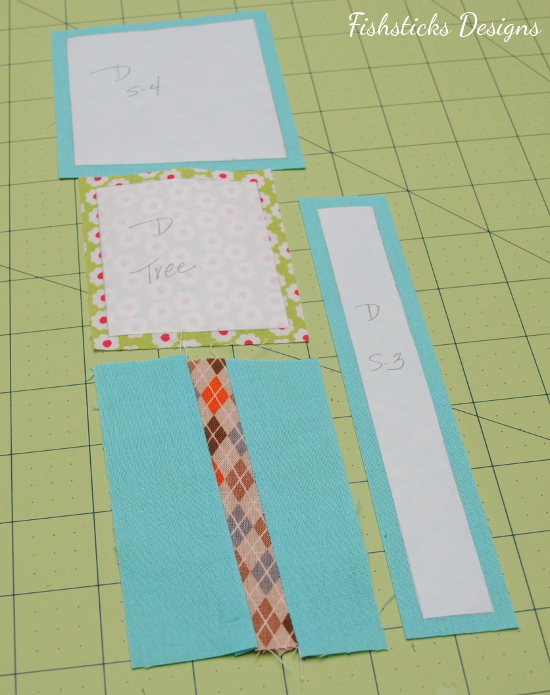
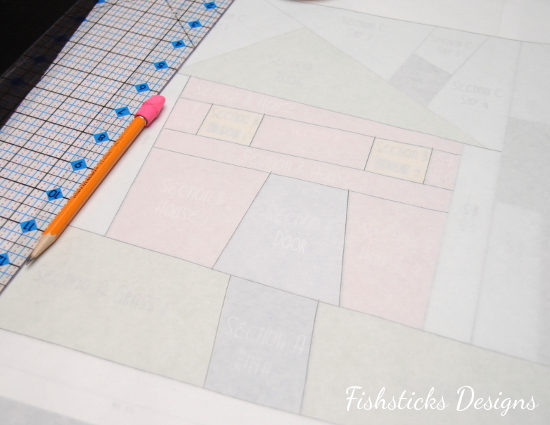 Use the color template to label all of the pieces. You’ll see that the block is divided into four sections, and the colors are labeled from left to right and from the bottom up. Using abbreviations will help this part to go faster.
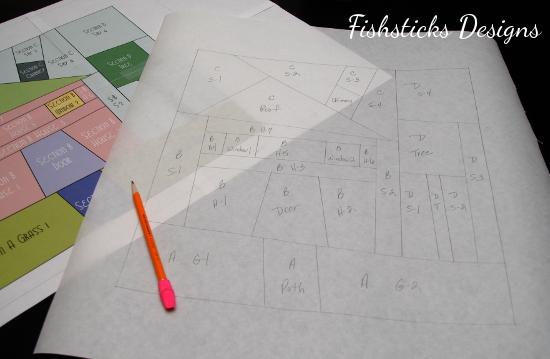 Choose your fabrics! This is a great time to use up tiny scraps. They are perfect for windows, doors, chimney, etc.
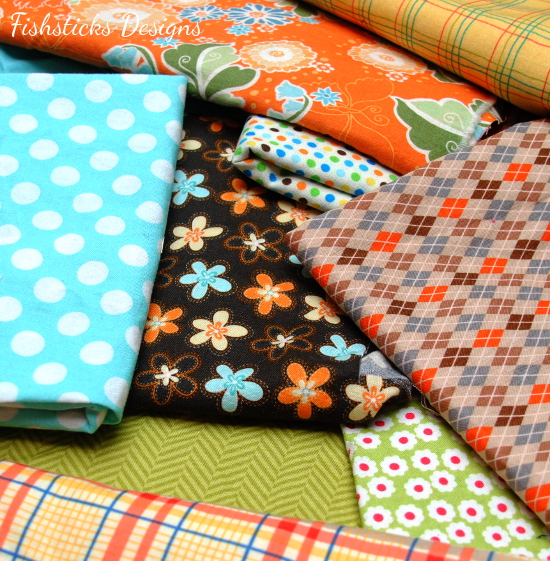 Cut your freezer paper template into pieces.
 Separate the template pieces into colors/fabrics.
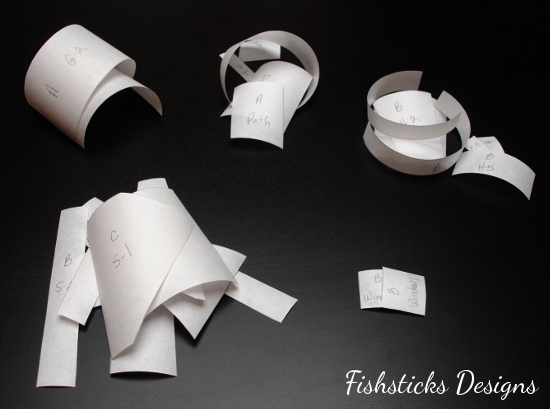 Now the fun part starts! Position one of your template pieces on the fabric you’ve chosen for it with at least 1/4″ margin all the way around. Be sure that you’ve placed the template on the right side of the fabric with the shiny side of the freezer paper down. With your iron set to cotton/no steam, press the template onto the fabric. The coating on the shiny of the freezer paper will melt and the template will temporarily stick to the fabric.
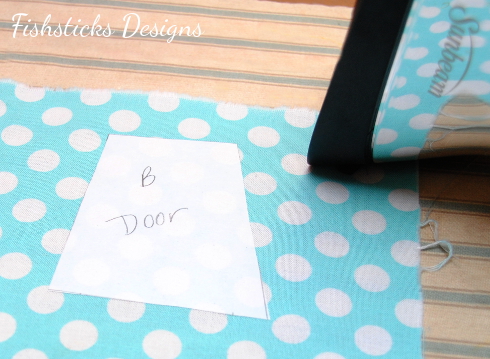 To add your 1/4″ seam allowance, place your clear quilting ruler on top of your template/fabric piece. Line the 1/4″ marking up with the edge of the template so that the ruler overlaps the template, as shown.
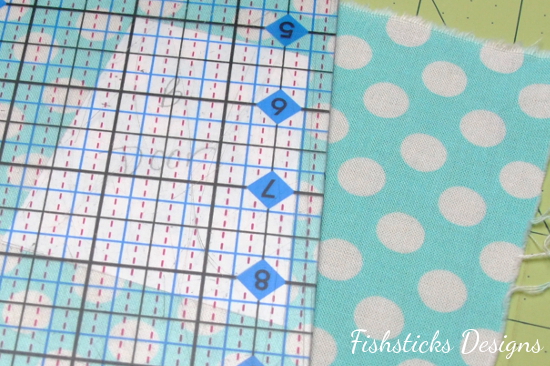 Run your rotary cutter down the edge of the ruler to trim away the excess fabric, leaving the 1/4″ seam allowance outside the template.
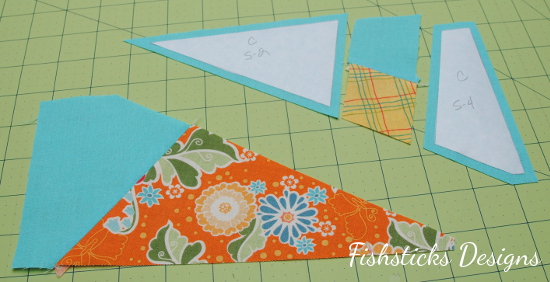
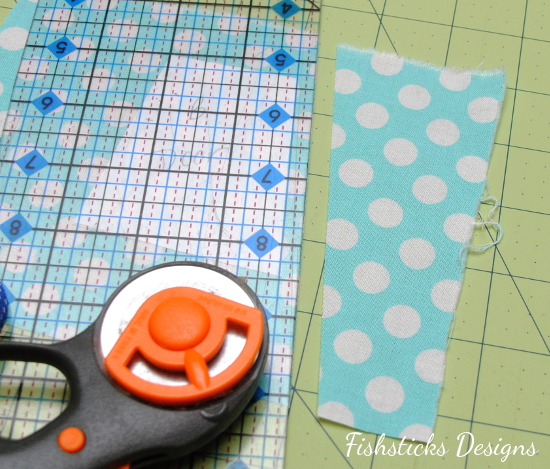 Cut each side of your fabric in the same manner so that you have a finished fabric piece with the template still attached and a 1/4″ seam allowance all the way around it. (Don’t take your templates off yet!)
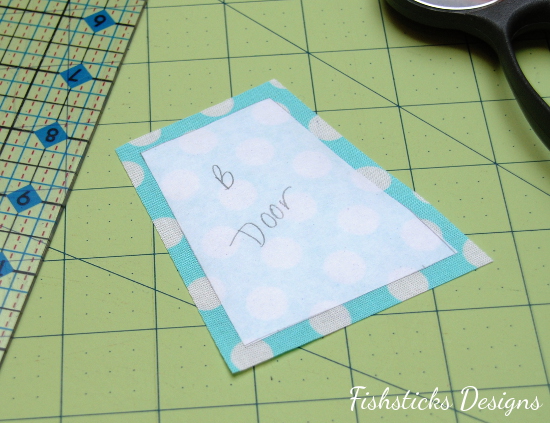 Where you have multiple templates for one piece of fabric, you can iron them all on at once, but be very careful to make sure you have 1/2″ (1/4″ times two) between all of the pieces. It’s best to put more than that, just in case.
 Continue ironing your templates onto your fabric and using your ruler and rotary cutter to trim away the excess fabric leaving 1/4″ seam allowance all the way around each template. Once you’re finished, separate them all into their individual sections.
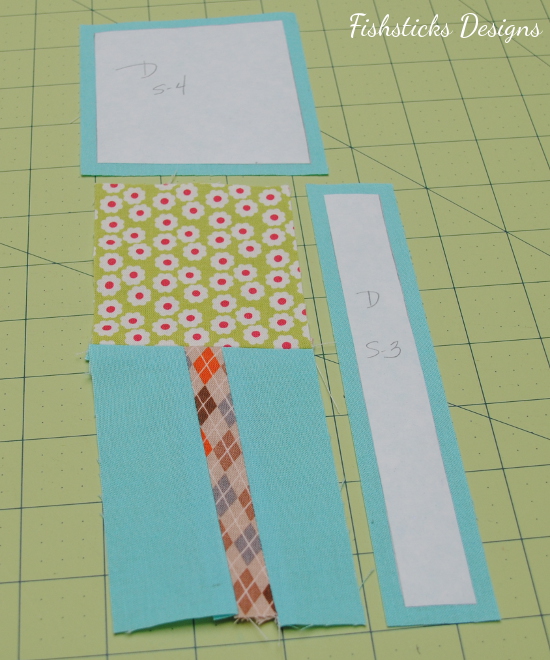
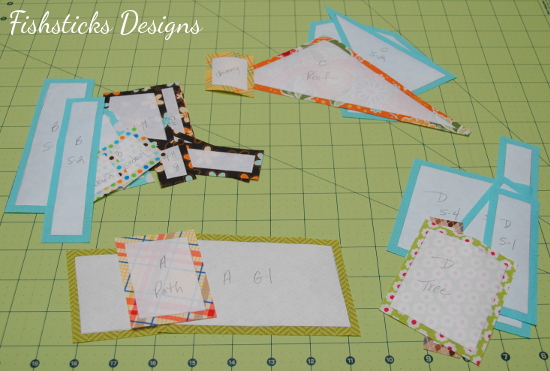 The remaining pictures will walk you through the order in which to assemble your pieces. Remove the templates as you get to each piece. Stitch the pieces together using 1/4″ seam allowance and press your seams (open or to one side, whichever you prefer) before moving on to the next fabric piece.
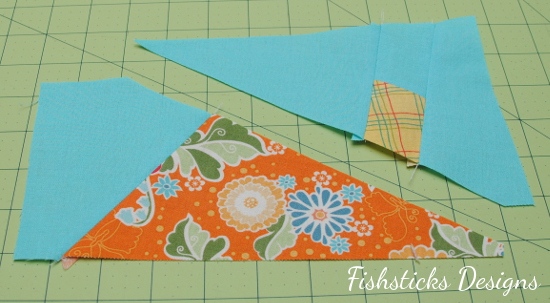
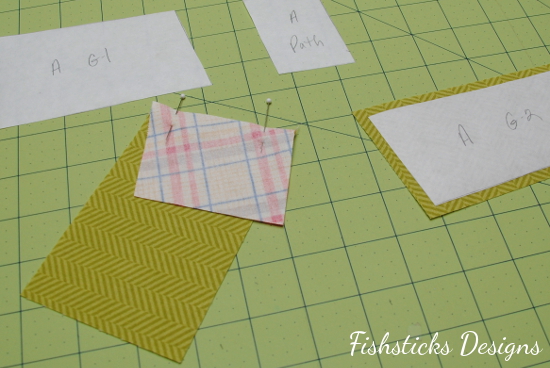 Start by sewing the Section 1 grass pieces to either side of the path.
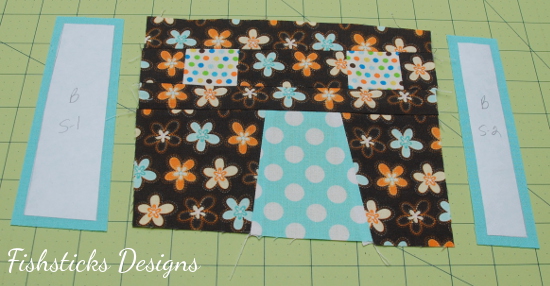
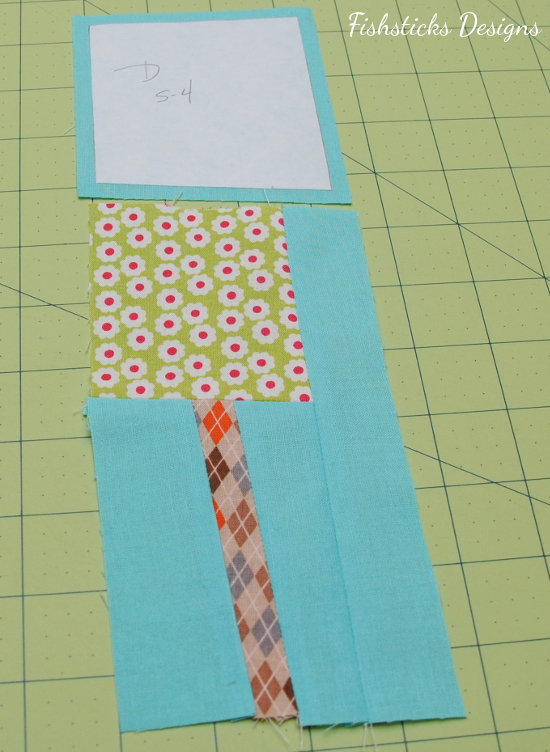
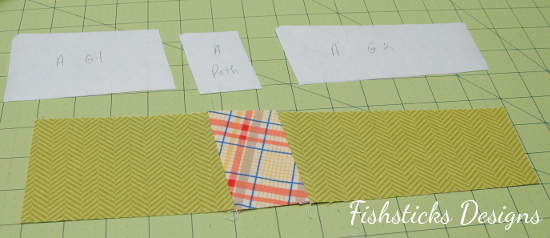 Assemble Section 2 next — the house, including doors and windows.
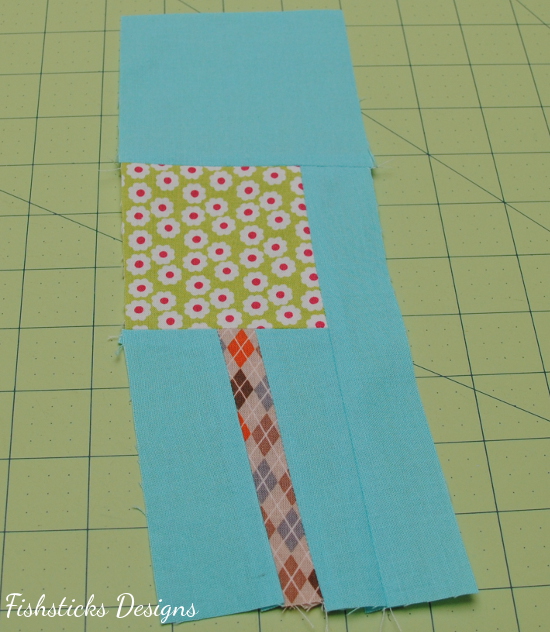
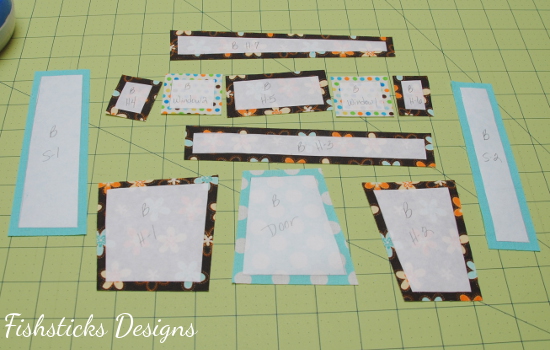
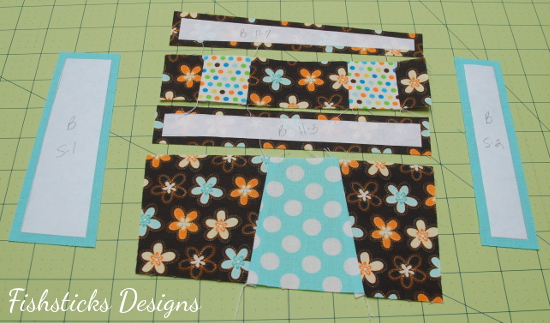
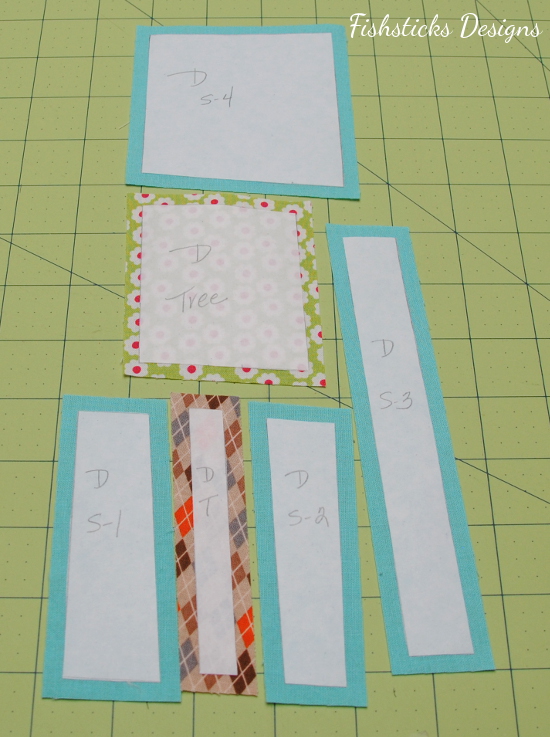
 Move onto Section 3 which includes the roof, chimney and sky pieces.
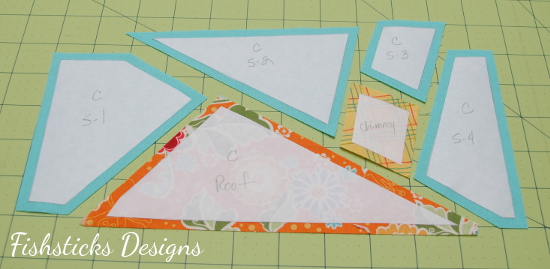
 Finally, sew the Section 4 tree pieces together.
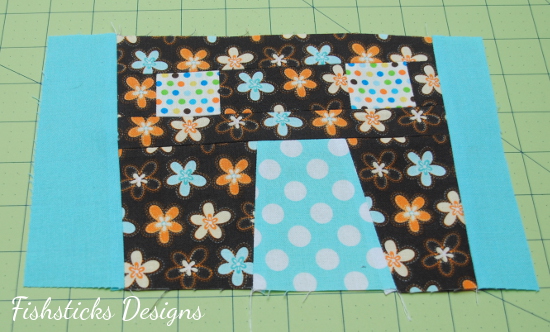
 Now you’re ready to sew your sections together!
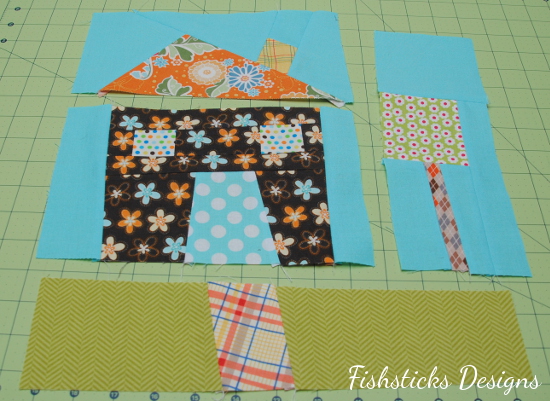


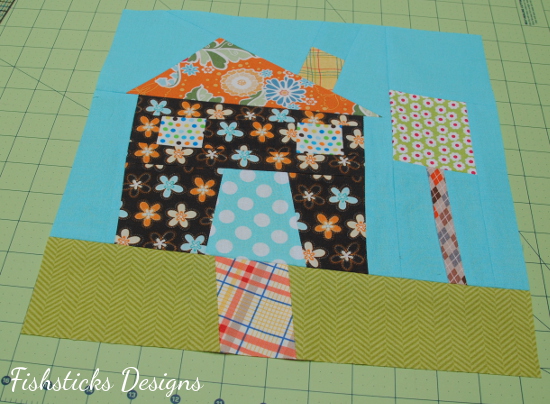 Almost done! Just square your block up to 12 1/2″ and admire your work. That wasn’t hard at all, right?
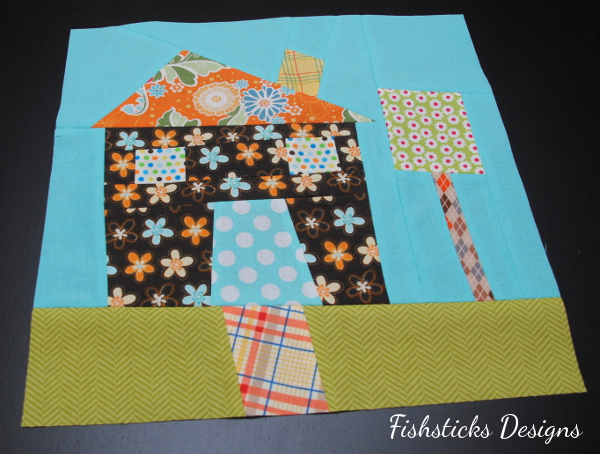 I can’t wait to see your finished blocks! I’ve been having such a great time sewing along myself. Want to see my blocks so far? I love how they’re coming together!
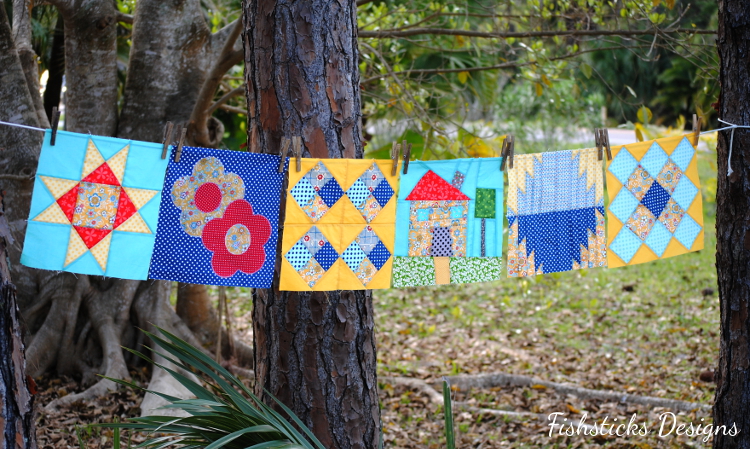
Around the Block with Patchwork Posse: Block #5
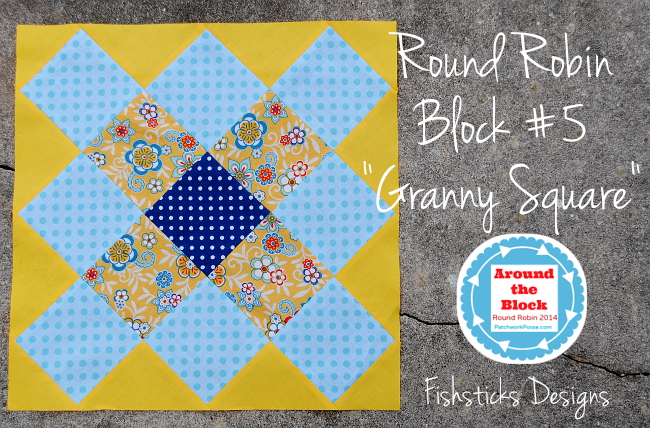 This week’s Around the Block Round Robin block is The Granny Square from Elizabeth at Simple Simon and Company! I love the classic look of it. Granny squares bring to mind thoughts of simpler times, don’t they? And, the unusual way that this block is assembled is pretty cool.
One of the reasons that I really like this block is that I’m actually in the process of teaching myself how to crochet granny squares! I’ve always wanted a big granny square afghan, and I love having a project that I can pick up for a few minutes here and there without having to figure out where I am. I’m starting with a toss pillow for now to see how it goes. Here’s a little peek at the pile that I have done so far. More on that later, when I’ve actually finished the pillow. 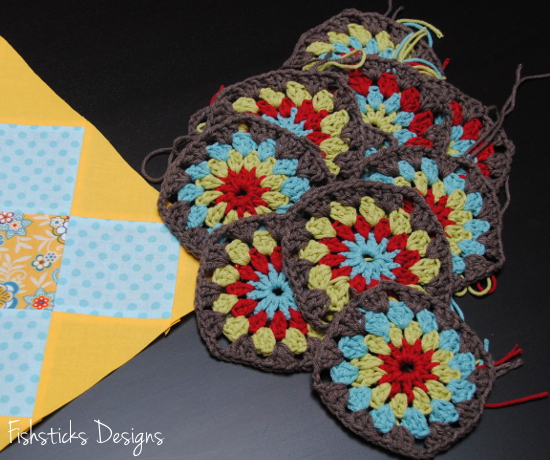 My Granny Square Block has a little baby brother because I was one of the first to sew it up, and there was a mistake in the sizing. (It’s all fixed now, so everyone else should be good to go!) I thought it a bit ironic that Becky shared this link on the Patchwork Posse Facebook Page yesterday: 52+ Projects for Orphan Quilt Blocks. I’ll be scrolling through to see if any ideas jump out at me … I’ve developed quite the collection of orphan blocks! Anyone have a favorite project to share?
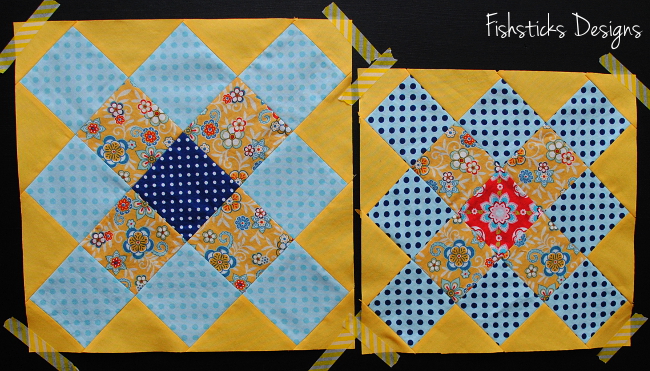
Around the Block with Patchwork Posse: Block #4
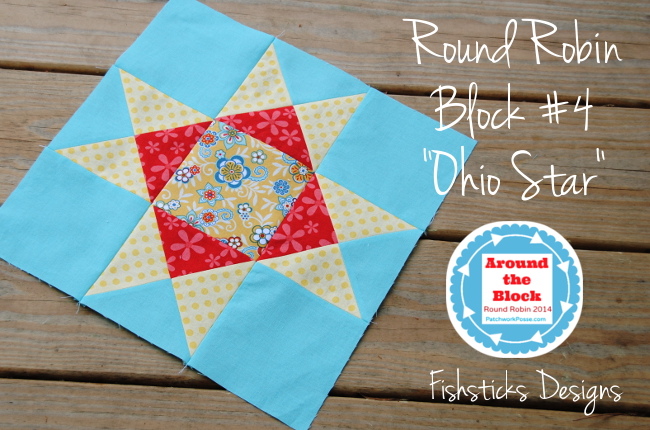 Whee! I finished this week’s Around the Block Round Robin block the same day as the post! I’m thankful that it was a quick one since I have three more pairs of PJs to finish and share before Friday. This week’s Ohio Star Block tutorial was shared by Tessa from The Sewing Chick. I so appreciate her simple instructions for sewing the four quarter-triangle blocks! They were a breeze!
Back to work on jammies now . . . and a little bit of a surprise for next week.
Around the Block with Patchwork Posse: Block #3
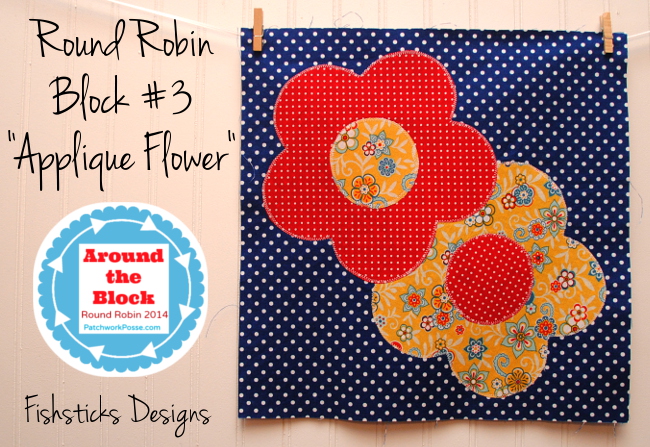 So, I took a little bit of creative liberty with this week’s Around the Block Round Robin block. This week’s “Flower Applique” block was designed by Kim from Kimberbell Designs. It’s a great one to try out if you’ve never done fusible applique! I used her flower applique design, but rather than add the yo-yo to the center when the quilt is done later, I made up a smaller circle applique. Once I had those two pieces cut out, though, I realized that there was plenty of room for a second flower, and I loved the idea of layering them to add a little dimension, especially since I skipped the yo-yo. I just ironed and stitched the bottom flower first, followed by its circle and then the second flower and circle.
This whole block went together in less than an hour! Woo-hoo for quick and pretty!
Around the Block with Patchwork Posse: Block #2
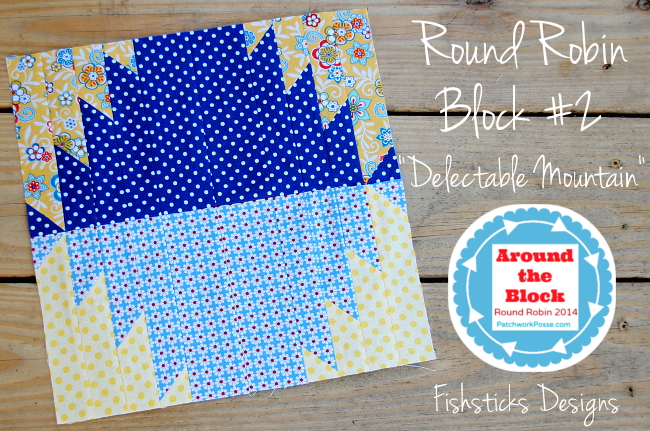 Moving along to Block #2 in the Around the Block Round Robin. This Delectable Mountain block was designed by Becky from The Patchwork Posse.
Man, I am learning so much already. For instance, today’s lesson was, “Read the directions”. This was probably payback for every time someone has emailed me with a pattern question, and I momentarily considered responding, “Read the directions!” (Of course, you know I’d never actually do that! I understand that we all learn in different ways, and I enjoy answering your questions.) When reading through the block instructions, I totally missed that when the half square triangles are placed on top of each other to cut them, they are supposed to be right sides together. I spent well over an hour trying to figure out how in the world these strips — the ones that I had cut incorrectly — were supposed to be pieced to form the mountain. It made my brain hurt. Not only that, but I totally emailed Becky to say that I was sure there must be a mistake in the tutorial. Oops! Finally, I searched Pinterest, found a video tutorial for a similar block and saw that the blocks were supposed to be right sides together when they were cut. Problem solved. Apology email sent. Block started all over again!
This is one that I’m really glad to have finished! My 16-year-old kept walking into the room while I was sewing and telling me that it did not look like a mountain. When I was finished and showed it to her, though, she said, “Cool! It looks like a mountain and its reflection!”


