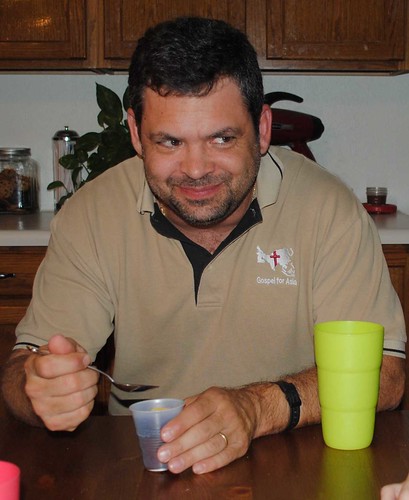
Worms in Dirt
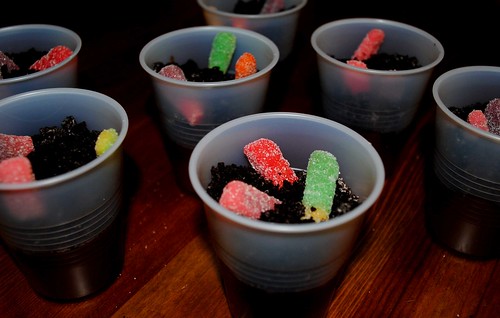
Hungry for some chewy worms and yummy dirt?
Mix up some mud (or maybe instant chocolate pudding) and be sure to lick the spoons, mixers, bowl . . .

Pound the dirt (or perhaps chocolate sandwich cookies) into teeny, tiny pieces.
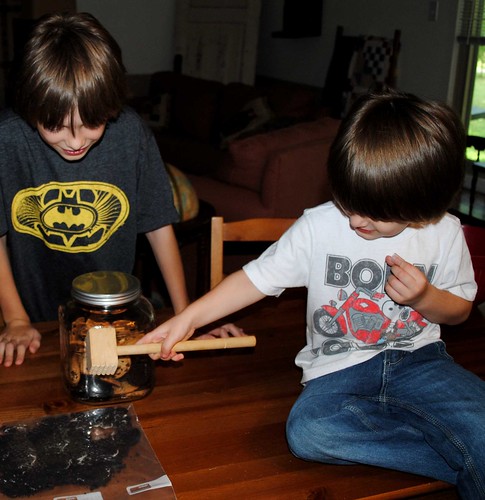
Let the (gummy) worms wiggle their way down into the muck.
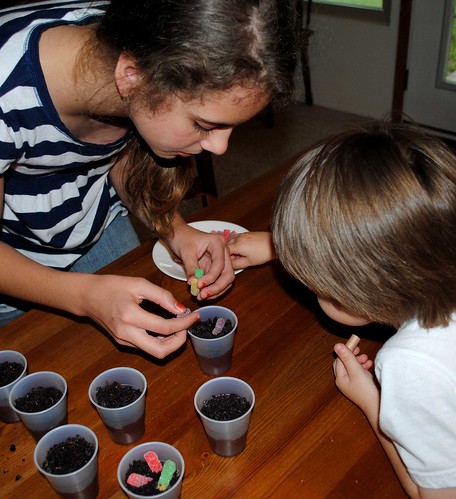
Serve it to Daddy after dinner and try your best to convince him that they’re real worms!
May Quilt Blocks for the Fresh Comfort Quilting Bee
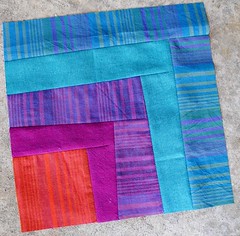
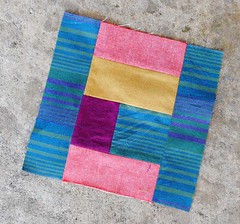
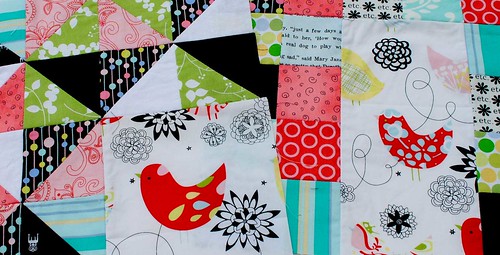
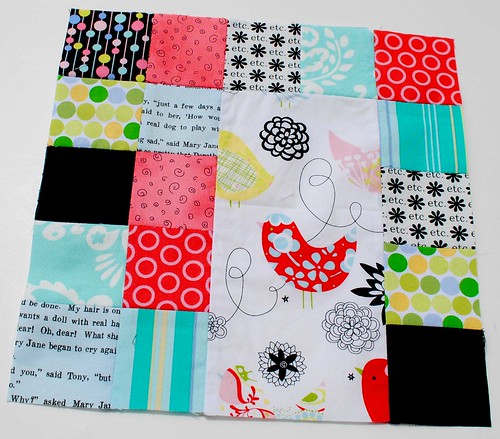
Carrie asked for 3″, 6″, 9″ and 12″ blocky squares this month. She wanted traditional as well as wonky blocks. I had a lot of fun with this one! The block above is a 9″ wonky bento box block. The ones below are 6″ and 3″ improvisational blocks. (That blue, green and purple stripe fabric refused to be ironed flat!)
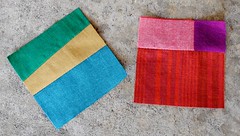
And, as usual, I sewed up two blocks using the same patterns for the quilt that I’m working on putting together.


Next month is my month to send off fabric and receive blocks! I’m so excited! I have all the fabric picked out, and I’m working on a few sample blocks right now.
I’m Late! I’m Late! I’m Late! SMS Giveaway Winner
It’s been a busy couple of days, and I just haven’t had time to sit down and find the winner until now. I loved reading everyone’s comments about my blog and what you love about newborns. Sew Mama Sew Giveaway Days are always so much fun! On to the winner . . . random.org had chosen comment #184:
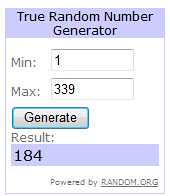
And, comment #184 is from Tara of Tinkerfrog! Congratulations, Tara! I can’t wait to see the sweet baby clothes that you make with the Little One Layette Pattern and fabric.
My Favorite Sewing Tip – Hemming Cotton and Cotton Blend Knits
Be sure to read my updated Hemming Tips here.

Sew Mama Sew is putting together a list of SMS Readers’ Favorite Sewing Tips so I thought now would be a great time to share some of the things I’ve learned about hemming knit fabrics. I love sewing with knit fabrics, and most of my patterns are designed to be sewn with cotton or cotton/polyester blend knits. Because of the stretchy nature of knits, sewing them requires a different approach than sewing wovens, but with the right tools, you can get great results. With the wrong tools, you might end up with wavy stretched out hems like this:

My method is definitely not the only method, but it’s what works best for me. I start with my iron and a can of spray starch.

I like to fold the hem up twice. I feel that the little extra thickness gives a nice look to the stitching and it helps keep stretching to a minimum. Spray the hem allowance on your fabric lightly with spray starch, fold up once and press, then fold up again and press. The starch will also help minimize stretching, and it washes right out when your project is completed. I prefer not to pin because I’ve found that pinning tends to stretch the fabric while you’re sewing. (There’s definitely a theme here. The less stretching, the nicer your hem will look.)

Many sewists use a twin needle for hemming knits. A twin needle is a great option because the way a twin needle stitches allows the fabric to stretch without the threads breaking. Unfortunately, I can never get the stitching on the back of the fabric to look nice with a twin needle, and I prefer to stitch along the hem on the inside. I’ve found that another great way to keep your stitches from breaking with stretching of the fabric is to put Woolly Nylon in the bobbin on your sewing machine.

The last, but maybe the most important, tool for hemming knits is a walking foot. A walking foot has built in feed dogs that move the top of the fabric at the same time and rate of speed as the feed dogs on the sewing machine move the bottom of the fabric. This makes a huge difference in how much your fabric stretches as it travels through your machine.

With Woolly Nylon in your bobbin and your walking foot attached to your machine, position your fabric in your machine with the wrong side facing you. Line your needle up close to the top edge of your hem and stitch all the way down. I check to see which guideline on my machine the bottom edge of the hem is on when I first start and then keep the bottom edge right against that line as I stitch. This way, your hem will be nice and straight on the right side of the fabric.


One other thing that you may have noticed is that I like to hem before I sew or serge my pieces together. It’s much easier to hem a flat piece of fabric and keep it from stretching than it is to sew over seams once the sewn item has been put together. I just tie off my serging or backstitch at the end of each seam when the item that I’m sewing is completed.

I hope that helps make sewing knits a little less intimidating. If you have any questions, just leave a comment, and I’ll try to answer them as quickly as I can!
Updating with some answers to your questions:
Tina asked, “Are walking foots relatively inexpensive?” My Kenmore actually came with a walking foot, so I wasn’t exactly sure how expensive they are. I did a couple of quick Google searches, and it looks like the average cost is around $25.
Steph T. and Sarah H. suggested using a ball point needle which is a very important tip that I left out.
Alisa asked, “You just use a regular straight stitch?” and “When you wind the woolly nylon onto the bobbin do you just do it the way you would normally wind it? You don’t have to change tension or anything?” Yes, I just use a regular straight stitch with WN in the bobbin, and I no longer have any problems with the threads breaking. I wind the WN in the bobbin almost the same way that I would wind normal thread. I place the cone of WN in a coffee cup off to the side of my machine and pull it up through the tension disk. Then I tie a piece of regular thread to the end of the WN and use it to pull the end through the hole in the bobbin and wind it up as usual.
the4rs asked, “Do they make walking feet for older machines, mine Elna is from 1960’s?” My trusty Google search found that Sewing Supply Warehouse carries a universal walking foot. You just have to know whether your machine has a low, high or slant shank.
I hope those answers help. Keep the questions coming, and I’ll keep answering!
May Giveaway Day!

It’s May Giveaway Day at Sew Mama Sew! I always have a great time checking out all the amazing blogs, and, of course, giving away something. We’ve welcomed a new baby boy into our family since the last giveaway day. Baby Charlie was born February 12th, and he is such a blessing!

For this giveaway, I thought I’d share in the joy of sewing tiny baby clothes. They really are so much fun to sew, whether you’re sewing for your own little one or sewing for a shower gift. The winner will receive a copy of my Little One Layette pattern and 1/2 yard each of Pink Chickadees and MOM Robots, both on 100% cotton interlock.

In order to enter, just leave a comment on this post. The winner will be chosen at random, but I’d love to hear what you think of my blog or maybe what you enjoy most about newborn babies. I’ll keep the comments section open until Thursday, May 20th at 10 p. m. central time and post the winner the following morning.
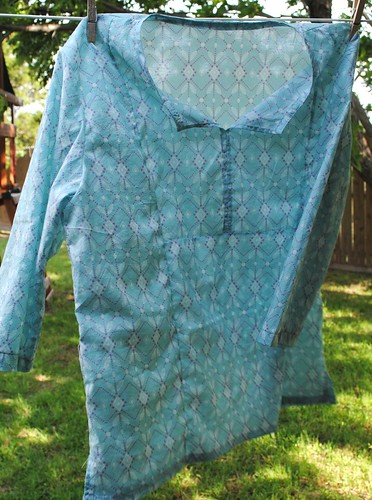
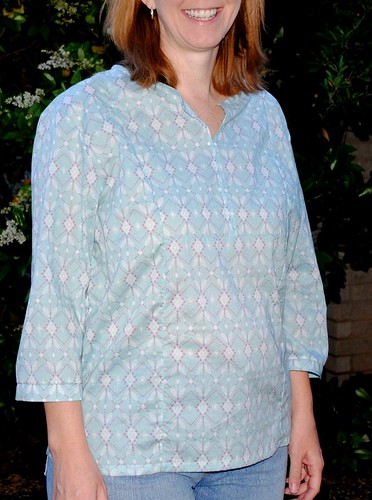
Little Folks Tunic
The finalists for Spring Top Week are posted at Made by Rae, and they are amazing! I love all the ruffles and gathers. Obviously I didn’t finish this tunic in time for the contest, but I did finish it! That’s at least a start, right?
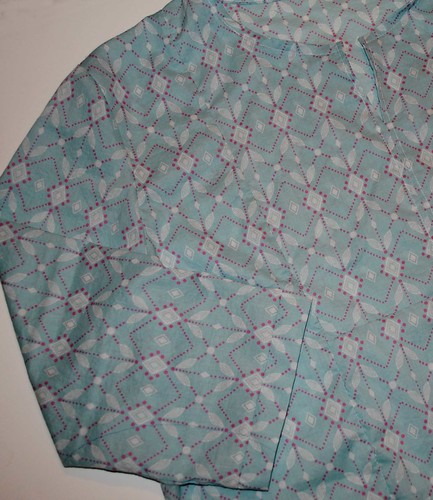
The pattern is Kwik Sew 3162 and the fabric is Anna Maria Horner Little Folks Voile. The pattern was really easy to follow. The only real modification I made was the hem on the sleeves. I just added a simple band to finish them at 3/4 length. Anna Maria Horner’s Voile is amazing. It’s really easy to work with and has the perfect feel and drape for clothing.
Eliott Elephant Little One Layette Modeled!
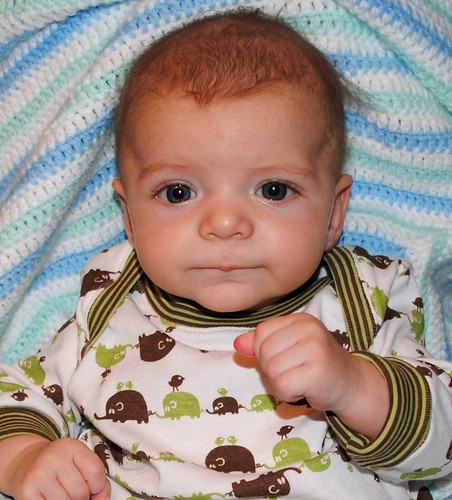
I do realize that I missed the whole entry period for the Rae’s Spring Top Week. It’s a little sad that I didn’t get to enter a top, but this little guy has been keeping me very busy, and who could look into those beautiful blue eyes and complain? I do, actually, have the tunic that I wanted to make partially cut out . . . maybe I’ll finish it this weekend?
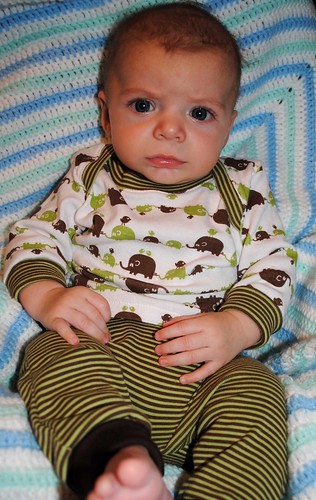
Charlie is growing so fast. I won’t be able to squeeze him into this outfit for too much longer. It’s the wrong season for it now anyway. Now that our little photoshoot is done, I’ll pack it away.

The beautiful blanket behind Charlie in the pictures was crocheted just for him by my mom. It’s gorgeous in real life!
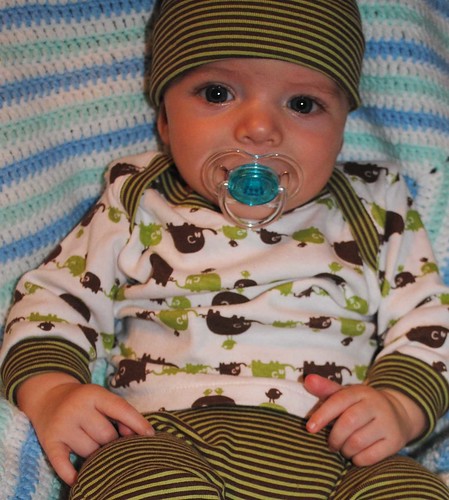
Just one more . . . don’t you want to squeeze him?

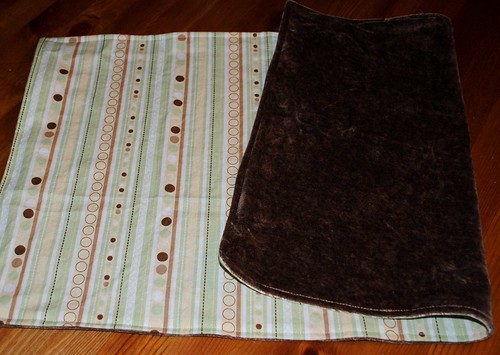
Ladybug Diaper Bag #2
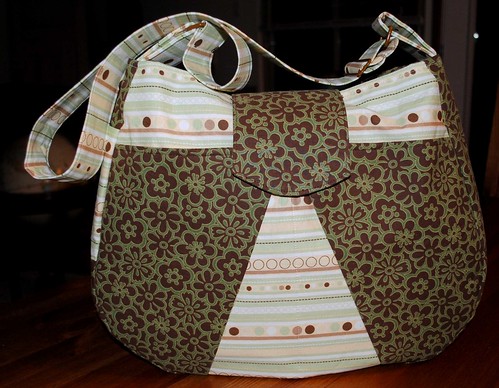
My friend, Michelle, is a week overdue with a new little one. I promised her a diaper bag like the one that I made for us, but with a new little one of my own, it’s taken me a bit to get it finished. Michelle let me pick out the fabrics, so I really hope she likes it! I love how it turned out. Maybe having a cute new diaper bag all ready to go will encourage baby girl or boy to come out and meet us?
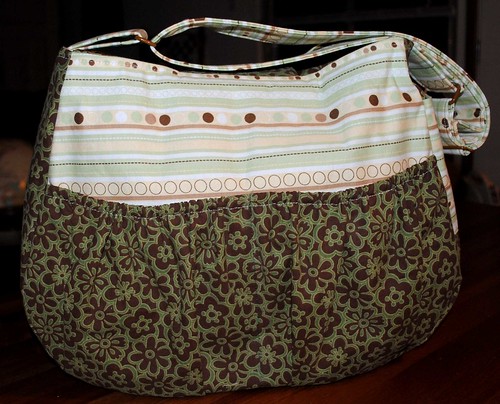
I used the Ladybug Diaper Bag pattern and made the same modifications that I did for the Mom & Baby Bag I made for Charlie a few months ago. The changing pad is a layer of the cotton woven in the bag backed with organic bamboo/cotton velour. It’s soooo soft!
Fresh Comfort Quilt Blocks for April
I am really enjoying the Fresh Comfort Virtual Quilting Bee. Each month I get to learn a new technique or try out a new idea for a quilt block! This month, Tacey asked us to do Opposites Attract blocks for her quilt. The idea of this block is to pair a busy pieced area with a quiet area featuring one main fabric.

For the first block, I did randomly pieced pinwheels using the main fabric for the bottom quarter of the block. For Tacey’s second block, I pieced together squares of the coordinating fabrics around a strip of the main choice.
Samantha fell in love with Tacey’s fabric selections, and I happen to have a few yards of the main fabric in my stash so you may see this combination again in a quilt for her in the future!
And, as usual, I made matching blocks in the same patterns to keep for myself.


Little Lambs Diaper Shower Set

The double baby shower was last night, so I can post the set that I made for the second mom now. Oh, and I happened to hear that she did read my blog post about the first mom’s set and almost convinced herself not to scroll down and see if hers was posted, too. Hee-hee . . . I’m so glad I kept it a surprise!

This mom uses cloth diapers, so I had a great time sewing diapers and knitting soakers for her. She also sticks to natural fabrics like cotton, hemp and wool because of her children’s allergies.

I recycled two 100% cotton knit receiving blankets into four fitted diapers for her using the free Darling Diapers Newborn Pattern.

And, I knit her two soakers (wool diaper covers). For this first one, I used the free Snapdragon Soaker Pattern and Mosiac Moon’s Coastal Sunset colorway on Cestari.

I knit the second soaker using the Frantic Mama Soaker Pattern which also happens to be available free. (Both soaker patterns are quick and easy to follow and produce really nice results!) The yarn is this one is Purewool in their Omekua colorway.

I think both moms really liked the sets that I created for them. I can’t wait to see their new babies wearing them!


