Bonnie
Moving Right Along: Pillowcases 21, 22, 23 & 24
Four more pillowcases on my way to 40 for Craft Hope’s latest project . . .
Kitties in the Garden

Pink Elephants

Monkey Business

Just Fluttering By

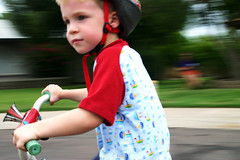
{this moment}

{this moment} – A Friday ritual. A single photo – no words – capturing a moment from the week. A simple, special, extraordinary moment. A moment I want to pause, savor and remember.
Inspired by SouleMama
Halfway! Pillowcases 17, 18, 19 & 20
Hoot!

Bearfootin’

Under the Big Top!

Ladybugs & Friends

For more information about my personal challenge and to find my 9 1/2 Minute Pillowcase Tutorial, check out this post: Pillowcase Challenge.
To see all the pillowcases I’ve done so far, click here!
Pillowcases 11, 12, 13, 14, 15 & 16 Are All Boy!
I’ve fallen a bit behind, but my birthday is coming quickly. It’s time to get moving! I read somewhere that ConKerr Cancer receives considerably more girly pillowcases than boyish ones. Since I’m the mom to four boys, I decided to make sure that I make plenty of pillowcases that little and big boys will love! These six are great examples.
The Aliens Are Coming!

Play Ball!

Everybody Was Kung-Fu Fighting . . .

. . . I think I’ll leave you singing that for the rest of the day. Maybe it’ll remind you to go sew some pillowcases! Seriously, one pillowcase takes less than 10 minutes, and it’ll bring such joy to a sick child. Here’s the tutorial again: Pillowcase tute
Shopping Cart Cover – Simplicity 4225 Pattern Review

I used Simplicity 4225 to make a shopping cart cover for my friend, Tiffany, about three years ago and swore I’d never make another one. Three years have gone by, though, and we really needed a cart/highchair cover for Charlie, and, of course, I couldn’t quite remember why I found this pattern so difficult to sew.
Things started out well. Before I began, I decided that I would modify the pockets. Instead of the one layer, pleated pockets that the pattern includes, I did two-layer elasticized pockets. Two on the right side and one on the left.

 I also modified the toy loops. I used fabric, rather than grosgrain ribbon, and made them complete loops, and planned to add plastic toy loops when the cover was finished. Things were still going well.

 This was the point where my memory started to click in . . . was there something odd about the leg holes? Hmmm . . . the instructions say to pin the seat sections together, sew around the area where the leg opening will be, trim away the fabric in the opening and then turn the seat right-side out. Here’s where you get to laugh at me, because in spite of the fact that I knew this was impossible–I even had a conversation with my husband about how this was impossible–I tried it anyway. I can now say beyond a shadow of a doubt that it is impossible–I tried it. Here’s where I got frustrated. A quick google search turned up a few terrible reviews of the pattern including one that said the sewist had given up on the project after multiple tries to get it to fit a cart properly. I was almost ready to shove the whole project into a box. It’s possible that I even browsed etsy for someone else to make one for me. I took a break for awhile. I think you just have to do that sometimes. I wasn’t really ready to give up altogether, though.
I had noticed that the cart covers on etsy all seemed to have binding on the legs, so I decided that’s what I would do. It was a bit of work because sewing binding onto a hole is the opposite of binding a finished project like a quilt, but after a bit of seam-ripping and a whole lot of pinning, I managed to get it done reasonably well.

Some of the reviews I’d read of this particular pattern pointed out that the way the instructions have you sew the sides of the seat together leaves the unfinished seams showing when you put the cover in a cart. This part was easy to solve. Instead of sewing the inside and outside pieces of the seat together to form the corners, I did the inside and outside separately. Then I slid the inside into the outside, hiding all the unfinished edges between the two layers.
I followed the instructions for sewing the ruffle onto the seat, except that I serged it on. (You can actually see my serging on the back of the seat in this picture. Without the serging, you’d see an unfinished edge here, too.)

One other suggestion that I read in another pattern review was to reduce the length of elastic. The elastic that I had on hand was in 54″ segments so I just used that amount, and it worked perfectly.
I’m really glad that I pushed through the difficulties and finished the seat cover because I really like it now that it’s done. The pictures above were all taken in a Joann’s shopping cart which is smaller than a cart that you might find at Walmart, but I think there’s plenty of room for the cover to stretch to fit a bigger cart. The pictures are all clickable, by the way, in case you want to see them bigger. This cover is definitely not very cushiony. There’s no padding on the ruffle part at all, but I’m happy with the fact that it’s less bulky this way. I haven’t yet tried it out in a restaurant highchair, but I’ll report back when I do. Like always, I’m happy to answer any questions. If you’re working on this pattern and need someone to hold your hand, just post a comment, and I’ll get back to you as soon as I can!
Just Slow Down and Enjoy the Moments
I need that reminder so very often. It’s really been too hot here to play outside lately, so I’ve been letting Jamie put a little water in the sink to dive his Lego guys in and out. As he has every day this week, he asked if he could play in the sink this morning, and I was busy trying to finish up a project, so I said, “Sure.” He knows that he’s only supposed to put in about 2″ of water and then turn off the faucet. I could hear him happily splashing away while I worked. Suddenly, though, he came running out yelling, “Mom! The pretty rugs are getting all wet!” And, here, my friends, is one of those moments where I had a decision to make . . . do I choose to get frustrated with the mess, fuss at the little guy who made it, throw down some towels and clean it all up . . . or do I stop for a minute, smile, grab the camera and capture this moment in the life of a preschooler who before I know it will be grown?


All too soon, my carpets will always be dry and those sweet little toes will be attached to size 11 feet with no desire to hang out in my bathroom playing in the sink with little Lego guys. For today, though, he’s three, and this is so much fun!
Pillowcases 7 through 10 Have Gone to the Dogs . . .

. . . and the cats!

A quarter of the way finished now! Are you sewing pillowcases with me? I’d love to know! You can find my pillowcase tutorial here, in case you’d like to join in.
Trying to Impress Big Tex at the Texas State Fair
Fall is coming soon, and here in Dallas, fall brings the Texas State Fair! Last year, Allen submitted a Lego project in the Creative Arts Competition at the fair, and he was so excited to receive an honorable mention ribbon. He enjoyed participating so much that Samantha and I decided to join in this year, too.
Allen’s following up last year’s submission with another Lego construction. During our study of Texas state history last year, Allen especially enjoyed learning about the Alamo so he decided to recreate it for this year’s fair! Can you see Davey Crockett in his coon-skin cap standing in the entryway?

Samantha taught herself to knit this year, and now she’s always got some project on her knitting needles. She decided on this very cute beret for her state fair submission.

This was her first project knit in the round on circular needles. She did such a great job!

And, then there are my projects. I actually considered whether or not I wanted to share mine, but in the end, I decided that since the fair is actually a few months away, you’ll probably forget that I posted these by then. If I do well, I’ll remind you. If I don’t, then we’ll just forget I ever mentioned sewing something for the fair. Sound good?
I’ve been holding onto this cotton knit Texas-themed fabric for years now, just waiting for the right project. What could be a better use for it than the Texas State Fair? In the Children’s Clothing category, I’m submitting this color-blocked and appliqued Charlie Tee. It’s a size 4T, so Jamie can wear it when the fair is over.

In the Infant Clothing category, I’m turning in this embroidered Jamie Jumper in size 18 months. This one’s my favorite of the two. I’m really excited about Charlie getting to wear it this fall. It’s a little big now, so I hope it fits!

We’re delivering all our projects to the fairgrounds tomorrow. The kids will be on pins and needles waiting for the judging. The results should come around the middle of next month.
Pillowcases 5 & 6 and a Couple of Quilt Blocks

Pillowcases numbers 5 and 6 are all done. 34 to go! These two sport some of my favorite Michael Miller prints.
And, I’m finally caught up on quilt blocks for the Fresh Comfort Quilting Bee. Bibi send us these adorable prints and asked us to sew up Dutchman’s Puzzle Blocks.

Of course, I had to make a matching one for myself, too!

The FD Photo Contest Winners!
Are you ready to see the winners? I have a quite a few to announce.
First up, the winner for the Week 3 Drawing. Rather than having the kids draw this time, I assigned a number to each entry and used random.org to choose. The number that came up was number 9, and number 9 was assigned to brenda3boysplus for her photo contest entry! Congratulations, Brenda!

Next is the random drawing for those who voted for the contest winner. There were a total of 67 comments between the two posts. I numbered them 1 to 67 starting with the first comment on the the first round of voting. Random.org chose number 30. Comment #30 belongs to Sarah AJ. Congratulations, Sarah!

And, the winners that I know you’re most excited about . . . the photo contest winners!
Drum roll, please . . . .
In the Baby Steps Category the winner is Baby Mushroom by Suburbanbelle!

In the On My Own Category the winner is Cruis’n the Cul De Sac by emilyjohnson226!
In the Friends & Family Category the winner is Hanging Around by Sew Me a Garden!

Congratulations to all the winners! I’ll be getting in touch with you to get your mailing addresses so I can get your prizes out to you right away. And, a huge THANK YOU to all of you who submitted photos, commented, blogged and voted! I hope you all enjoyed the contest as much as I did!


