Sewing/Crafts
At Least It’s Not Blood
Yesterday was one of those days. You know the kind, right? One of those days when things just don’t go as you planned, but you love life anyway? My naptime plans yesterday included a blog post about my living room floor cushions (the ones that you can see up in my new blog banner above) and finishing up the tutorial that I should be posting right now. Around 1:30, I went to put Charlie, who couldn’t have been out of my view for more than two minutes, down for nap. I came around the corner, though, to find him standing on the staircase covered in what most definitely looked like blood! I think all moms know that rush of adrenaline that pours uncontrollably through your body when you see a sight like that. “Charlie! Is that blood?” He was remarkably calm for it to be blood, but he could have just been in shock, right? “No.” “What is it?!” “I don’t know.” “Where did you get it?” At this point, I realized that it most definitely did not smell like blood. “I don’t know.” “Show me where you got this.” Nail polish. Bright cherry red nail polish. All over the master bathroom. Tile. Counter. Faucet. Toilet. Cabinets. Rug. And, of course, all over Charlie. At least it wasn’t blood, right? Time to find a better place for the nail polish.

He did do a fairly good job of painting his big toenail, didn’t he? So, I spent naptime cleaning up Charlie and then cleaning up nail polish. It takes forever to remove bright red nail polish from a bathroom, by the way. It did come off of almost everything, though. Only the rug went into the garbage. It did not come off of Charlie very well, however. There will be a little bit of photo-editing involved with that tutorial so that no one thinks my little guy is covered in blood. Which, by the way, I am still very thankful it was not!
In other exciting news, the Fishsticks Designs Facebook page hit a huge milestone last night! I posted this photo to my Instagram and my personal FB page just before dinner:
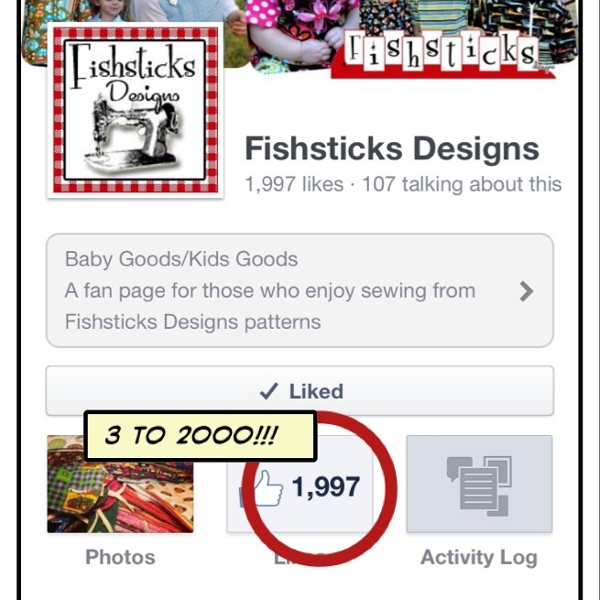
And with the help of a few sweet friends, including Kristy at Hopeful Threads and Leigh at Rooibos Mom, this is where we are this morning!
I think a celebration of some sort is in order! I’m working on something for next week! In the meantime, barring any unforeseen nail polish incidents, that little boys’ Easter tutorial is coming this afternoon.
Adding a bit of an update here since this topic of little ones getting into things that can cause them harm is so important: We choose to purchase products that are as safe as possible, including all of our cleaners and cosmetics. It’s important to do that, especially when you have small children in your home. It’s impossible to have your eyes on your child every second. Things like deodorant, toothpaste, perfume, nail polish — those things that we use everyday can be dangerous for our little ones. It’s important to keep these things up high where children can’t reach them, but children are resourceful. If a natural non-toxic option is available, I’m always going to choose it. When my child gets out of my site for a few minutes and paints his toenail and drips polish on the cabinets, toilet and tile in the process, I don’t want to have to worry about anything more than cleaning up the mess.
February Riley Blake Mystery Quilt Block – Hearts
 Yes, February is over, but I’m not considering myself behind on this block since the next block doesn’t come out until Monday. (I almost called this Block #2, instead of the February Block, but I already called the first block January, so . . . )
The second Mystery Quilt Block in Riley Blake’s Quilt Block of the Month series is a paper-pieced, appliqued heart. The video was actually down on the weekend that I started my block so I just downloaded the pattern and used the freezer-paper piecing technique that I’m familiar with.  It wasn’t until I watched the video a few days later that I realized my heart is pieced backwards. Who’s going to notice, right? Oh, and I stitched the right and left portions together first instead of the top and bottom portions. Ooops! It worked out, though!
My husband wandered in at about the point below and said, “I thought you were making a heart?” “It’s an abstract quilt, Dear.”  Jina’s and Cindy’s blocks on the Riley Blake blog were finished using reverse applique. My “abstract” heart sat around here for over a week waiting to be trimmed into a non-abstract heart while I waffled back and forth over how I was going to finish it. In the end, though, lack of time thanks to a weekend lost to a nasty little stomach bug that attacked the whole family, led me to go with a quicker method. A little sewable iron-on adhesive coupled with the blanket-stitch on my sewing machine, and the applique was done.
![]() Here’s my Heart Block all finished!
Here’s my Heart Block all finished! And here are the January and February blocks together. I think I’m ready for March!
A Sewing Soiree!
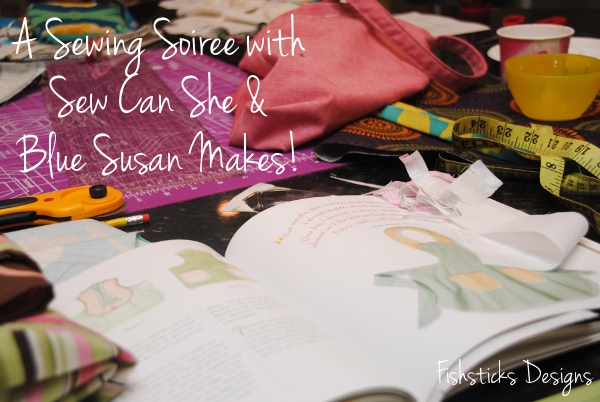 Oh, my! I had so much fun on Friday night! Sarah of Blue Susan Makes and Caroline of Sew Can She invited me to join them for their first Sewing Soiree!
Sarah taught the group how to make her Simple Tote. Caroline brought along some sewing toys for us to play with, including this very cool digital Slice cutter!
 The whole house was buzzing with shared tips and guidance, the humming of over a dozen busy sewing machines, the snipping of scissors and the steaming of irons.
  There was a beautiful spread of yummy treats and some great door prizes! Everyone who came got to take home a little gift bag with a fat quarter, ribbon and a presser foot guide from Sew Can She! (I just saw that Sarah is giving away a goodie bag AND a beautiful set of handmade pot holders over at Blue Susan Makes this week! Go enter and join in on a little bit of the fun!)
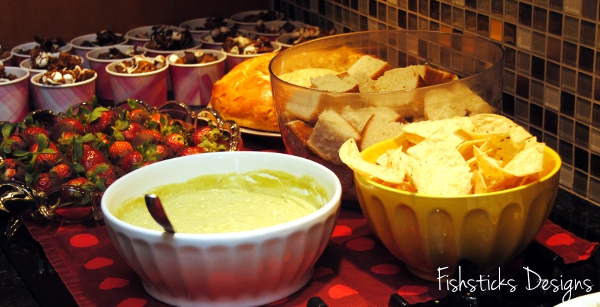 We chatted and sewed and ate and laughed and had a blast! I can’t wait to do it again!
The Fabric Flower Book Winner & A Peek at Next Week
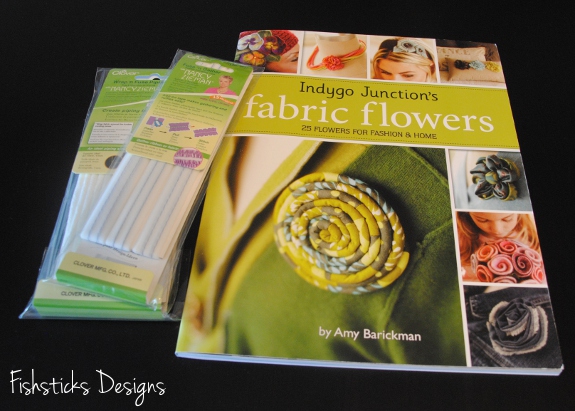 Random.org chose comment #73 as the winner of Indygo Junction’s Fabric Flowers book and the sewing supplies from Clover!
 That comment was from Diann! Diann wrote, “The raw edged flower is the best! I can see it on summer sun hats…” Congratulations, Diann! I’ll be in touch with you to get your mailing address.
Since I already have your attention, would you like to see a little peek at the Easter tutorial that I’m working on for next week? It’s something that will help you get your little guys all dressed up for Easter Sunday.
The Mud Puddle Splashers!
 Good morning! I know I said I was going to be back at naptime yesterday, but I got distracted by cookies — all-natural, gluten-free, coconut flour, chocolate chip pecan cookies. Yum. I need to tweak the recipe a little and then maybe I’ll share!
  Really, I got wrapped up packaging up a couple of wholesale orders and answering emails, and the afternoon got away from me, but I did bake cookies. My kids needed some mama-time.
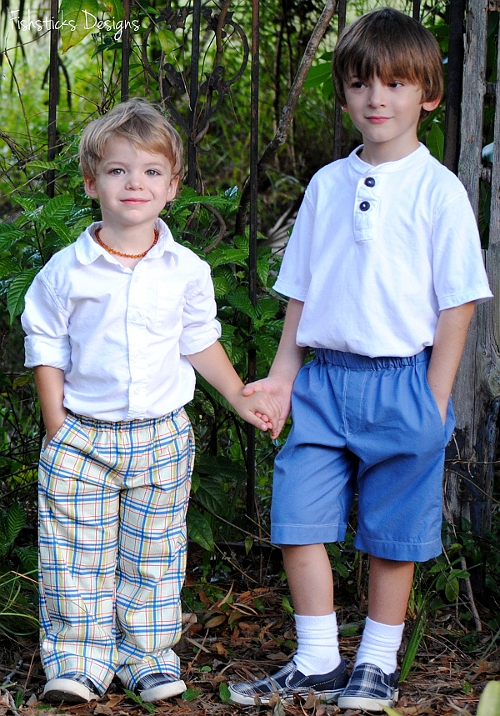
Back to the subject at hand! The complete Mud Puddle Splashers pattern is done! I hope you enjoy it as much as I do. It’s become my go-to for quick and simple basic pants and shorts for my two youngest boys. I love that the little extras don’t take much time, but they make a huge difference in the finished look and the practicality of the pants. The side seam pockets are a huge hit with my little guys. Pants are just not pants without pockets for your hands or your pennies. (Remember, if you have a big enough piece of fabric, you can cut the pockets and the legs in one piece. You’ll find instructions right here: Naptime Mud Puddle Splashers.)
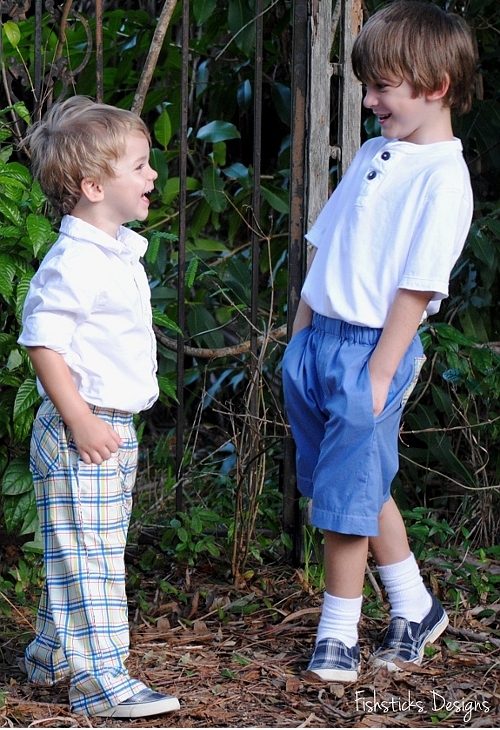 The faux fly gives the look of a zipper without the fuss. Little ones appreciate the ease of the elastic waist and big kids like the comfort.
  The back pockets are the perfect finishing touch. I’ve said before that I think back pockets make the difference between a pair of pants looking not-quite-done verses properly-finished. (My husband is actually the one who originally expressed that opinion to me when he asked me to be sure and add back pockets to our boys handmade bottoms.)
 And, the cuff! Experienced moms know that kids tend to grow up faster than they grow out. How many times have you looked at your child and thought how did those pants get so short so fast? The optional cuff really extends the life of these pants so you get more wear-time for the work that you put into the sewing. (I can certainly appreciate that!)
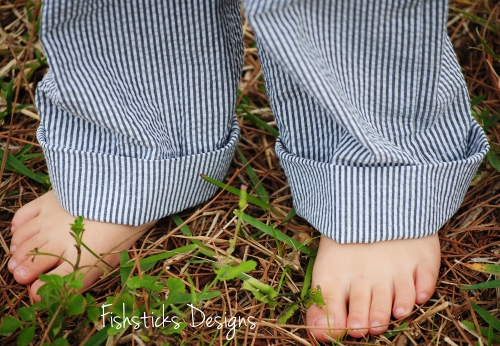 I mentioned last week that I had plans to donate a portion of the proceeds from the MPS to charities that benefit at-risk children. I still absolutely want to do that. I originally designed this pattern for charity, and I want it to continue to have that purpose. I’m actually glad that I put off posting this introduction, though, because I needed to research the laws about businesses giving a portion of the profits of something to charity. I’m still not sure if Florida has a specific law, but most states do, and I’m not big enough to pay an attorney to help me out with it. So, for now, I’m going to have to remove that wording from the pattern listing and the paper-pattern cover. I’ll just have to continue to look for other ways to give and encourage you to give! (There are still two days left to sew bibs for the February Hopeful Threads Dinner for 2 project!)
I’ll wrap up this post with a little reminder of where this pattern got started! If you want to read more about the project that we completed last July or where the Mud Puddle Splashers name originated, including why in the world I made mud puddles in the backyard and let my children jump in them, just click over to this post: Boys Shorts Month at Hopeful Threads. You can find all of my patterns, including these three new ones, in my pattern store: Fishsticks Designs. The patterns are arranged in alphabetical order, and the new ones have a little white banner in the upper left-hand corner so they’re easier for you to find.
The Scrappy Sack!
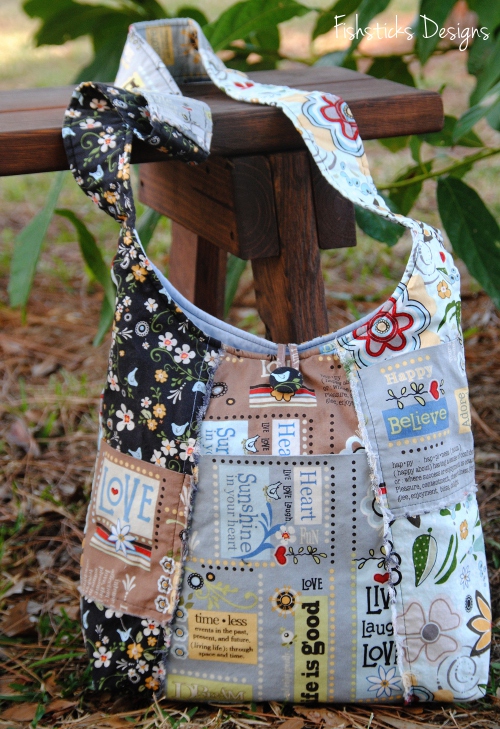 Do you have a pile of favorite fabric scraps that you’d love to put to use? How about sewing up a Scrappy Sack? You can use pieces of every size! (The care-free look of this bag even lends itself well to pieced together pieces. If you look closely at the pictures in the instructions, you might see that I pieced together a couple of the strap pieces and the back of the main front pocket. Except for the solid inner, I made this whole bag with stash scraps from ADORNit’s Vintage Groove Collection.)
The Scrappy Sack has three raw-edge pockets on the front that give it that fun frayed-edge look. There are two small cell-phone-ish sized pockets and a larger middle pocket that is perfect for many e-readers or other things that you need to grab quickly. With a finished size of 13 ½” x 14″ x 4″, this bag is not small at all, but it’s not so big that you feel as if you could carry the kitchen sink. 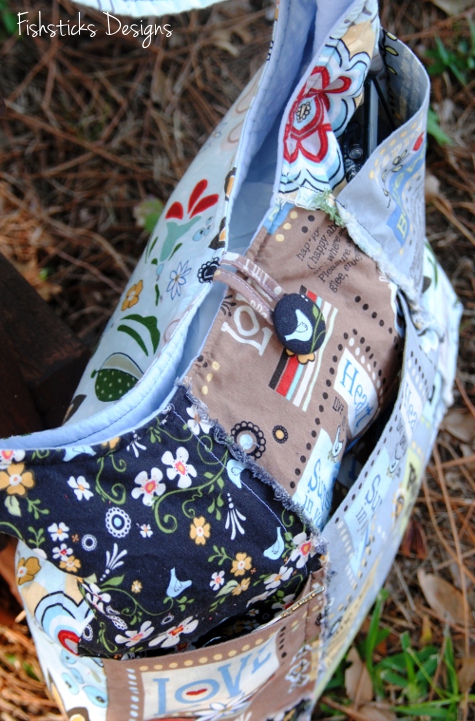 The fabric-covered button and loop are great little places to showcase your tiniest bits of favorite fabric. I love the little bird on this one!
The Basic Bag strap is designed to be worn across the body, low on the hips, but instructions are included for shortening the strap to the perfect length for you. Inside, the Basic Bag has four pockets: two business-card pockets and two pen/pencil pockets.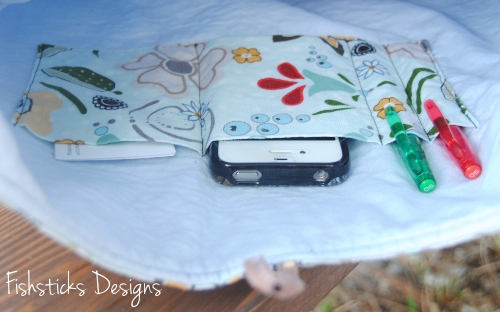 But what if you want a bag that you can use no matter where you are? We can’t be happy-go-lucky all the time, right? Sometimes, you just have to be a little more sophisticated. How about a reversible Scrappy Sack?
The Reversible Scrappy Sack uses the same pockets on the reverse side as the Basic Bag but with finished edges. Of course, you could sew the Basic Bag with finished edges, too, but where’s the fun in that? I think my favorite thing about the reversible bag is how the bright and cheery, happy side peeks out just the tiniest bit even when that classy, sophisticated side thinks it has it hidden away! I’ll be sharing more about the Mud Puddle Splashers Shorts & Pants Pattern during naptime this afternoon! You can find all three of my new patterns, and all of my other current patterns in my pattern store right here: Fishsticks Designs Pattern Store.
The Katie J. Jumper!
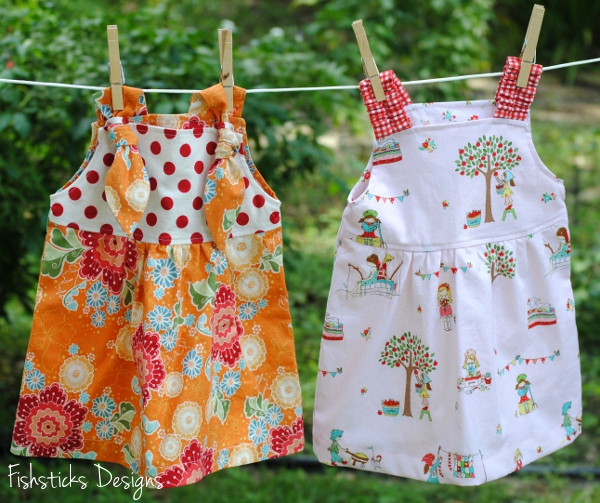 My three newest patterns are all ready for you and available now as downloadable e-patterns in the Fishsticks Designs Pattern Store! First up is the Katie J. Jumper. I love all the options that this simple little dress offers! You can see the two strap options above. The stretch strap is elasticized and has a pretty gathered look. My oldest daughter, Morgan, loves this one for our granddaughter, Katie, because it’s cute and easy to get on and off!
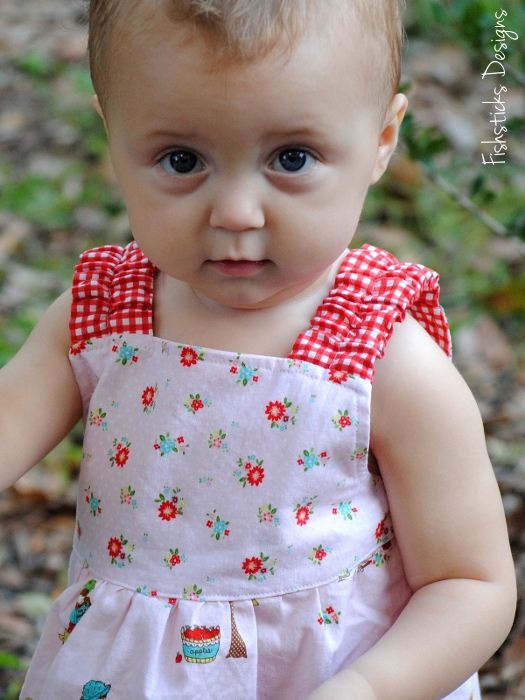 The knotted strap dresses the jumper up a little and adds a bit of modern style. The strap pulls through a loop that is attached to the bodice rather than through a button-hole. This gives the bodice a comfortable fit.
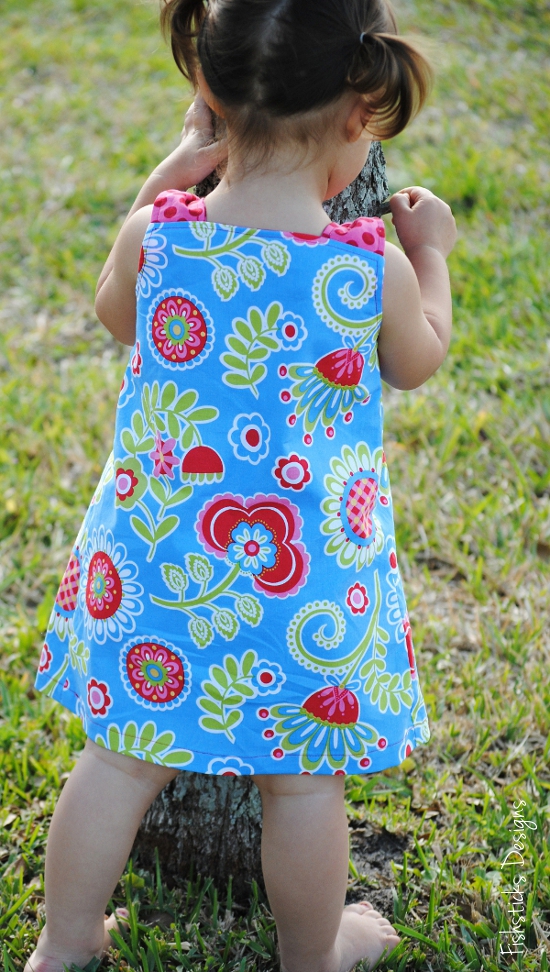
 There are two back choices for the jumper. The one-piece back on the basic jumper gives it a contemporary feel. (This pictures also gives you a good idea of where the basic jumper hem falls. It’s right at or just below the knee. )
 The gathered back is really just a repeat of the front bodice and skirt, and it gives the jumper a fuller, more traditional finished look.
 There are two reversible options for this dress, too! (You can peek at the second option in that picture just above.) The first reversible option is the basic reversible jumper. It’s a straight-forward reversible option that you can make with either back choice.
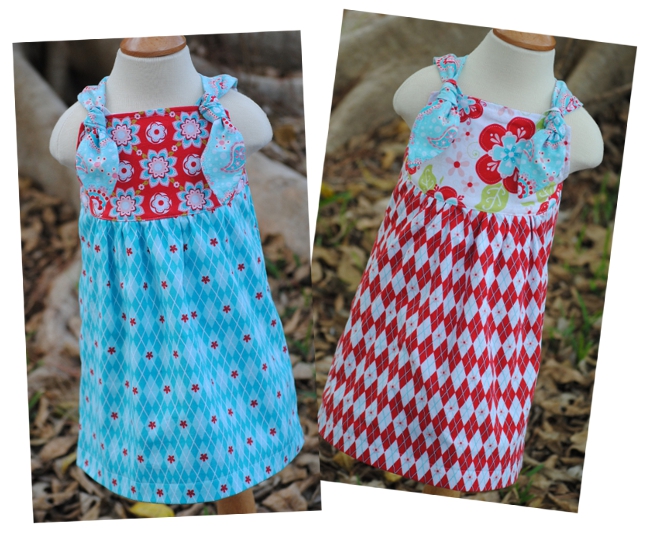 The second reversible option is the Double-Layer Reversible Jumper. The Double-Layer Reversible Jumper is slightly longer than the Basic Jumper, falling about 2″ below the knee. The reverse side of this jumper is finished with a bottom band which peeks out under the hem on the main side.
 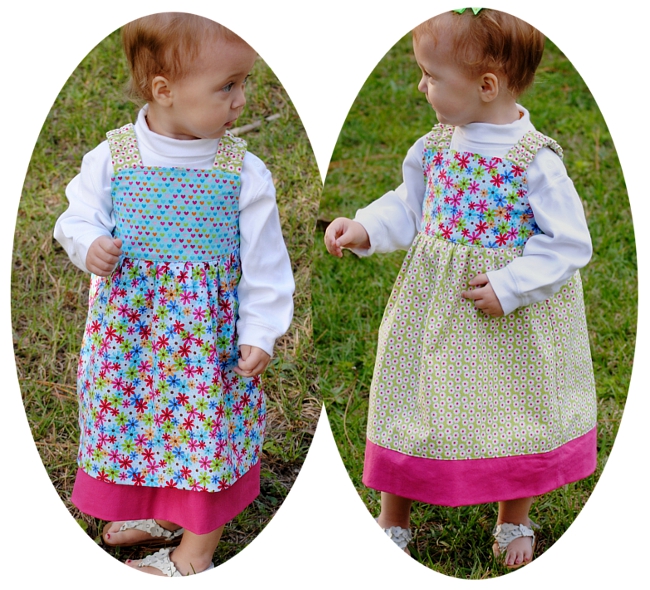 That wraps up the details on the Katie J. Jumper. You can find it right here: The Katie J. Jumper E-Pattern. I’ll be back in a bit to share more about the Mud Puddle Splashers and the Scrappy Sack!
Indygo Junction’s Fabric Flowers Book Tour (and Giveaway!)
 I can’t tell you how excited I was to be asked to be on the book tour for Amy Barickman’s new book, Indygo Junction’s Fabric Flowers! There are so many fun little embellishments packed in here that use tiny scrap pieces of fabric. I chose to make one that even uses recycled fabric! (I love putting previously-loved clothing to new use.)
  Amy’s instructions made turning these two pairs of my 13-year-old son’s old jeans into a beautiful Ragged Edge Rose so simple! My 15-year-old daughter, Samantha, pinned this rose to her denim library bag, and it went from simple to “That is so cool, Mom!” instantly.
 Since I gave up my first rose, I had to make a second one. I happen to own a denim jacket like the one in the book photo, and it was looking a little boring. It needed a Ragged Edge Rose made with colored denim! A quick run out to a local thrift store turned up the perfect pair of pink jeans. And now, look at my jacket! (I hope we have at least a few more days cool enough here for me to wear it!)
 Want to take a peek at some of the other flowers in the book?
Are you inspired to start ripping up some old jeans and digging through your scrap pile to make some fabric flowers of your own? Great! You have a chance to win your own copy of Indygo Junction’s Fabric Flowers AND some fun tools from Clover: Fuse ‘n Gather & Wrap ‘n Fuse Piping!
 To enter, just leave a comment telling me which flower you’d like to try out first and/or what you would embellish with your own handmade fabric flower! I’ll leave the giveaway open through Wednesday, February 27th at 10 p. m. EST and announce the randomly-chosen winner on Thursday, 2/28.
Wait! That’s not all! You get a prize without even entering! Everyone who reads this can go shopping right now in the Indygo Junction Store and receive 20% off of your whole order! Just use the code: FFBK15. This code is valid through 5/1/2013. 
A flower a day & 25 chances to win! Don’t miss a stop on Indygo Junction’s Fabric Flowers Blog Tour:
2/2/13 – Indygo Junction Kick Off Post
2/4/13 – Kollabora
2/5/13 – CraftFoxes
2/6/13 – Sewing Secrets
2/7/13 – Princess Lasertron
2/8/13 – Dollar Store Crafts
2/11/13 – Tatertots & Jello
2/12/13 – Family Ever After
2/13/13 – This Mama Makes Stuff
2/14/13 – Amy’s Creative Side
2/15/13 – Today’s Creative Blog
2/18/13 – Lazy Girl Designs
2/19/13 – Skip to My Lou
2/20/13 – The Sewing Loft
2/21/13 – The Crafty Cupboard
2/22/13 – Fishsticks Designs <—— Today’s tour stop!
2/25/13 – Taradara
2/26/13 – Diary of a Quilter
2/27/13 – Craft Gossip
2/28/13 – How Joyful
3/1/13 – Lindsay Sews
3/4/13 – Flamingo Toes
3/5/13 – In Color Order
3/6/13 – See Kate Sew
3/7/13 – Handmade Charlotte
3/8/13 – Sew Caroline
3/9/13 – Indygo Junction Wrap Up Post, Bonus Giveaway & Free Flower Project
Comments are now closed, and a winner has been chosen!
A Few Spring Pattern Previews!
Three new Fishsticks Designs patterns are coming on Monday! It’s been a really long time, hasn’t it? I thought you might enjoy seeing a few little sneak peeks. First up the Mud Puddle Splashers!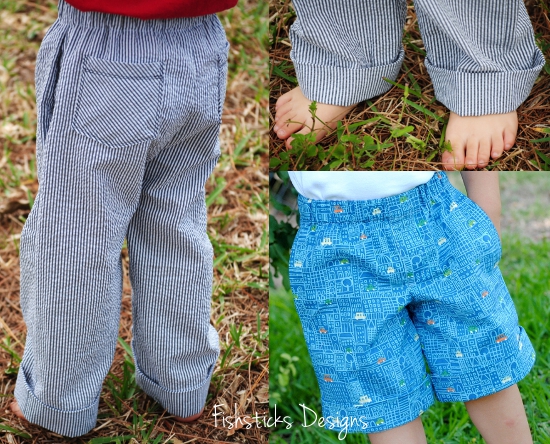
You may remember that the Mud Puddle Splashers was a shorts pattern that I created in a select group of sizes for last July’s Hopeful Threads Boys’ Shorts Month. I received so many great reviews and so many requests to put together a full pattern, and it’s finally almost done! I personally love this pattern for great basic little kid pants! The final pattern will include sizes from 12 months all the way to size 12. A portion of the profits from the Mud Puddle Splashers pattern will go to charity . . . more on that Monday.
The second pattern is my first girls’ release since the now-retired Emmy Dress. (I do have a granddaughter to sew for now. I can’t possibly leave her out, can I?) Take a little peek at the Katie J. Jumper! In sizes 6 months to 5, this jumper has so many options! There are two strap options, two basic jumper options and two reversible jumper options! I love giving you patterns with options!
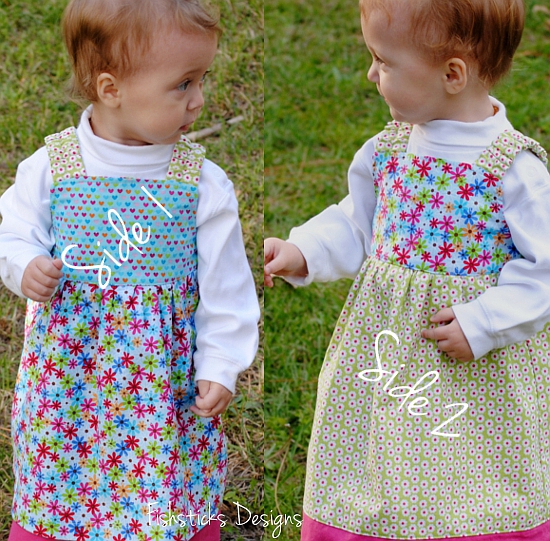 Finally, here’s the Scrappy Sack! If you read my blog posts at Christmas time, you’ve seen the prototypes of this bag. With the help of my amazing group of testers, I’ve added a some options that I think will make this a fun and funky bag that you and your teenage daughters (or granddaughters) will adore!
That is all for now, but I’ll have lots of pictures, more information and the patterns for you on Monday morning! In the meantime, be sure that you’ve entered the It’s a Snap Source Giveaway, AND don’t miss tomorrow’s post! I’m so excited to be a part of the blog tour for a new book. There will be another great giveaway and a discount code for the book author’s store!
Upcycled Grown-Up Bibs!
 This month’s Dinner for 2 project at Hopeful Threads is all about bibs. If you’ve been reading along, you already know that here in Florida, we’re collecting handmade bibs for the Hidden Treasures Foster Home in China. (You can read more here: Big Kid Bibs for Hidden Treasures.) The project is actually called Dinner for 2, though, because over in Louisiana, Anita is collecting bibs for the residents at Grace Nursing Home! I couldn’t let the month pass by without sewing a few adult bibs to send her way.
Remember how I said that I had collected a pile of thrifted men’s button-down shirts in anticipation of the Upcycled Men’s Shirt Challenge at Project Run & Play? Well, guess what I did with the extra shirts? I turned them into bibs for a few of the men at Grace Nursing Home! First up, the plaid dress shirt version: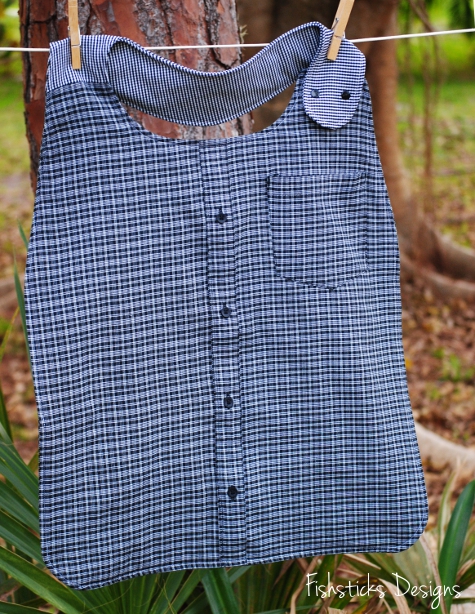 Here’s the fun-loving, novelty version:
 Finally, the casual flannel shirt version.
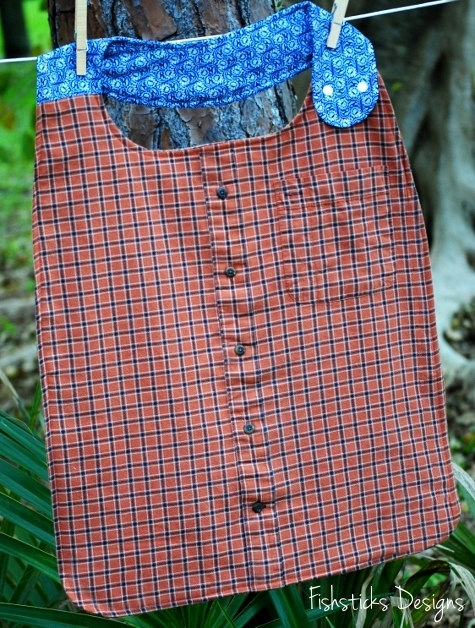 Aren’t they fun? Using thrifted shirts in good condition saved on fabric costs and gave them a more grown-up look! Sewing them was really easy, too. I scaled my Big Kid Snap Bib pattern up to adult size, using my husband as my model. For each bib, I cut the front and back body from the front and back of a men’s large button-down shirt. To add some absorbency, I also cut a hidden body layer of flannel. Before I started sewing things together, I stitched the button placket on the front shut. For the wraparound neck piece, I used coordinating fabric, cutting the same three layers. Once I stitched each neck piece to each body piece, I just followed the instructions from the Big Kid Snap Bib pattern, making the diameter of the neck about 7 1/2″. Easy peasy, right?
I had planned to just blog about these adult bibs, but I couldn’t resist drawing up a pattern for you to use. There’s still time to add to the collection heading to Louisiana! You might even want to sew them for other things, too! Wouldn’t they be perfect for the tasters at a chili cook-off or maybe the contestants at a pie-eating contest or even just for the grown-up messy eaters at home? Okay, here’s the link to the pattern: The Grown-Up Bib. This is only the pattern. For the instructions, you’ll need to go download this pattern and follow the steps I mentioned above: The Big Kid Snap Bib.
If you sew for Dinner for 2, be sure to add your pictures to the Flickr album, and if you haven’t already entered the It’s a Snap Source Giveaway from Monday, be sure to do that, too!


