Project Run & Play
Bowties are Cool ~ Denim is Cool, Too!
 I know – Denim Week at PR&P is over! I’m running behind. I spent quite a bit of last week working on upcoming new patterns and Quilt Market samples, and then my site was down unexpectedly for a little while. I am happy to report that I did finish up Jamie’s outfit, though, and he got the bowtie that he wanted!
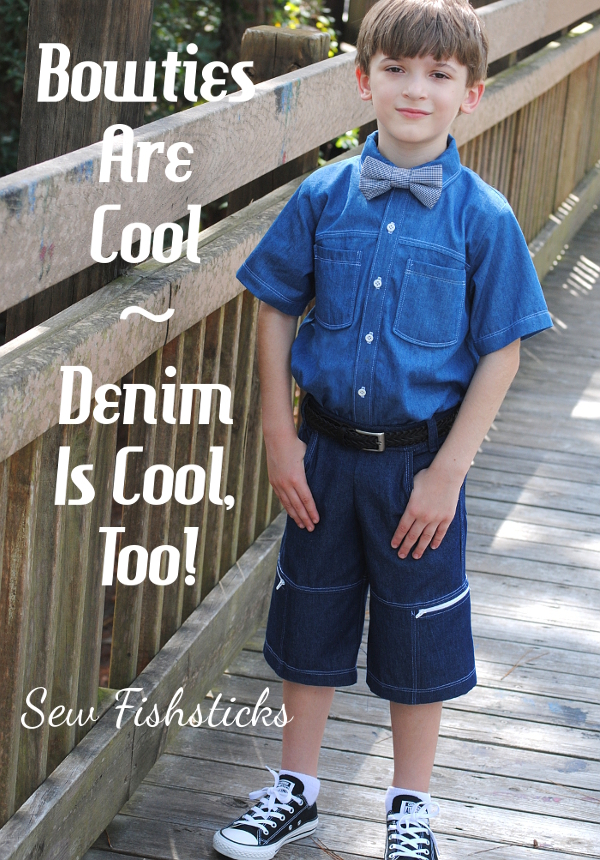
We’re sort of big Doctor Who fans around here. The 11th Doctor is my personal favorite … “I will always remember when the Doctor was me.” I love that Jamie thinks bowties are cool. For the record, though, I asked him which Doctor was his favorite. “David Tennant,” he said. I tried to convince him that surely he was mistaken, “But, Matt Smith wore the bowtie!” “Well, David Tennant is my favorite, but I really like Matt Smith’s bowtie!”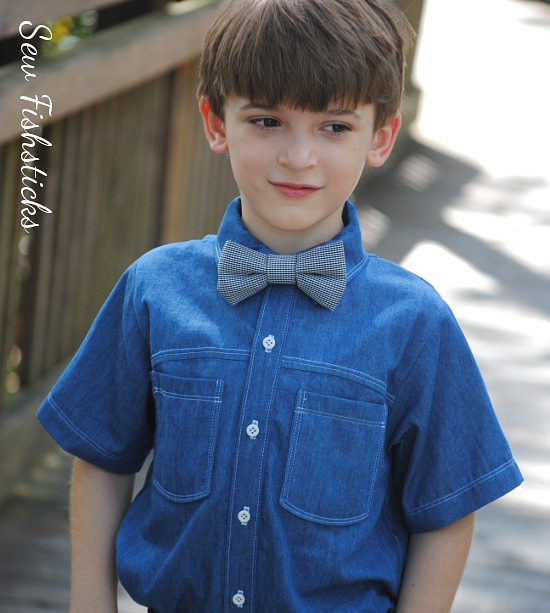 Since I’m still sewing along with the Project Run & Play challenges, and last week was the Denim Challenge, Jamie got a whole denim outfit. I did a quick Pinterest search when I was first starting on this outfit, and I found tons of denim shirts with jeans … even a few with bowties! That was great encouragement to go with my plan of a denim button-down top with jean shorts.
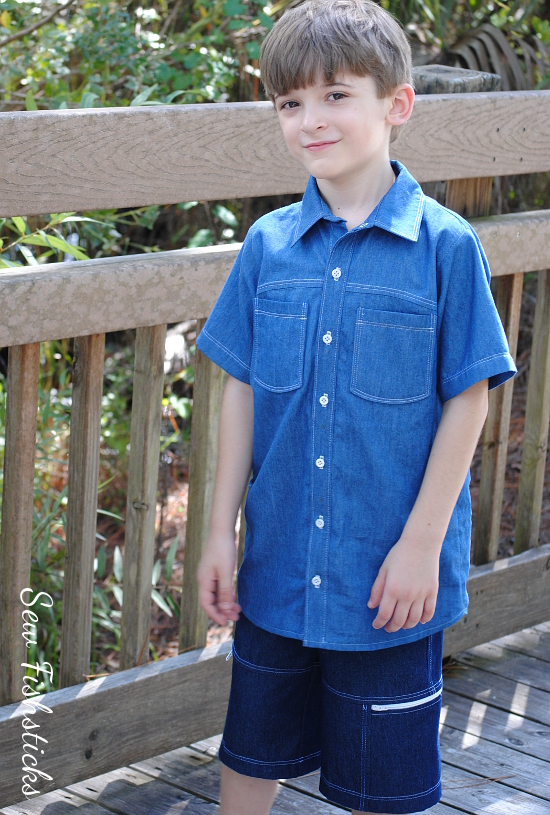 For the top, I started again with my Everyday Camp Shirt. This time I added a high curved yoke and pockets with curved bottoms on the front. I narrowed the collar like I did with Charlie’s shirt last week, and put in that same collar stand, too. I cut the button placket separately to give it more definition, and added a curved yoke on the back. I also gave the top a shirt-tail hem.
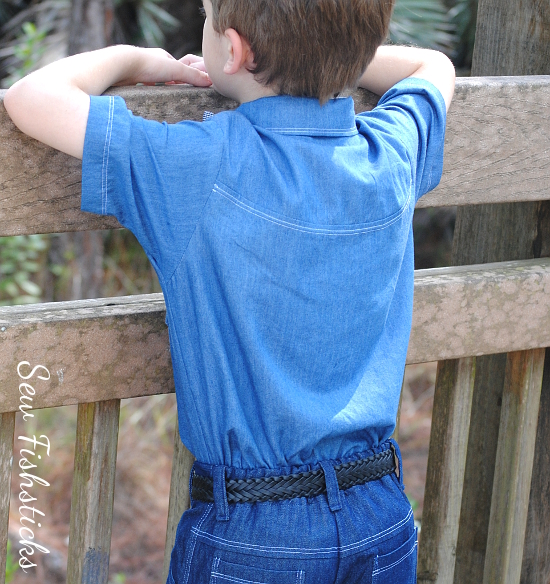 This button-down has a ton of topstitching. Topstitching seems to be my personal theme for this PR&P season!
 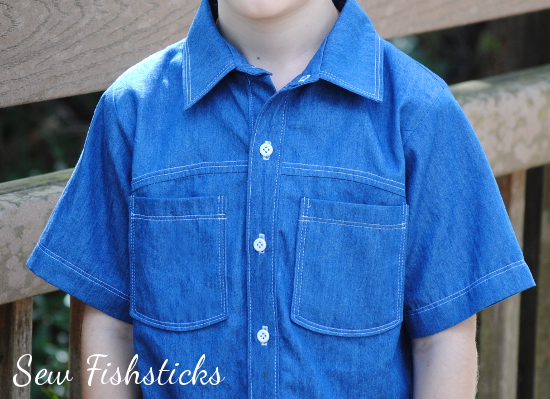 Because my sweet Australian followers so kindly asked me to go ahead with doing a tutorial for that side zipper-pocket on the Sand & Sidewalk Boardshorts, I used that pattern again, primarily because I wanted to take photos of the pocket process, but also because I really love this pattern! I added the belt loops this time, but skipped the extra topstitching on the front pockets. On the back, I added a curved yoke to mimic those on the shirt, and I used those same curved-bottom pockets. I really like all the curves in this outfit!
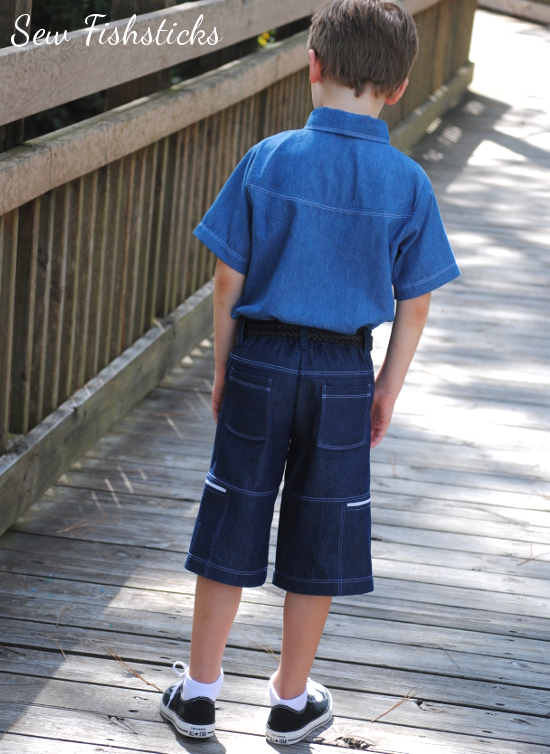 I have all the photos done, so hopefully, I’ll have that pocket tutorial ready for you in the next few days!
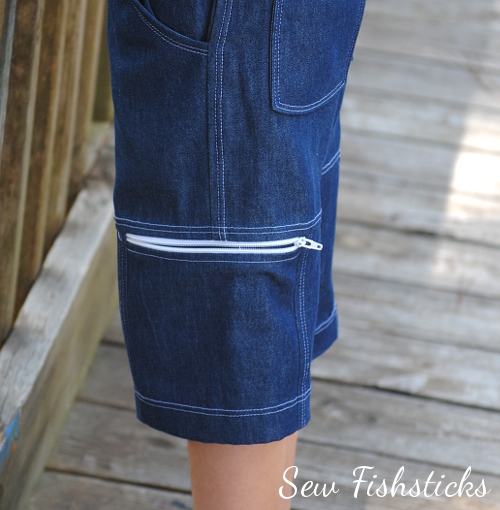 Of course, this outfit works really well without the bowtie, too. And, I think that it’ll be worn far more often this way than with the tie … maybe? Hmmm … I suppose I’ll have to wait and see what Jamie decides!
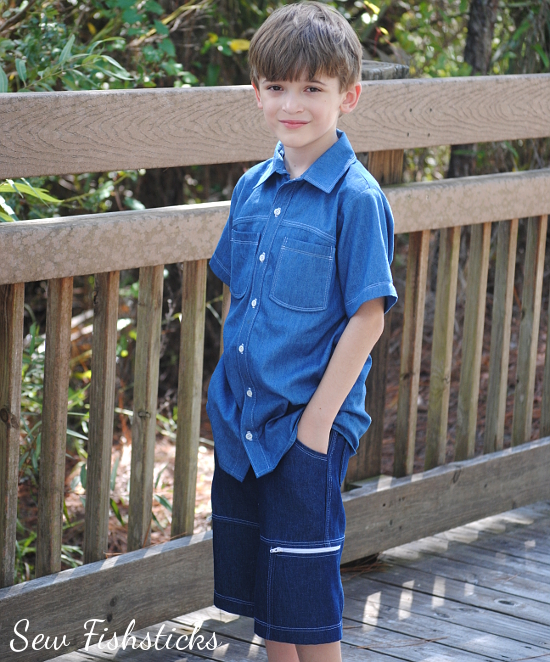 You may be able to tell from my pictures that Jamie is almost always very serious and thoughtful. Getting him to smile for pictures is nearly impossible! (Isn’t it cool how children from the same family can be so different?)
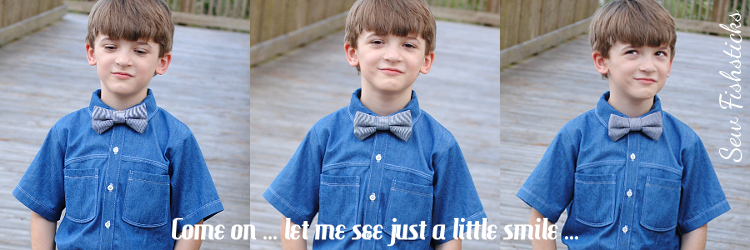 On to my signature look. Hopefully, I’ll have that one done and posted before the week is up!
Fabric in the top is from Joann fabrics.
Fabric in the shorts is from Robert Kaufman Fabrics.
The bowtie fabric and the buttons on the shirt are upcycled from thrifted men’s tops. (The buttons are from one of the shirts that I used for last week’s look!)
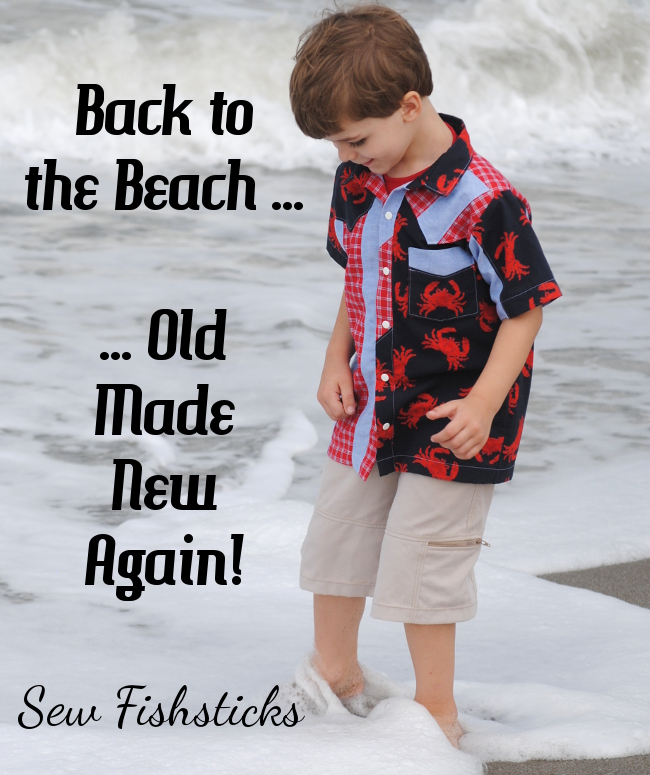
Back to the Beach ~ Old Made New Again!
 I adore upcycling!! And, there are a few reasons why. The one that stands out, of course, is that it’s environmentally responsible to make something new from something old, rather than throwing it out. There are some other great reasons, too, though! First, it’s a great way to save your pennies! I so often hear that sewing for your children can get expensive, and it can. Salvaging fabric from used clothing is easy on the budget! Second, the aisles of thrift shops are a great place to find fabrics that are hard to come by elsewhere. You might even find yourself buying and working with fabrics that you wouldn’t have considered using otherwise. Perhaps my favorite motivation, though, for re-using old clothing is that you get to see how the fabric wears! When you purchase fabric new and unwashed, it’s hard to know what it will look like twenty washes later. With used clothing, the fabric has already been washed and dried multiple times, so you can see how it’s holding up!
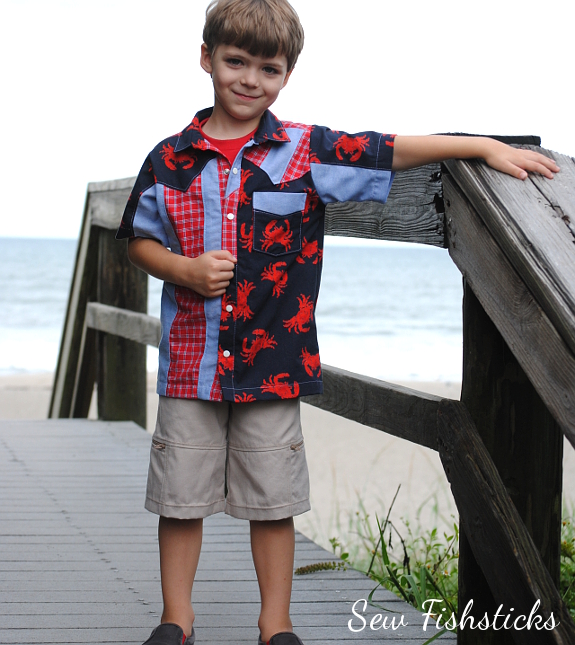 This week’s challenge theme at Project Run & Play was the “Hand-me-down Makeover”. With last week’s disappointing loss, I wasn’t planning to continue sewing along, BUT on the last day of voting, Jamie came running into my studio and excitedly exclaimed, “I know you’re sewing for Charlie this week, but next week, can you make me an outfit with a bow tie?” Apparently, I’d gotten my boys really excited about having a new handmade outfit every week for four weeks. Without even thinking, I started explaining to Jamie that his Inspector Gadget outfit was losing, and I probably wouldn’t sew the remaining outfits …. and he cried. And, then I cried. And, then I promised to sew the rest of the weeks. So, here we are!
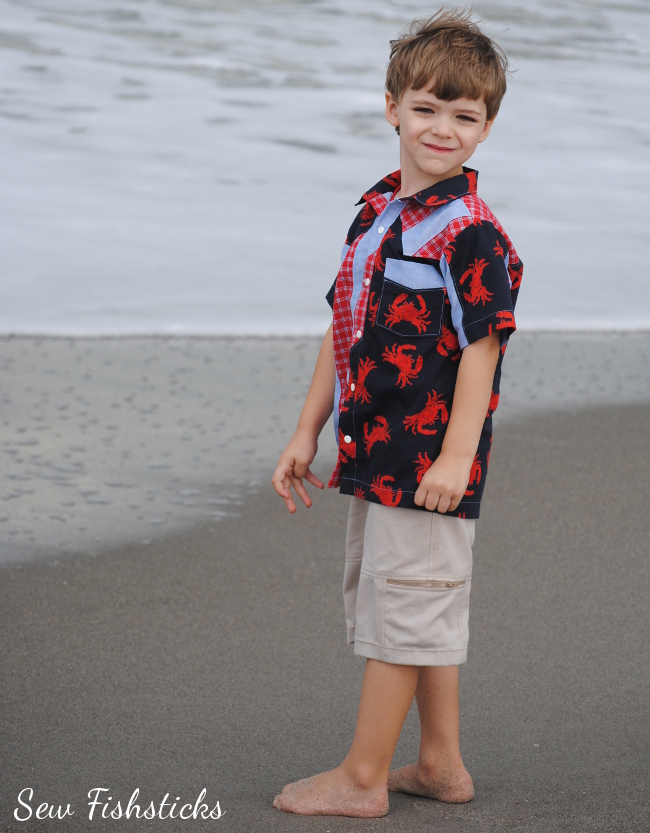
The very first time that I sewed along with PR&P, there was an upcycling challenge — using men’s button-down shirts, I think — and I made a beach outfit for Jamie. You can see that outfit here: the Upcycled Beach Boy. When I was scouring the racks of a local thrift store and ran across a navy blue button-down shirt printed all over with bright red crabs, I thought it seemed fitting to go Back to the Beach this time around!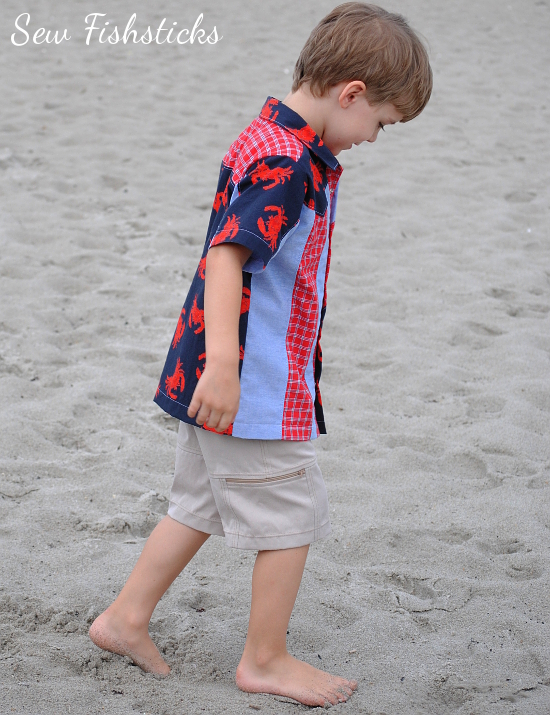 For the camp shirt, I began with three cotton woven shirts which I chopped up and pieced back together to create a casual, fun, beach-y top.
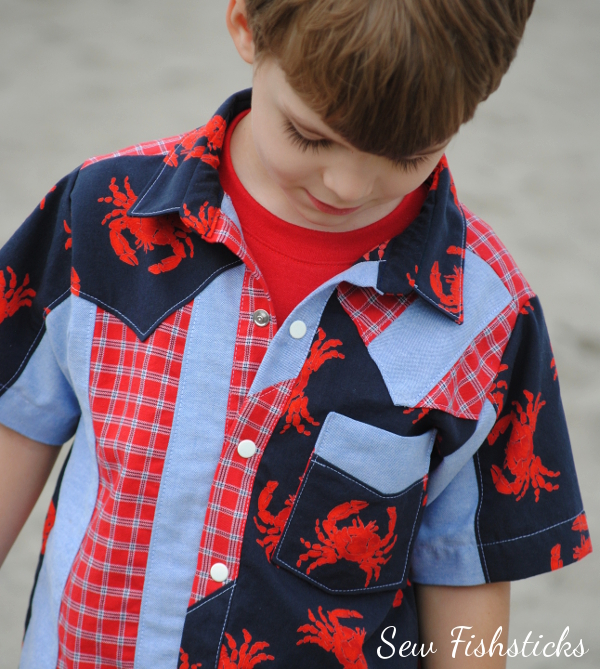
 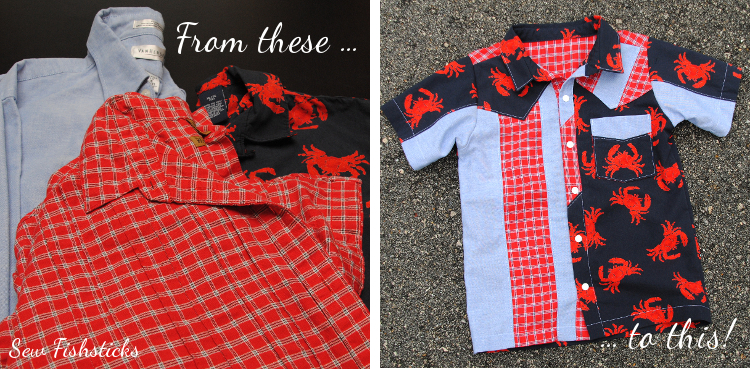 I modified my Everyday Camp Shirt pattern by shifting the shoulder seam towards the front, narrowing the collar and adding a collar stand. I also drafted up a western-style yoke for each shoulder. I finished the top with metal snaps, at Charlie’s request. “So I can do it myself!”
Oh, my! Those eyelashes!
The back has a pieced, straight yoke.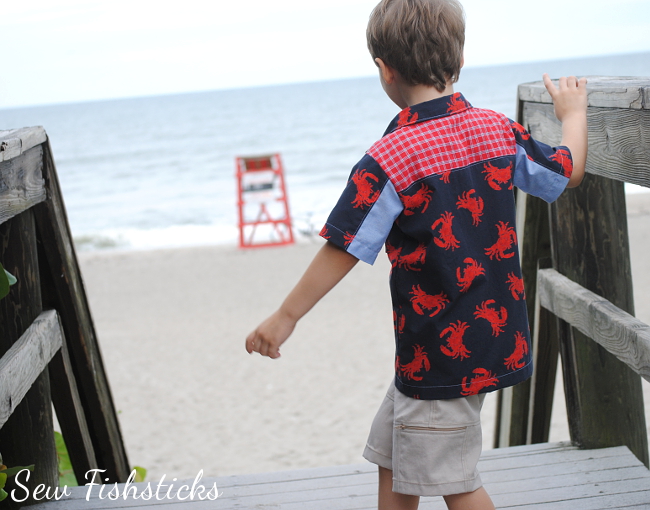 Charlie was so excited about the crabs on this shirt! As soon as we got to the beach, he started telling me this story about a crab and his family who live under the sand and the water. He’s such a great story-teller!
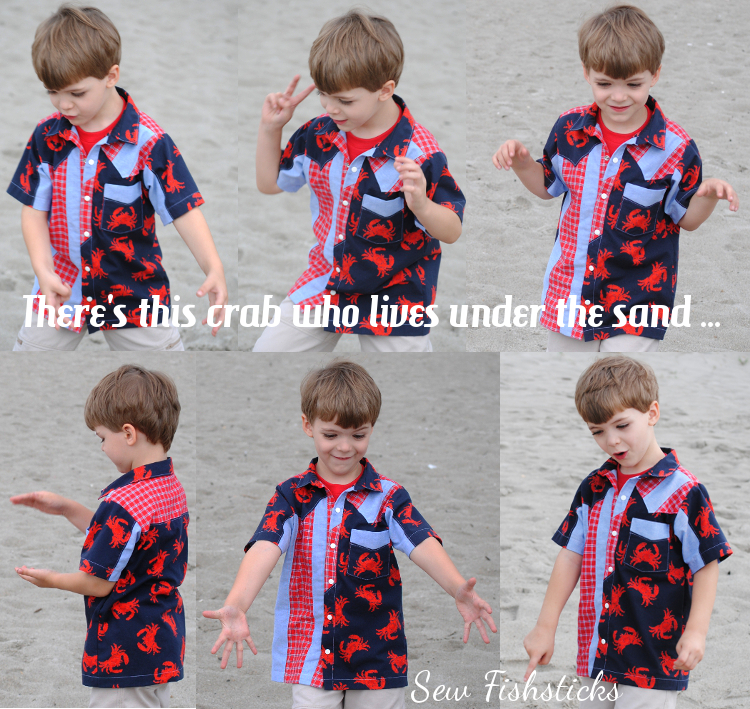 Under the camp shirt, Charlie is wearing a tank top made from my free The Tank pattern with the addition of the pocket from my Honor Roll Raglan.
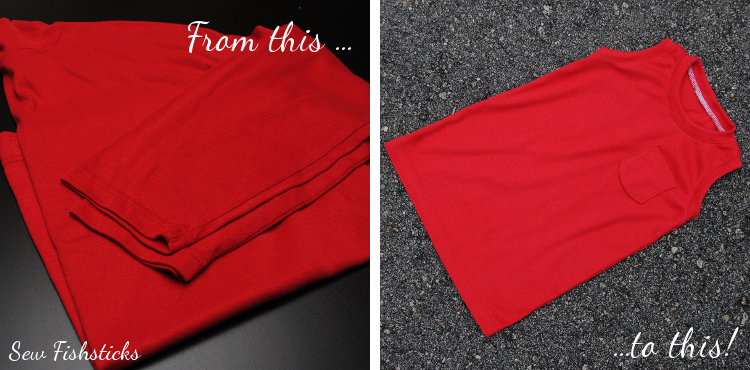 The tank started life as a red cotton interlock mock-turtleneck.

Beach photoshoots are so much fun!
The shorts are my favorite part of this whole outfit because of the cool side zipper pockets! I upcycled the shorts from a men’s khaki twill cotton shirt. (I used every spare inch of the shirt fabric!)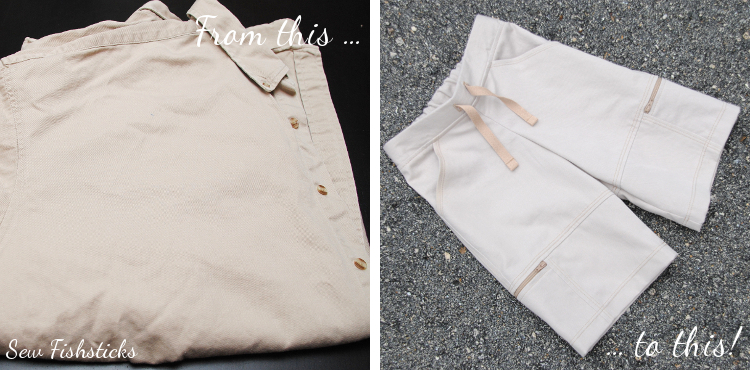 I used my Sand & Sidewalk Boardshorts pattern for these. I loved the way that last week’s zipper fly turned out, so I was going to do another, but Charlie begged for “pull-on pants”, so I went with the drawstring finish instead.
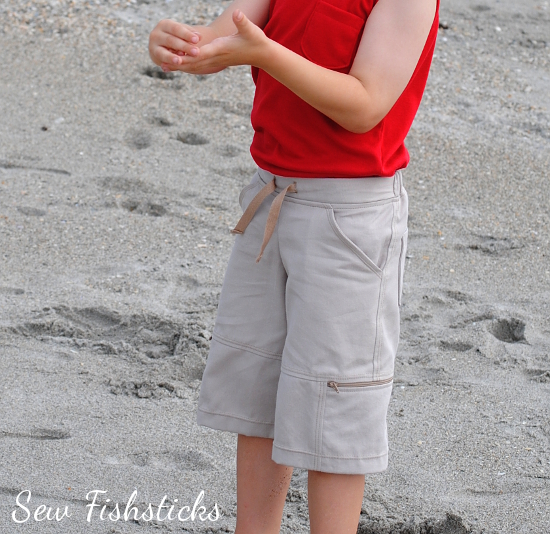 I had the idea for this zipper pocket early in the process.
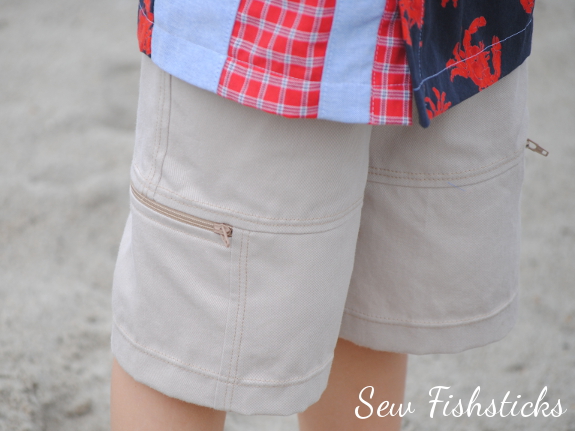 I originally thought I would just work it into the knee panel, but after discussing it with a friend, I decided that it really needed to be on the side. So, I wrapped the knee panel all the way around and pieced the pocket into the center of it. (I can totally do a tutorial for it, if there’s interest! Maybe in the spring when those of you who don’t live in Florida are sewing shorts again?)
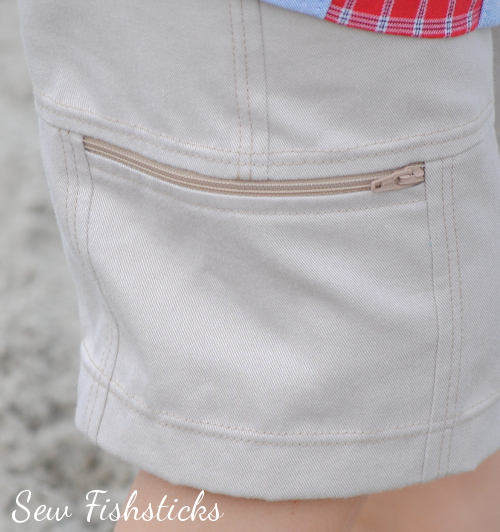 It’s the perfect pocket for shell-collecting!
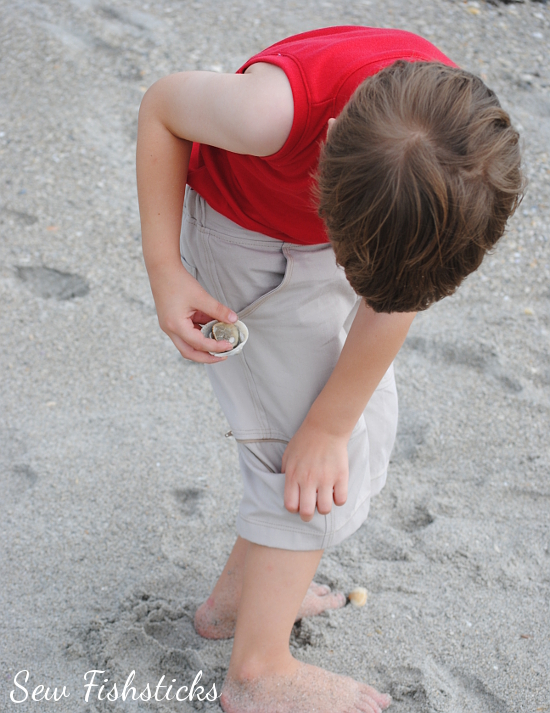 I used the Everyday Camp Shirt pocket for the back pockets on these pants. (I actually did the same thing last week, and really liked the look.)
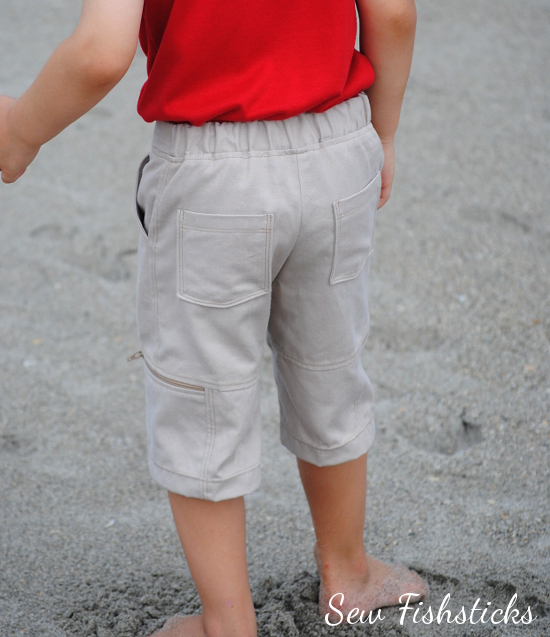 This is a great Florida fall outfit! Charlie declared it just right for running …
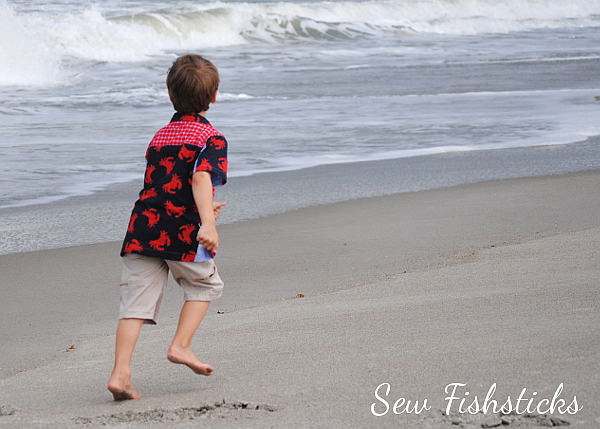 … jumping …
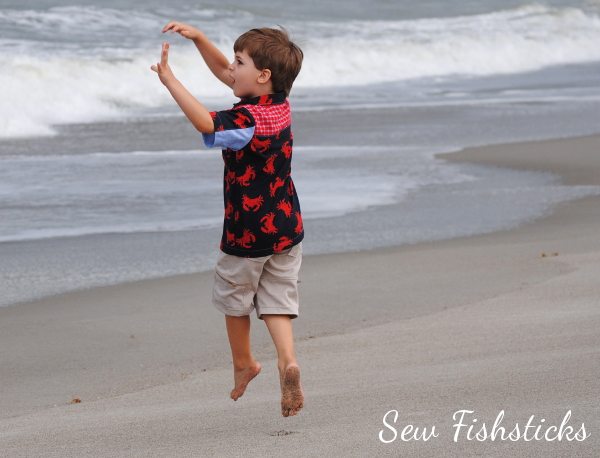 … and bird chasing!
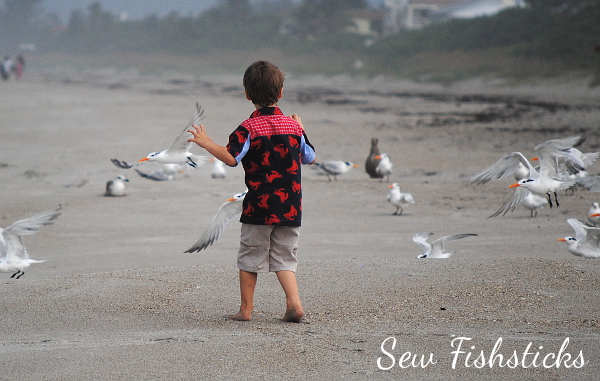 Wait! One more … this is just before he got soaking wet from head to toe!
Can I just put my toes in … pleeeeeeeeeeeaaaase?
PR&P Week One: Go, Go Gadget Fashion!
 I am so excited to be competing in Season 10 of Project Run & Play! To read more about PR&P and find out how you can join in the sew-along, just click here. To see all of this week’s designer looks and vote for your favorite, click right here! Read on for tons of pictures and more details about my first week look.
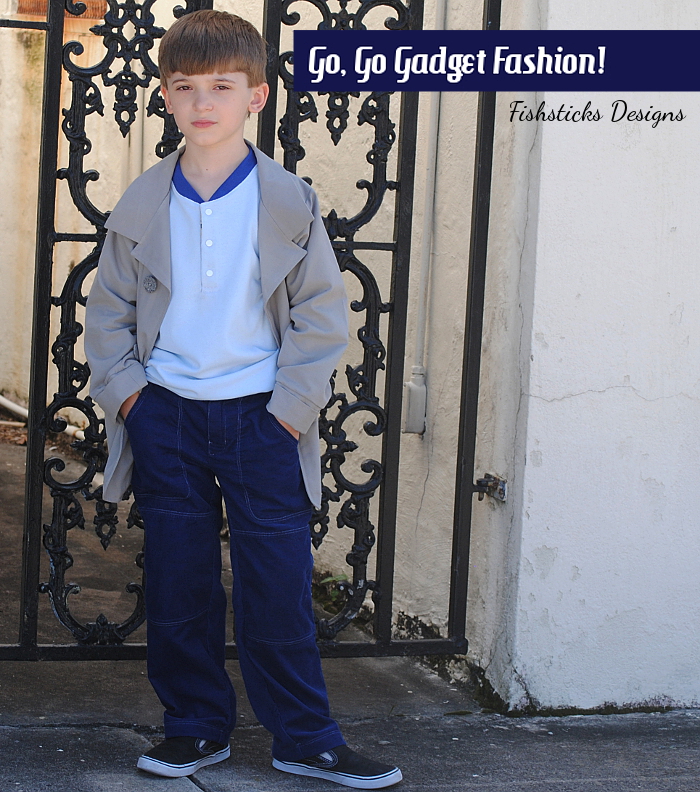
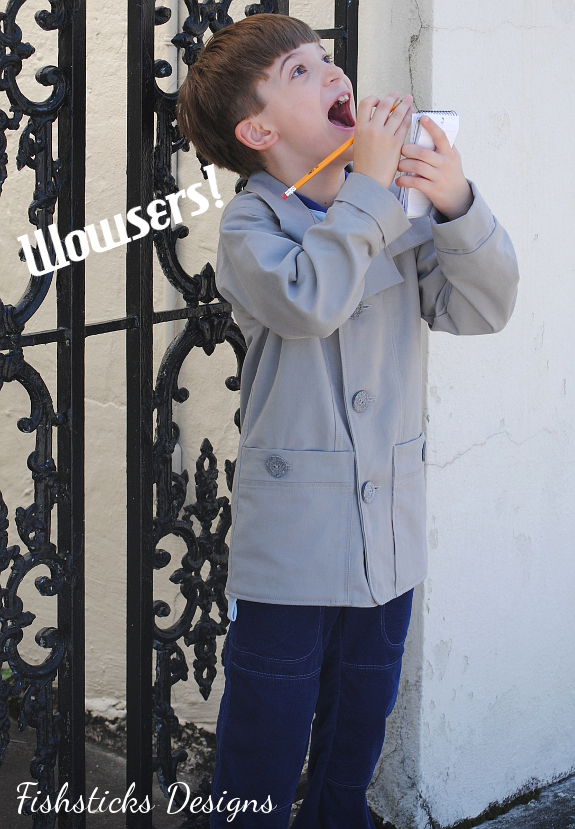
As a child of the 1980s, I was really excited about the Project Run & Play theme for Week 1 – 80s Cartoon-Inspired Looks! I was 10 in 1980, and I graduated high school in 1988, so I have fond memories of so many 80s cartoons! The big problem came when I had to pick just one! What a hard choice! I knew that I wanted to make this an everyday outfit, and I didn’t want the outfit to look costume-y or really feature any specific characters. With those things in mind, I narrowed it down to a few choices. From there, since I was sewing for my seven-year-old, I enlisted his help to make the final decision. Jamie’s choice? Inspector Gadget!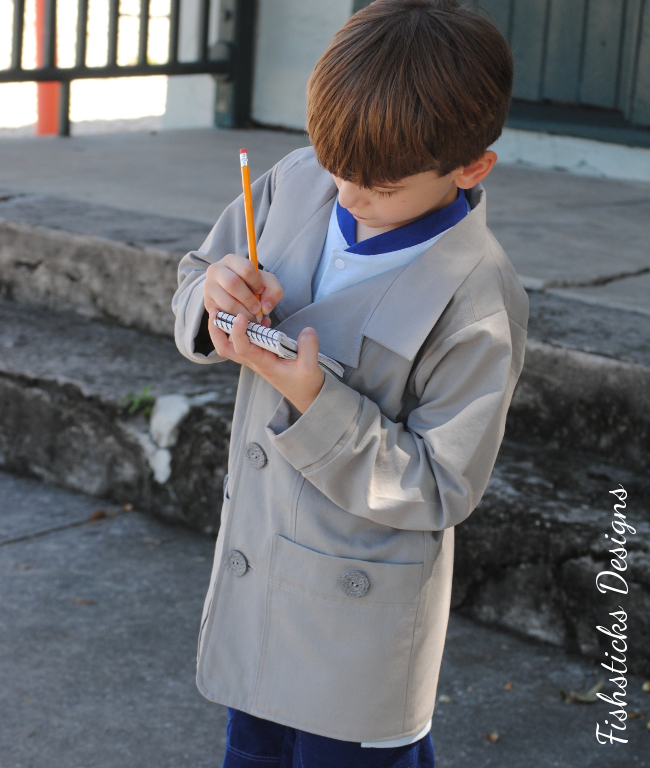 My Go, Go Gadget Fashion ensemble is an everyday outfit inspired by Gadget’s own classic inspector’s wardrobe, but with hidden accents that represent his robotic gadgets! I thoroughly enjoyed designing and sewing this outfit, and Jamie loves it! (His favorite part is the jacket. He didn’t want to take it off, and it was in the 80s here in Florida on the day of our photo shoot!)
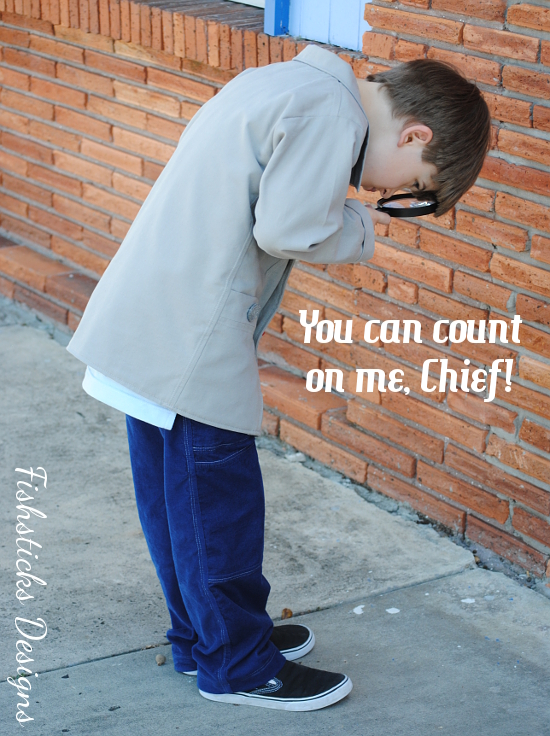
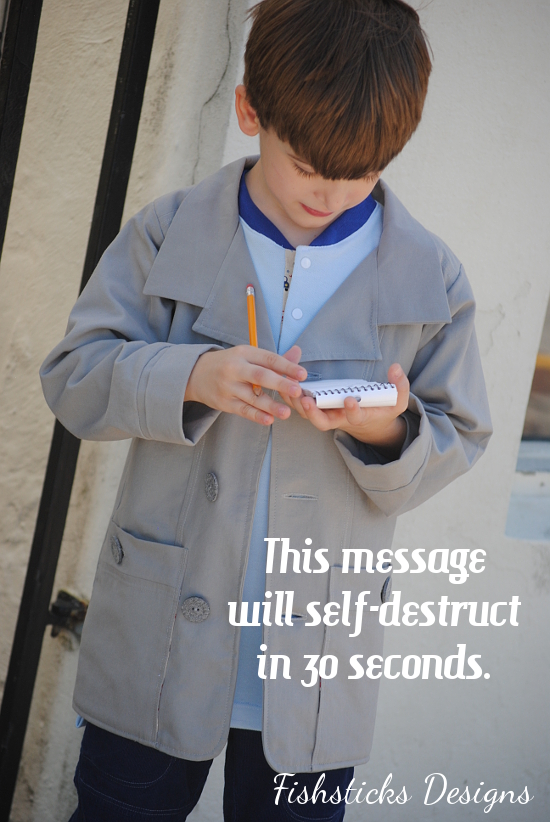
The set is made up of three pieces – jacket, top and pants. I designed the jacket with a trench coat style fit, but with a shorter length to make it more practical for my little guy.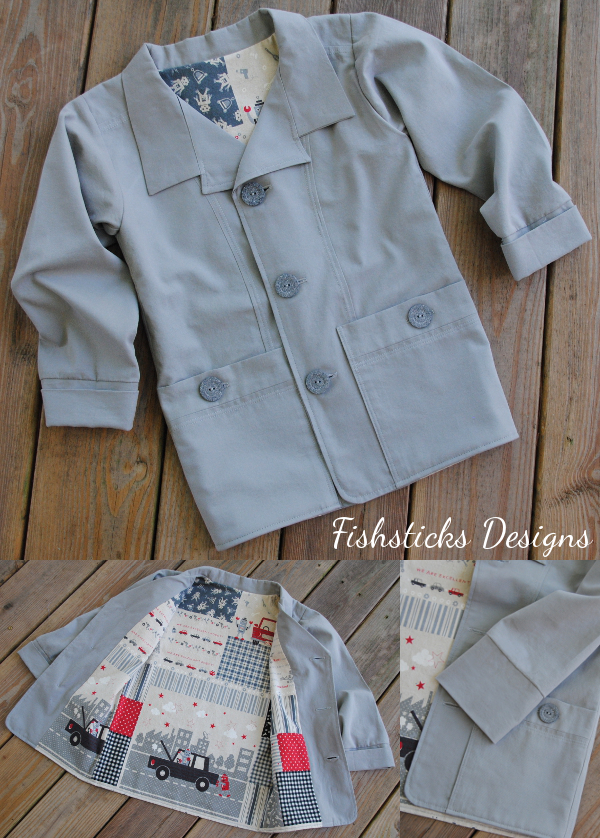 The jacket outer is sewn with a soft gray cotton twill, and it’s fully lined with a cotton and linen blend robot print. The cuffs fold down for extra growing room.
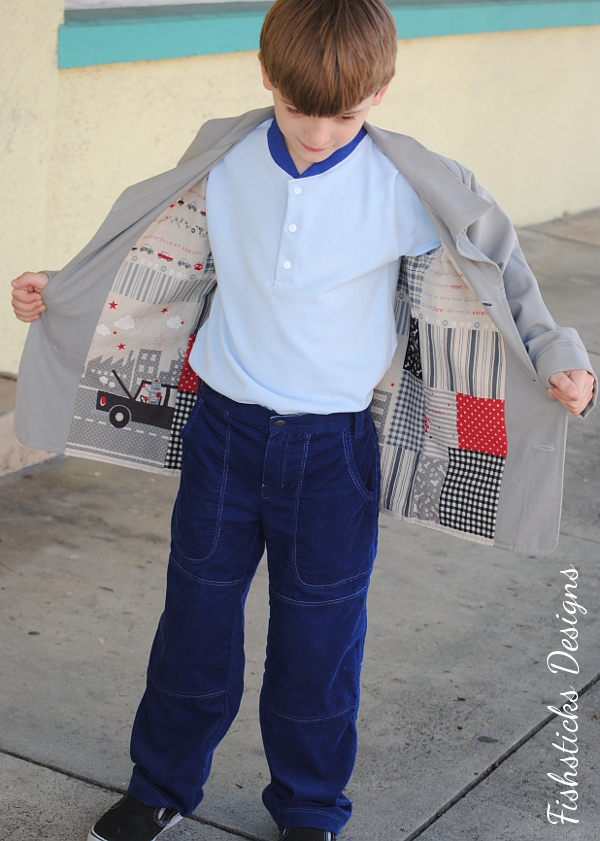 The front plackets feature a gentle curve at the top, and they’re finished with rows of twin topstitching in matching thread. Actually, there is a lot of topstitching in this jacket — in the pants, too! I love the detail that it adds. I’ve said before that I think topstitching is like ruffles for boys.
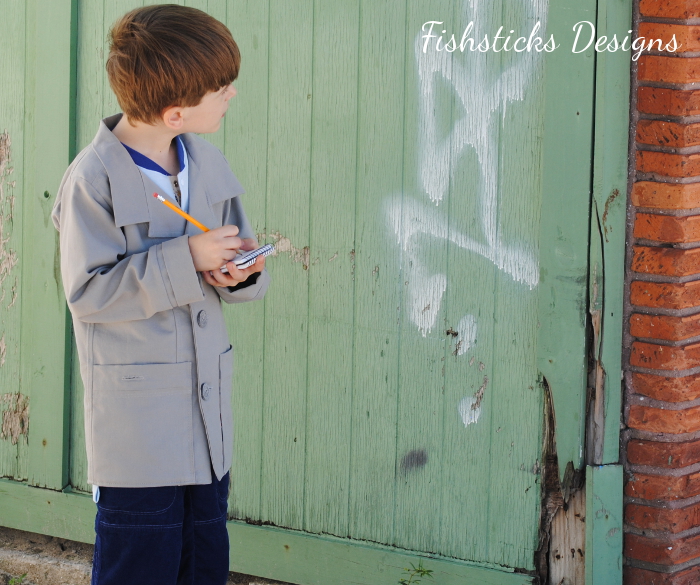 The two front pockets are big enough to hold Inspector Jamie’s notepad, pencil, magnifying glass and anything else that he might need for his investigative work! They also button up to keep everything safe inside.
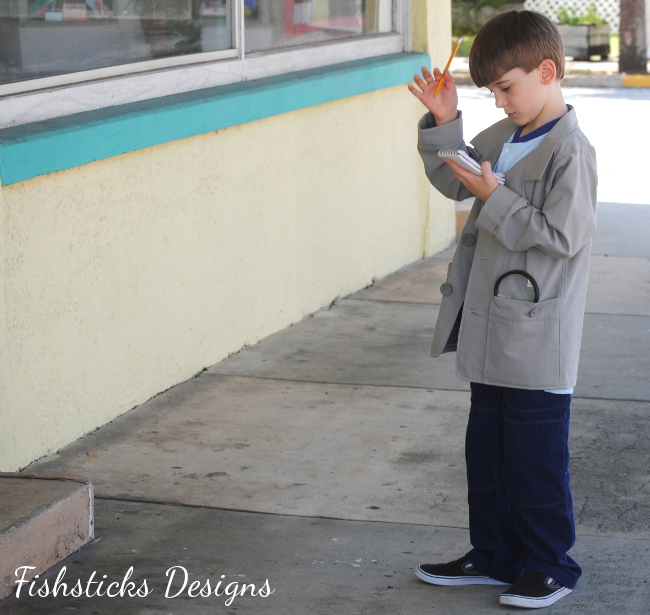 The 1 1/8″ buttons have a really cool mottled gray coloring, and they’re eco-friendly because they’re made of recycled cotton.
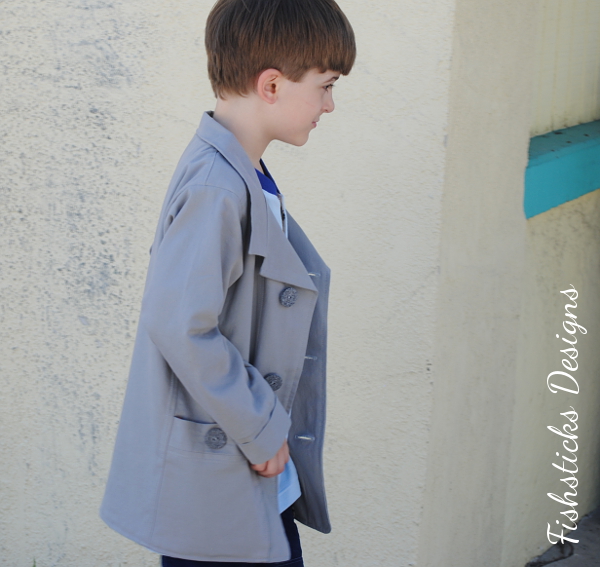 The Henley-style top is constructed of light blue cotton pique fabric. Inspector Gadget’s shirt is white, but Inspector Jamie is tough on white clothes, and he lives in a house with well water that doesn’t get along well with white for very long. I love the look of the light blue mixed with the gray of the jacket and the dark blue of the pants.
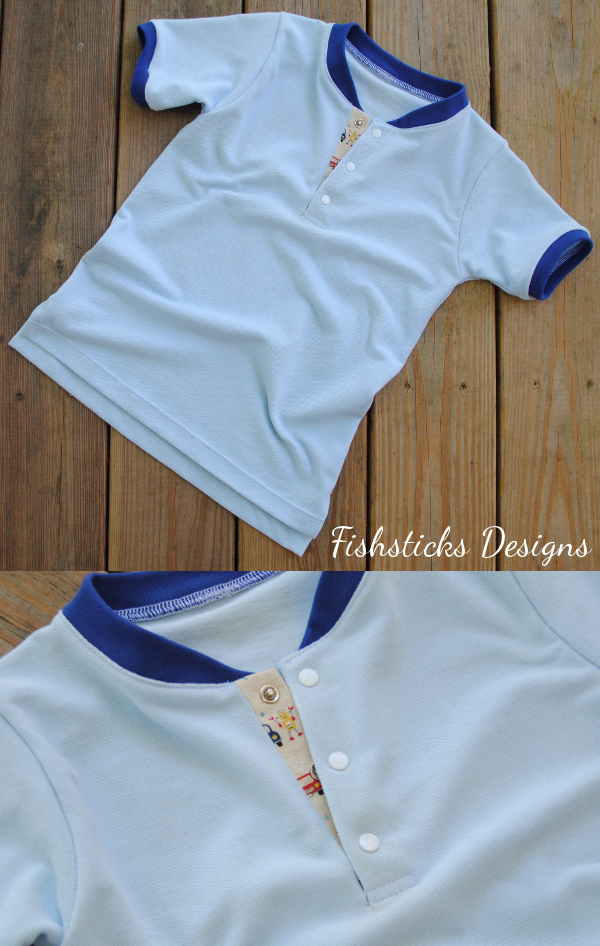 The traditional Henley collar is sewn with 1X1 cotton/spandex ribbing, and the placket inset features more cotton/linen robot fabric. Isn’t that little yellow robot peeking out just adorable?
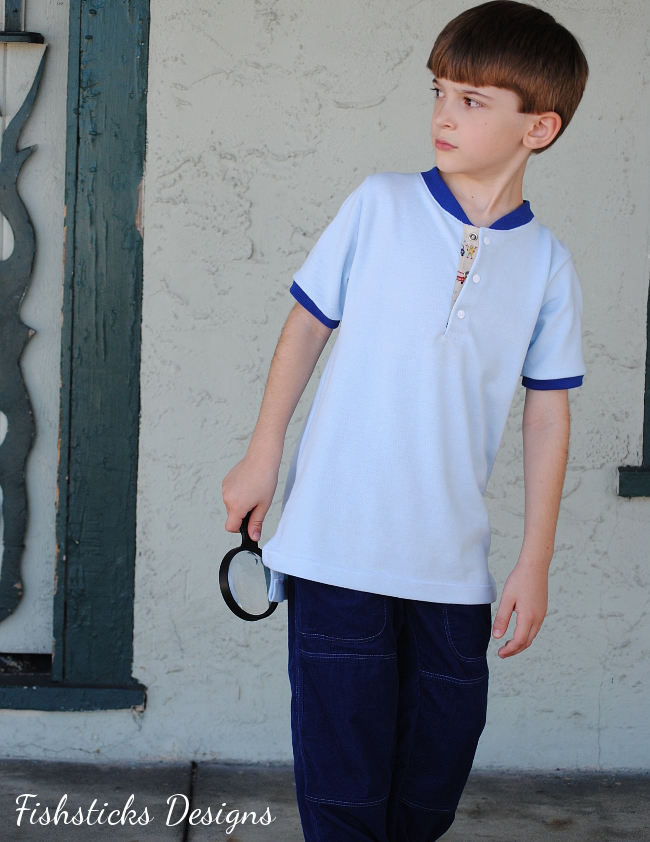 I finished the placket with white metal snaps. (See the little scratch on Jamie’s cheek in the picture below. It’s the result of momma leaving a pin in the shirt when he first tried it on! Have you ever done that? I felt so bad, but he seemed rather excited when I told him that we would just say that it was a scar from his past detective work.)
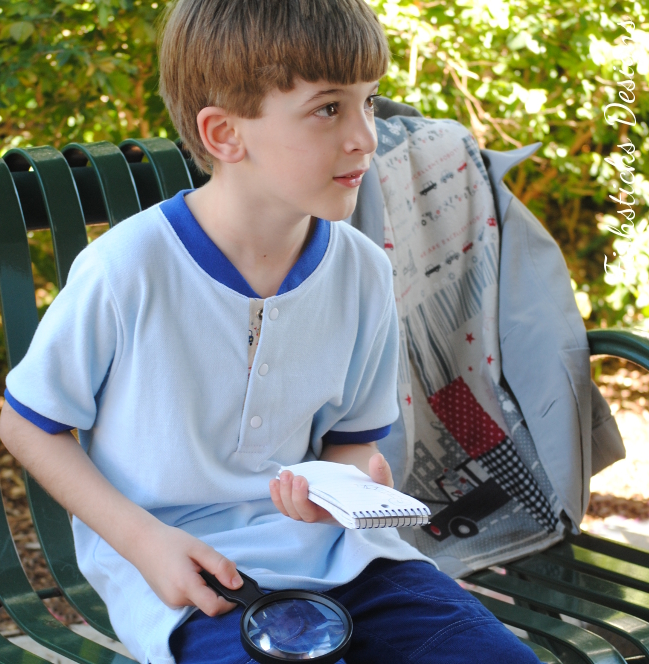 I cut the back of this top longer than the front, and I added in side vents.
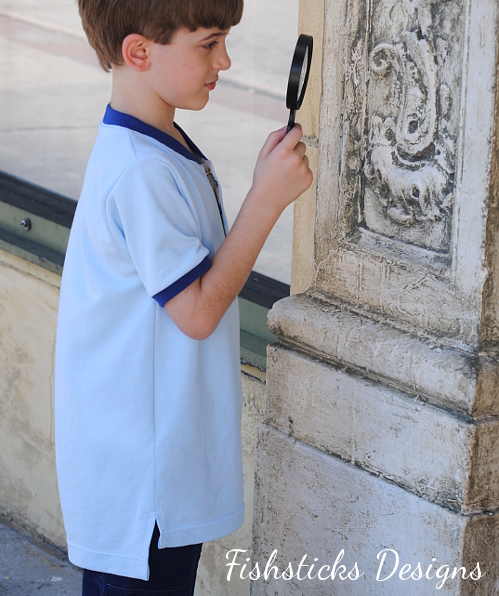 The fine-wale cotton corduroy pants wrap up this outfit in comfortable, modern style. A zippered fly hides more tiny robots on the fly shield and the inside of the waistband. The waistband also features functional belt loops.
  Two huge front pockets provide more storage room, and double knees give longer-lasting wear. The coordinating topstitching on the pockets and the knee panels gives more great detail.
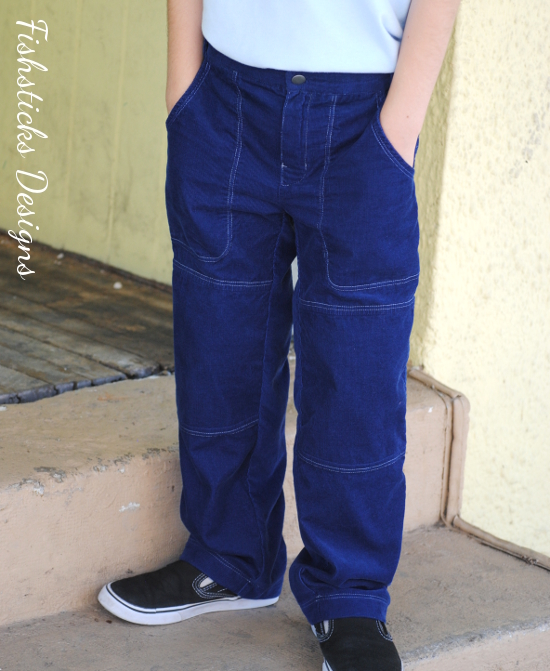 Jamie is tall and thin and generally wears slim sizes in ready-to-wear pants, so elastic in the backwaist gives him a comfortable fit. The back yoke and pockets finish the pants off nicely.
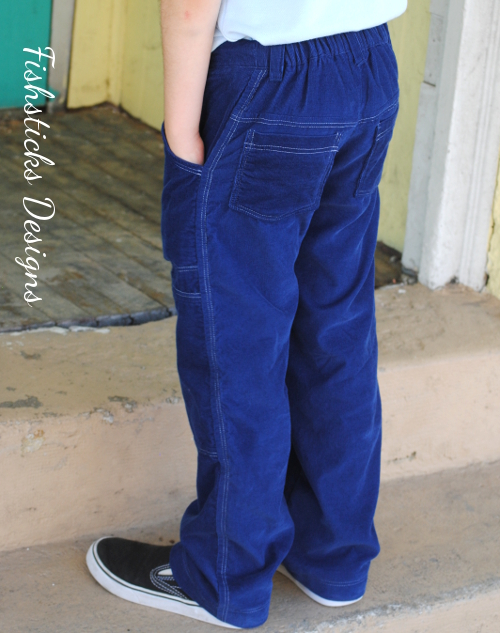 I think this outfit accomplished all of my goals: Inspector Gadget-inspired, comfortable everyday wear, and loved by the receiver! I happen to think he’s quite handsome in it, too!
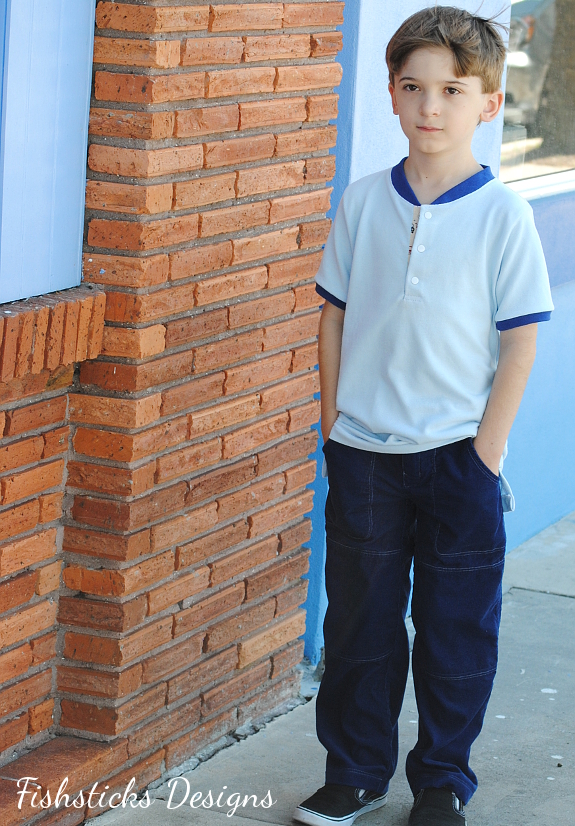 Jamie planned out the props for this photo shoot himself, and he had a lot of fun with it!
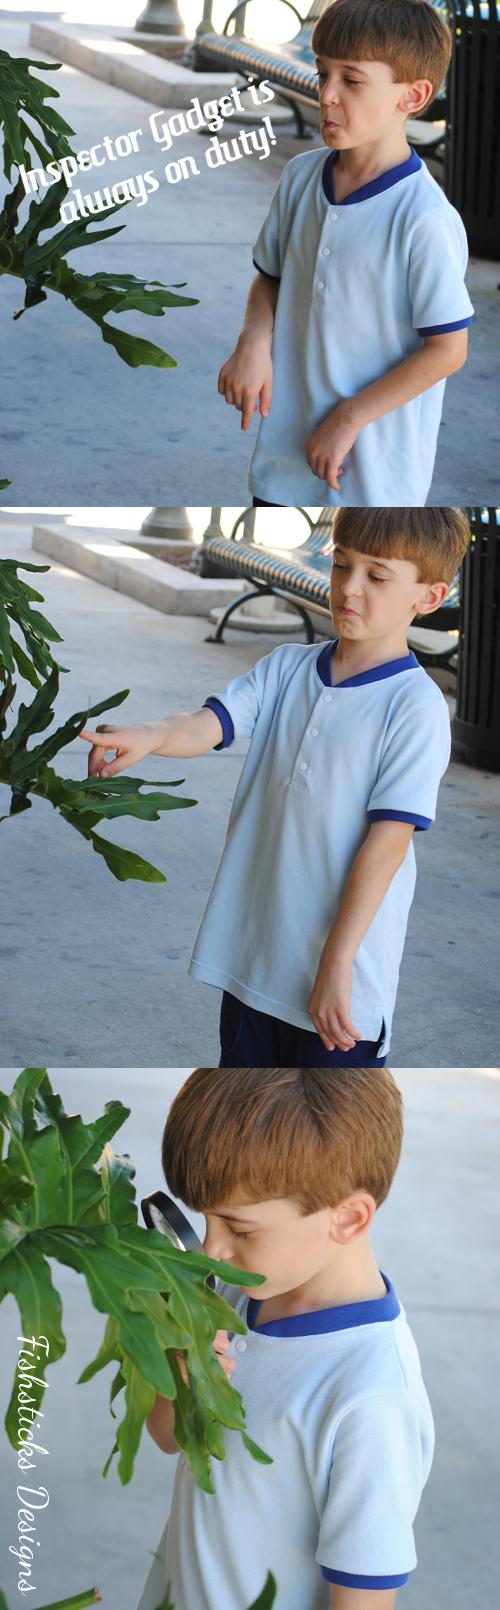
 All patterns are self-drafted.
Jacket fabrics: Gray Cotton Twill by Fabric Finders from Southern Seams, Robot Cotton Linen by Kokka from Sew Me a Song, Recycled Cotton Buttons by Green Earth from Joann Fabric.
Shirt fabrics: Light Blue Cotton Pique upcycled from a thrifted Old Navy polo, Ribbing from Joann Fabric, Robot Cotton Linen by Kokka from my stash.
Pant fabrics: Royal Blue Fine Wale Corduroy from Hobby Lobby.
Thank you so much for dropping in to visit and reading about my Go, Go Gadget Fashion Look! Don’t forget to go vote: Project Run & Play – Week 1!
Project Run & Play, RBD Chevrons & Exciting Knit News!
![]() Are you following along at Project Run & Play? Did you see that there’s a Fishsticks Designs giveaway that starts today? I’m so excited to be sponsoring this All-Star Season! It’s been so much fun already! This is Riley Blake Chevron Week at PR&P, and there are some seriously amazing designs already popping up in the sew-along. You can check them out right here: Chevron Week. The All-Star chevron projects will be posted tomorrow!
Are you following along at Project Run & Play? Did you see that there’s a Fishsticks Designs giveaway that starts today? I’m so excited to be sponsoring this All-Star Season! It’s been so much fun already! This is Riley Blake Chevron Week at PR&P, and there are some seriously amazing designs already popping up in the sew-along. You can check them out right here: Chevron Week. The All-Star chevron projects will be posted tomorrow!
Katie’s not here this week to model this sweet little number for you, and she was sick most of the week last week, so my dress form will have to do. These fabrics are all stretch jersey knits from the Riley Blake Sweetest Thing collection that was released last fall. (A little secret? The knit chevrons are coming back . . . and they’re bringing along some new friends!)![]() I’ve been working on a new collection of patterns, four patterns to start, designed specifically for stretch jersey knits. They’ll be featuring the HUGE collection of stretch jerseys that Riley Blake Designs is releasing next month! This little dress is one of the set. All of the patterns will be quick and simple to sew, and they all use various raw edge finishes to showcase that great jersey curl. They’re still about a month off, but I couldn’t resist showing you a little preview since I’ll be incorporating those great chevrons!
I’ve been working on a new collection of patterns, four patterns to start, designed specifically for stretch jersey knits. They’ll be featuring the HUGE collection of stretch jerseys that Riley Blake Designs is releasing next month! This little dress is one of the set. All of the patterns will be quick and simple to sew, and they all use various raw edge finishes to showcase that great jersey curl. They’re still about a month off, but I couldn’t resist showing you a little preview since I’ll be incorporating those great chevrons!![]()
Since we’re already chatting about the new RBD knits, have you seen them yet? You can peek at all of them right here: Riley Blake Knits – Coming Soon! There are solids, dots, and CHEVRONS in over a dozen colors!
![]()
My favorite, though, is the stripes! Stripes in not just one, but two sizes! 18 in all! I love knit stripes!
Did I say this was a HUGE collection? I feel like I’m in knit heaven!
Project Run & Play: Inspired by a Little Boy’s Art & Imagination
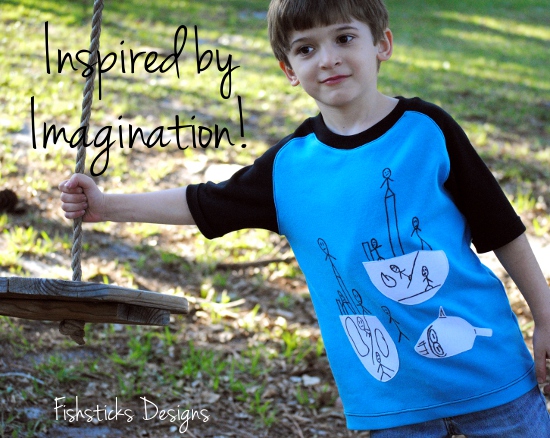 The Project Run & Play All-Star Season has begun! Are you sewing along? The first theme is Inspired by Art. In keeping with my goal to sew everyday wearables for my little ones, Jamie got a new Patrick Curved Raglan inspired by his own artwork!
 This pirate ship drawing is one that Jamie did a few months ago. I saw it hanging up when I was looking for ideas for this week, and asked him what he thought about putting it on a shirt. He couldn’t have been more excited! (Jamie doesn’t tend to get overly excited about the clothing that I sew for him anymore, so I was really excited to see what he would think when I was done!)
 I started by scanning and enlarging the picture. I printed the ships and the shark on separate pages and cut them out to make patterns for the appliques. To reproduce the rest of the drawings, I drew them freehand on to the fabric using a Frixion pen. Because Frixion ink disappears when you iron it, I was able to correct any mistakes before tracing the final drawings with a Crayola fabric marker. I did all the applique and the drawings on the front of the shirt before sewing the pieces together.
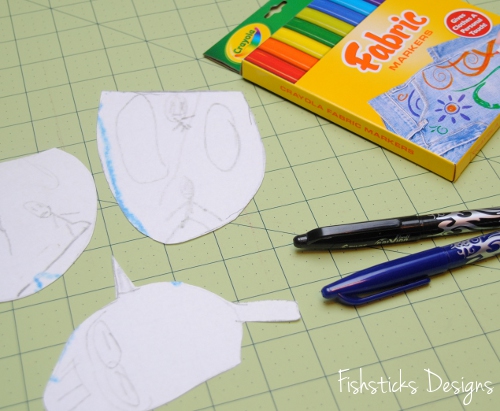 The end result?
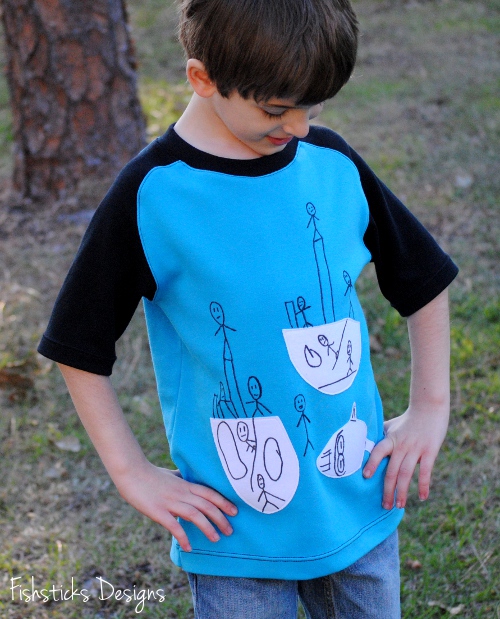 I think he likes it!
 It is his artwork! How could he not like it, right?
 Here’s Jamie’s rundown of all the parts of his artwork:
 This was so much fun to create! And, Jamie says that it’s “the coolest shirt ever”! Woo-hoo! A win for mom and for Jamie!
Project Run & Play: Signature Style with Superhero Appeal

The final Project Run & Play theme is Your Signature Style. As the weeks have come and gone, I’ve pondered what my “signature style” is and wondered what I could sew that would show it. The whole series flew by, though, and as usual, it was the last minute. There was no time left to think, only time to sew! Yesterday was Charlie’s third birthday, and since he was the recipient of this week’s sewing, I let him make the major design decisions.
Is that a superhero hiding behind that palm tree? Could it possibly be Captain America?!
  Charlie loves superheroes, especially The Avengers, or “The Avengers Assemble” as he calls them. His current favorite happens to be Cap’n ‘Merica!
 As I mentioned, time was short, so I grabbed two patterns that I know are quick and trustworthy — for the top, my Charlie Tee & Hoodie and for the bottom, my soon-to-be-re-released Mud Puddle Splashers. I wondered aloud as I was tracing Captain America’s shirt design onto my Charlie Tee pattern, how I was going to spin this as my signature style. Suddenly, I realized, though, that this is my signature style! In creating this outfit, I followed my normal routine: grab a pattern that you know and love, evaluate the needs and desires of the wearer, choose a few little extras, use what you have available (fabric, time, equipment) and create something practical and fun.
 The shirt was pieced together using the colorblocking method that I mentioned in Week 2. It just took a few more pieces than usual. I cut the red and white stripes at the bottom longer than I needed them to be, pieced them together, then cut the curve at the top before cutting the matching top piece. I used the ringer sleeves and the hood from the Charlie pattern, partially to add some character to the top, but also because I broke my walking foot last week. (I managed the hems on the shirt and the shorts without a walking foot, but there was no way I was going to try topstitching a neckline without one!)
 It was nearing 10:15 on Monday evening, and I’d promised myself that I’d be in bed by midnight, so the shorts got the Naptime Knit Mud Puddle Splashers treatment. I did add back pockets, but rather than turn and topstitch them, I trimmed off the seam allowance and just folded them wrong sides together. It’s interlock knit, so the edges aren’t going to fray, and that raw-edge look works great for little boys. (Why, yes! Yes, I did make TWO pairs of red shorts for Charlie during this PR&P series! I wondered for about half a second if I should, but red works well for him, so they’ll get plenty of wear.)
 Happy Birthday, Charlie! Oh, those eyes. Of course I’m biased, but aren’t they amazing? (I considered virtually cleaning up the bruise between his eyes and removing the grass from his hair, but this is so very Charlie! He’s not quite ready to save the world, but he works hard at conquering his own backyard.)
 Before I wrap up this post, I have to share one more little thing. I mentioned in yesterday’s post that I had to clean up a cake disaster, and I’m a little bit impressed with how it turned out. You won’t find me posting pictures of cakes here very often. I can sew really well, but cake decorating is not my thing. HOWEVER . . . I think this one might be encouraging to other harried moms like me.
I tried out a new cake recipe yesterday, and it was incredibly yummy: Paleo Chocolate Birthday Cake. The problem arose when I realized that I’d failed to remember to put parchment paper in the pans before pouring the cake batter into them. This is what I found myself faced with:
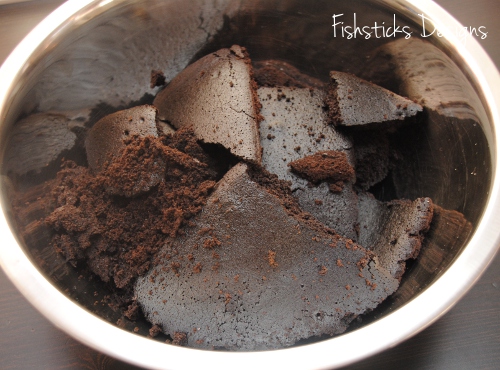 Not pretty, huh? Well, what’s a creative mother of a little boy who loves Captain America to do when she’s faced with a bowl full of broken cake? Why, build a cake mountain, of course! And, let everyone think that’s what she meant to do from the start!

Oh, the blueberries? Charlie not only loves Captain America, but he also loves blueberries. He’s been insisting for weeks that his cake had to be chocolate with chocolate frosting and blueberries. So there you go!
Project Run & Play: The Upcycled Beach Boy
 Challenge #5 at Project Run & Play is The Men’s Dress Shirt Challenge. I adore upcycling things, so I was really excited about this week. So excited that I visited multiple local thrift stores to dig through the dress shirts on several occasions. (I actually purchased a total of eight dress shirts with at least six different ideas in mind. Thanks to thrift store prices, though, I spent less than $30 for all eight!)
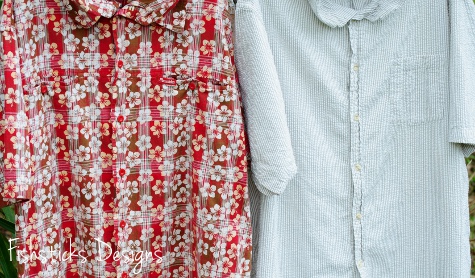 In the end, I settled on the two 100% cotton shirts above. I’ve been rotating between sewing for Jamie, Charlie and Katie, and this week was Jamie’s week. With a size 6 to sew, I needed plenty of fabric. These are both X-large shirts. The seersucker shirt is an X-large tall!
  I had originally planned to do something a little more exciting with the Hawaiian shirt. At least more exciting than turning a big Hawaiian shirt into a little Hawaiian shirt. My plan was to use my camp shirt pattern, but instead of the collar, I was going to sew in a hood. I tried the hood. Really. It’s still thrown on the floor of my sewing room right behind me. After ripping it off and sewing it back on twice, I still wasn’t entirely happy with it. I reached a point where I took a look at the partially finished shirt with the hood attached and wondered to myself if I was just sewing in the hood to make the shirt look different for this blog post, never to be worn again. My practical side won out, and Jamie has a new outfit that is cute, well-made and wearable, even if it is a little un-imaginative!
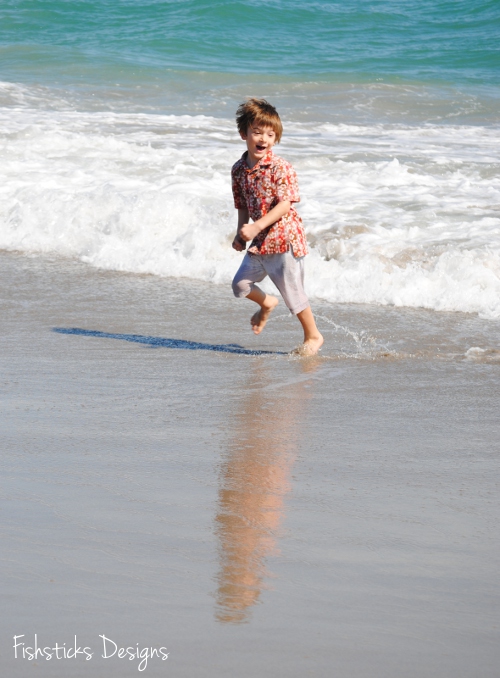
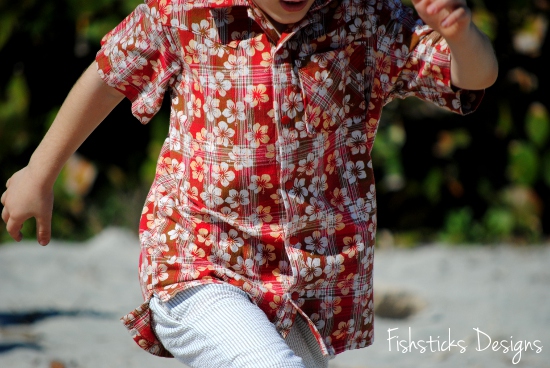 This outfit was made for the beach, and we happen to live less than a 10-minute drive from the beach, AND we were blessed with beautiful beach weather today. (Have I mentioned how much I love being back in Florida?)
 Doesn’t this make you want to come dig your toes in the sand?
 Oh, yes, the outfit! For the top, I started with my Everyday Camp Shirt pattern, the same one that I used for Jamie’s bowling shirt in Week 2 of PR&P. This time, I added angled yokes to the front of the shirt and the bias-cut pocket. (Love the bias-cut pocket!) I also used metal snaps because Jamie prefers them to buttons which are harder for him to do on his own.
  The original men’s shirt had side seam vents and a drop tail that I thought were perfect for the casual beach look, so I recreated them. I was able to cut the shirt out in such a way that I could re-use the original hems on both the body and the sleeves, but I wasn’t quite able to line up the stripes on the side. Eh. I think the pattern is busy enough that it’s not really noticeable.
 The shorts are Mud Puddle Splashers! (I finally got the pants update for the MPS pattern to my testers last night, and I’m hoping to have the finished pattern ready for sale in the next couple of weeks. You guys have been so patient with me during our move and settling in period! New patterns are coming. I promise!) I love the Mud Puddle Splashers for simple, easy, everyday little boy pants. These have the side-seam pockets, the faux fly and the back pockets. (I failed to get any good pictures of the details on the shorts. I was a little too busy just enjoying watching my little ones enjoy the beach . . . in February!)
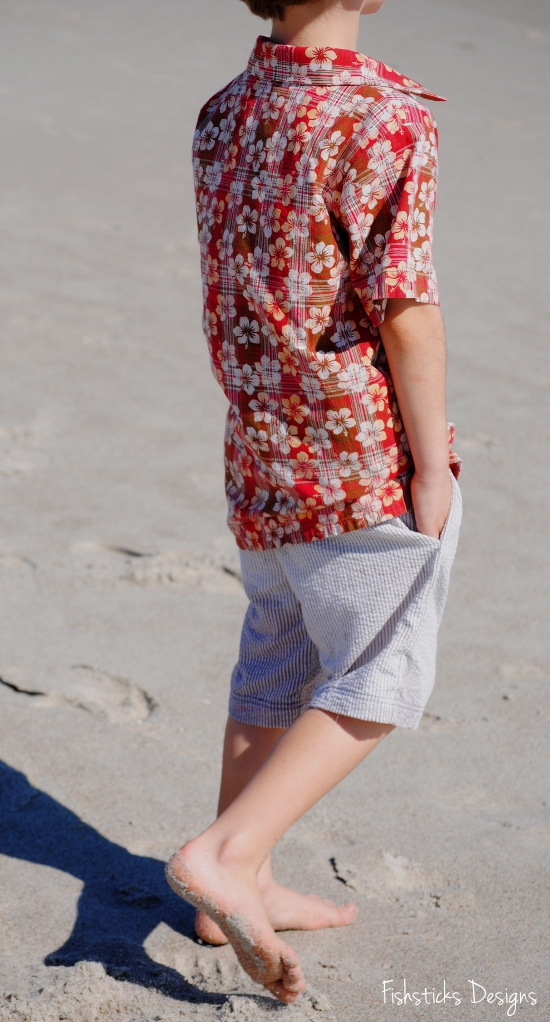 I heard on the radio today that there’s a blizzard blowing in up north, so I’ll leave you with a few more pictures of Jamie’s fun at the beach on this warm morning. (You may feel free to remind me of this post in the middle of July when you’re enjoying comfortable evenings with your windows open, and I’ve barricaded myself in my air-conditioned house because of the sweltering Florida summer heat.)


Project Run & Play: Love Is in the Air
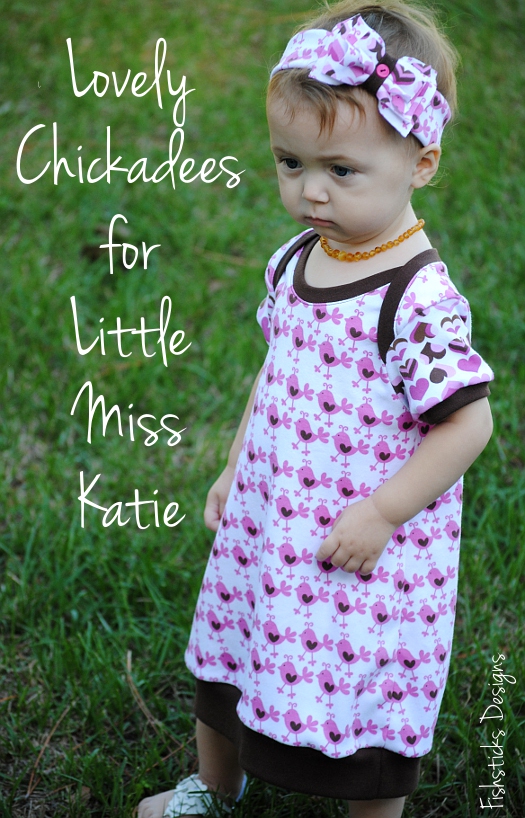
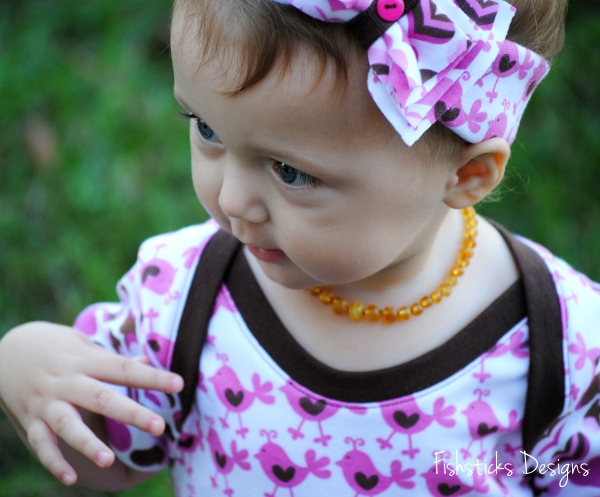
This week’s theme at Project Run & Play is “Love is in the Air”, and I was excited to sew something for my granddaughter, Katie, again this week! I’ve had this Chickadee interlock and the coordinating Hearts hoarded in my stash for years, and I’m so glad that I finally dug them out and used them. They’re perfect for Valentine’s Day, aren’t they?
I used the laptee from my Wee Tot Collection as the base for this little dress. My time was really limited this week because of some other exciting projects that I have in the works. (Be sure to check back here on Friday for a new tutorial and an opportunity to use your sewing talents to give to children in need!) With only one afternoon to sew, I knew I needed to grab a pattern that I not only know really well, but also one that goes together really fast. I think it’s so important to have a handful of patterns that fall into that category. For me, all of those patterns are sewn with knit fabrics. (I can sew a Charlie Tee from cutting to finish in less than an hour every time.)

My modifications give this dress some great character, and they actually saved me even more time! The only time this dress touched the sewing machine was when I topstitched the neckline. Everything else was done on the serger. I trimmed a bit off of the sleeve and added a band to finish it off. To give the body of the dress a little poofiness, I cut it into an A-line and finished the bottom off with a band several inches shorter than the width of the bottom edge.
I think the bow might be the one thing that makes this whole outfit, and it’s the first bow that I’ve ever made! It’s just a couple of simple loops of fabric with several pieces of fabric pulled through the smaller loop to make a “bow”. The button was a last minute addition because I didn’t like that the bow part kept sliding and exposing the seam. All of the edges were left raw and just tucked under.

Katie seems to really like the chickadees.

See! There’s a smile!

Project Run & Play: For the Boys
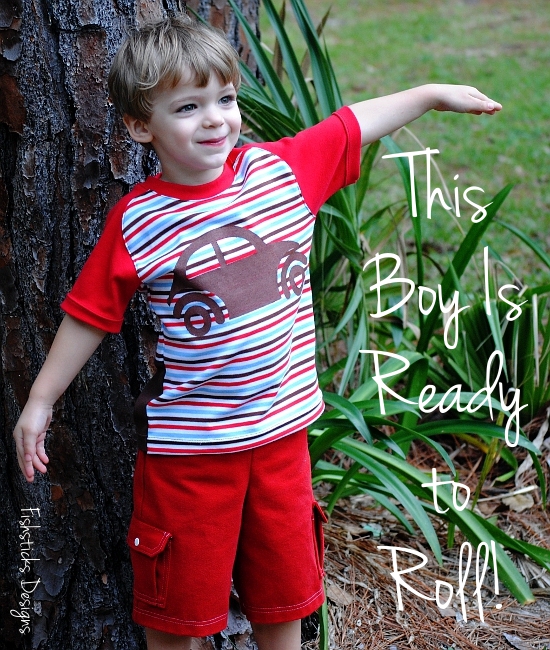
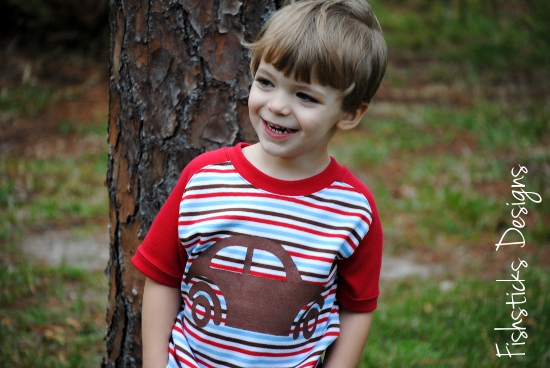
It’s Boy Week at PR&P! I sew for my boys all the time, but I still enjoyed coming up with an idea that is all about my boys! One of the loves that all of my boys, from oldest to youngest, share is the hunt for Punch Buggies. My 19-year-old son, Sean, is the one who taught the little ones to spot them. They aren’t allowed to actually punch anyone when they see one, of course, but my six-year-old Jamie is a champ at spying VW Beetles from blocks away! (Sean’s halfway across the country from us in college now, and the little ones occasionally ask me to text him pictures of Punch Buggies just so that he knows they’re still looking.)
Since I sewed for Jamie last week, Charlie got this week’s outfit. (I’ll have to make a Punch Buggy shirt for Jamie later, though, or there might be a revolt.) I drafted up a Beetle design and used the freezer-paper stenciling technique to paint it on a Patrick Curved Raglan.

I used some color-blocking again this week. This time it was a necessity since I didn’t discover that I was short on fabric until I had already planned the whole outfit. I got creative with it, though, and added a unexpected second car on the back. If I hadn’t told you, would you have even guessed that I didn’t plan it this way all along?

The red shorts are really my favorite part of this outfit. After seeing the red pants that Suzanne from Winter Wonderings, Wanderings, & Whatnot made for her little guy’s Collegiate Cool Look last week, I just had to make red pants for Charlie. I opted for shorts since we live in Florida, and shorts get far more use here than long pants. I wanted to make them with red denim, but red denim isn’t easy to come by, especially locally. A quick trip to one of our local thrift shops, though, turned up the perfect pair of recyclable red jeans!

I made some minor modifications to my Inside or Out Pocket Pants pattern including reusing the main structure of the front pockets from the original jeans. I did have to reconstruct one of them to remove the watch pocket, and I ripped out and redid the topstitching so that it would match the remainder of the shorts. Speaking of the topstitching, I considered using some brown denim accents on these, but in the end, I decided against it so that the shorts could be worn with multiple tops. Instead, I let the white topstitching be the accent.

The back pockets are those from the IOOP pattern with twin needle topstitching.

I added a gusseted cargo pocket and used the pattern’s pocket flap with the addition of a metal snap.

Charlie loves this outfit and couldn’t wait to put it on. Is that not the sweetest smile? I can’t help but notice, though, that those twin curls on either side of his forehead make him look quite mischievous.
Charlie put the whole outfit to the “boy test” by running, jumping, rolling, falling, etc. in the backyard, and I think it passed with flying colors!

While this week is all about the boys, there were quite a few little boy outfits sewn up the first two weeks, too! I love that! Our little guys are so often neglected when it comes to handmade clothing. It makes me smile to see so many moms making the effort to sew for them, too!
Project Run & Play: Polka Dots & Stripes

This week’s Project Run & Play Challenge is Polka Dots and Stripes. (Have you sewn anything? You should give it a try!) Sunday was my Jamie’s sixth birthday, and he wanted to go bowling. I knew that I wanted to sew a shirt for him, since his birthday is this week, but the idea for a bowling shirt didn’t actually come to me until Sunday morning! Am I the only one who occasionally overlooks the totally obvious?

I printed a new copy of the pdf version of my Everyday Camp Shirt pattern and started drawing lines and chopping it apart where I knew I wanted the color-blocking on the front and the back. Color-blocking is really simple to add to any pattern. Just draw lines where you want your new fabric to begin and end, then add lines on either side for seam allowance. I use 1/2″ seam allowance, and then I just fold the pattern to get the right portion of it when I’m tracing on to the fabric. You could also print two copies of the pattern, though, and actually cut out the separate pieces of the pattern before tracing. Does that make sense? (Maybe I need to do a tutorial with pictures. It’s such a great way to take a pattern that you already love and give it a new look.)

I sort of wish that I’d made the stripe on the sides of the front a little wider. It’s easy to see in real life when Jamie moves around, but it was really hard to get in pictures. This picture does show it well, though!
In addition to the color-blocking on the front, I added a yoke on the back and simply turned the fabric on the bias. When you’re working with stripes, that’s an easy way to add some interest without using a second fabric. I also cut the pocket on the bias and added a strip of the polka dots as trim on the top.

I promise he does smile. He was so excited to go bowling! He just isn’t interested in smiling for the camera lately. Too much pattern cover photography, maybe? Poor kid.

I did the raw-edge applique on the back of the shirt using the method that I explained in my Christmas Tee in a Twinkling Tutorial in November. In case you’d like to make your own Everyday-Camp-Shirt-turned-Bowling-Shirt, here’s a pdf of the applique pattern for you: Bowling Applique. Be sure to link to me if you use it. I’d love to see what you create!


