Real Food Recipes
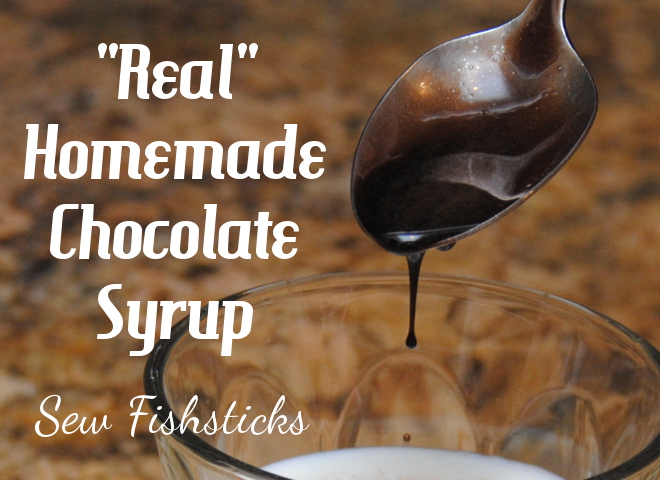
The Easiest Homemade {Real} Chocolate Syrup Ever
 It’s a little bit hard to actually call this a recipe since it’s really so simple, but when you’re a mom trying to find ways to incorporate real food in fun ways into a child’s diet, and you find a simple solution, you just have to share it!
My kids love chocolate milk. Most kids do, right? Those store-bought chocolate milks, though, are full of ingredients that we don’t feed our children, and the chocolate syrups are just as bad. There are quite a few coffee recipes out there that use cocoa (or cacao) and pure maple syrup, so I started experimenting one day, and this is the result — an amazingly simple chocolate syrup recipe with all real ingredients that mixes completely into milk (cow, almond, soy, coconut) and coffee, and it tops desserts beautifully, too!
Just two ingredients: dark cocoa or cacao powder and real maple syrup.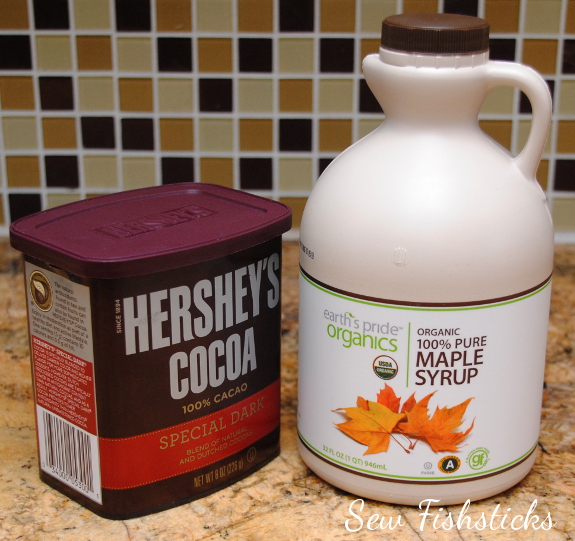 Measure 3/4 cup of maple syrup in a sauce pan, add 1 tablespoon of cocoa powder.
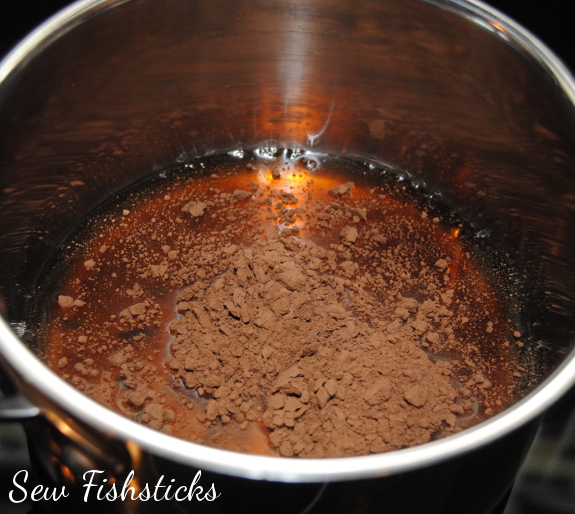 Heat it over medium heat while whisking until it’s just warm enough for all the powder to dissolve. Set it aside, and let it cool to room temperature.
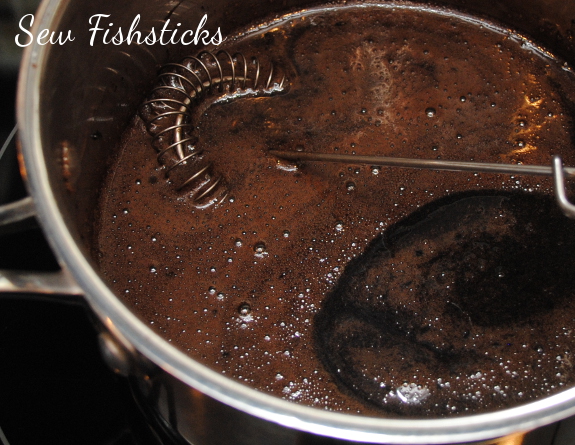 Pour it into a syrup jar or a squeeze bottle and keep it in the refrigerator door. (Our syrup jar came from Target.)
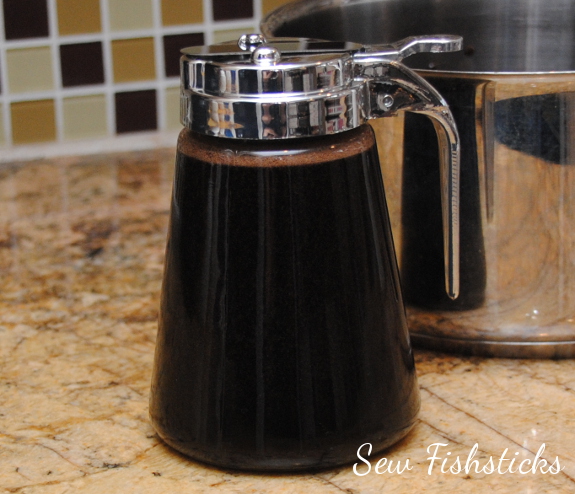 When you’re ready for chocolate milk, just pour the amount of syrup that you like into your glass of milk and mix it in.
 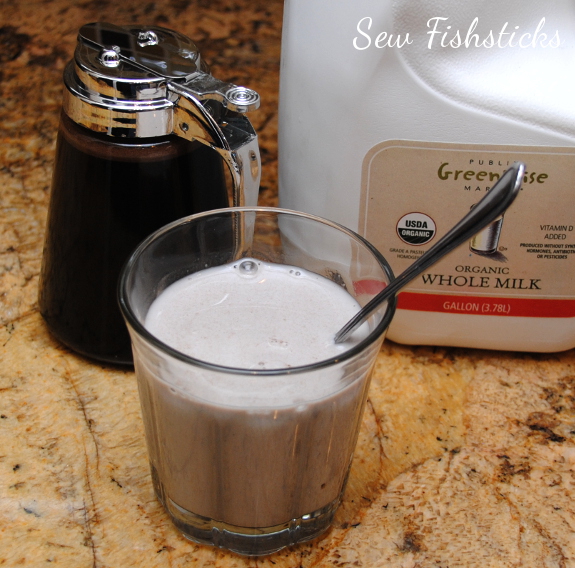 Or, if you have a craving for a coffee house mocha, brew up a cup of coffee and stir in some homemade chocolate syrup with your half and half. Yum!
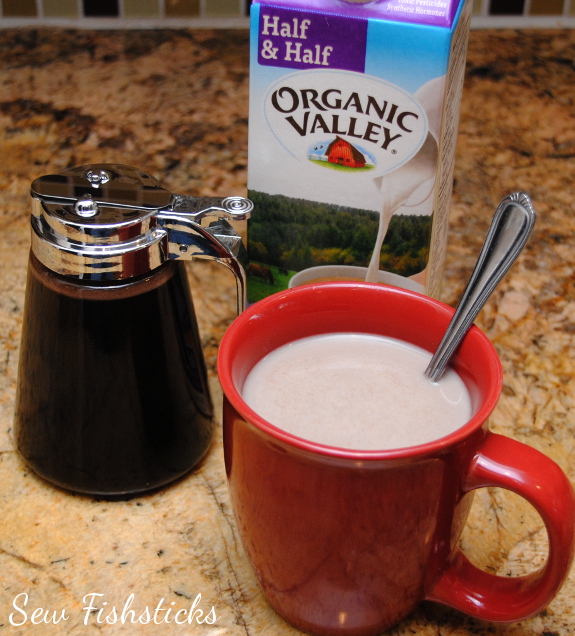 You can do all sorts of things with this syrup: serve it with chocolate chip pancakes, pour it on chocolate sundaes, drizzle it over chocolate cake. That’s a lot of chocolate, isn’t it? Can you ever really have too much?
Last-Minute Game Day Hot Dip {Gluten Free & Low Carb}
 So, there’s a big game this weekend in the U. S., and whether or not you’re a big football fan, there’s a good chance you’ll be gathering together with friends to watch it . . . or perhaps to just watch the commercials. Either way, there will be food involved. I have a tendency to fail to plan ahead when it comes to bringing along snacks to share, so I love having a few simple, but really good recipes in my stash. This one is incredibly yummy, super easy, and gluten-free/low carb to boot!
Here’s what you need to get started: 1-8 ounce package of cream cheese, softened
1 cup of salsa
1 cup of shredded cheddar cheese
Preheat your oven to 350 degrees. Toss the cream cheese and the salsa into a mixing bowl. Mix until they’re well combined
 Dump in 1/2 cup of cheese and fold it in.
 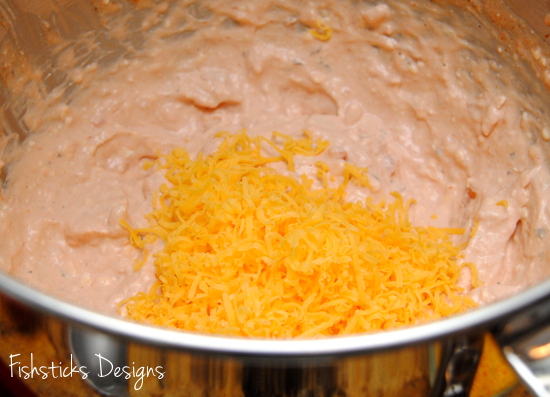 Pour the mixture into a 9″ pie plate or an 8″ square baking dish.
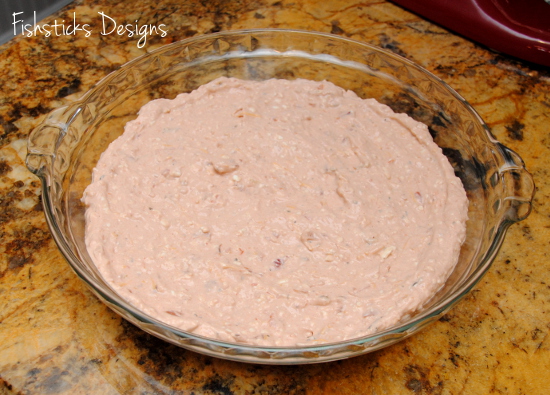 Spread the remaining 1/2 cup of cheese over the top.
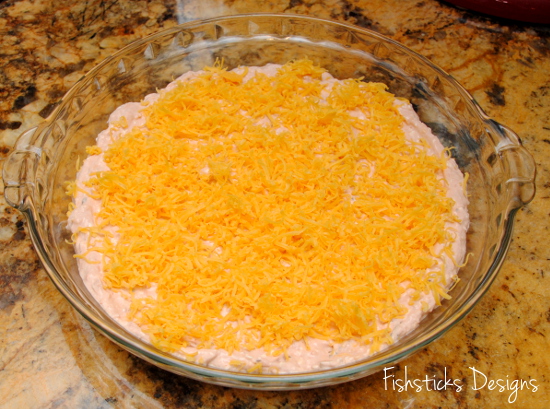 Bake for 18 to 20 minutes or until the cheese is melted and the dip heated through. Garnish it with some chopped scallions, if desired.
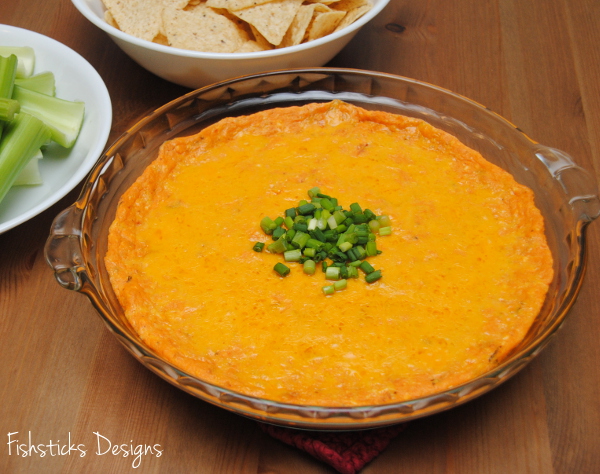 Serve it with tortilla chips or with celery sticks for your low carb friends.
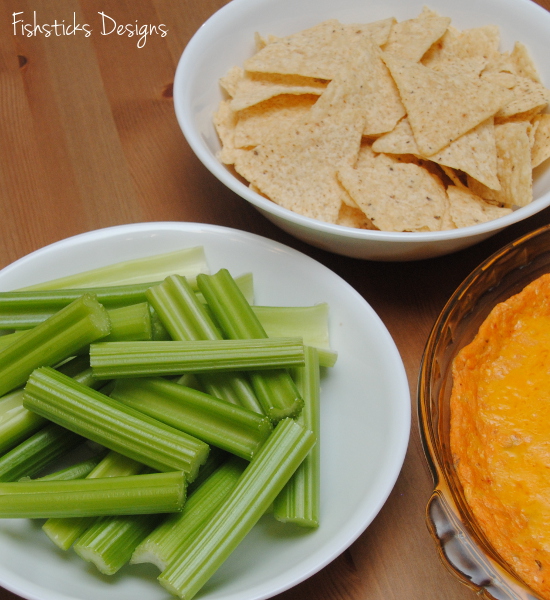 Quick and easy, but a little more impressive than stopping at the grocery store on the way, right?
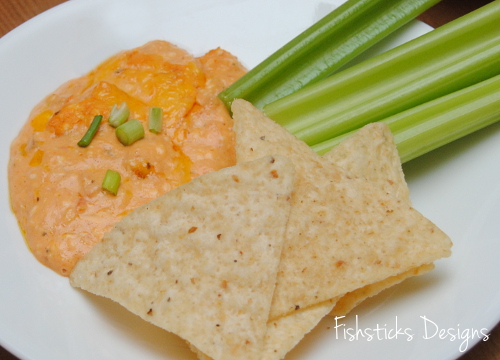
Real Food Gluten-free Dark Chocolate Brownies &
the IJ Pattern Winner
 I have been experimenting with creating a yummy, gluten-free brownie with real-food ingredients since I went gluten-free in January, and I think I finally found the one! It’s not too gooey, not too cakey, but right in between. It’s filled with dark chocolate and has just a hint of coconut flavor from the coconut oil. YUMMY!
These do have a small amount of white sugar from the chocolate chips. I started my experimentation with this recipe, and hoped to substitute something else. Nothing else worked quite the same way, though. I do use Enjoy Life chocolate chips since they’re free of soy and other allergens, and they taste great!
I’ve been working to take xanthan gum out of my gluten-free baking because it’s just not an ingredient that I’m comfortable using. It doesn’t fit the real-food guidelines well at all. I’ve found that whole husk psyllium works well in everything except for yeast bread, and it’s good for you! It’s also fairly easy to find in any health food store. (Sprouts carries the Organic India brand that I use.) The Ingredient List
¾ cup brown rice flour
½ cup almond flour
1 tablespoon whole husk psyllium
1 teaspoon baking powder
½ teaspoon salt
3 tablespoons dark cocoa or cacao powder
½ cup salted butter (if using unsalted, increase salt by ¼ tsp.)
¾ cup + ¼ cup chocolate chips
½ cup coconut oil
2 teaspoons real vanilla extract (gluten-free)
1 cup maple syrup
4 eggs
Preheat oven to 350 degrees. Measure dry ingredients into bowl of stand mixer or a large mixing bowl. Mix or whisk by hand. Melt butter and ¾ cup chocolate chips over low heat in saucepan, stirring to keep from scorching.
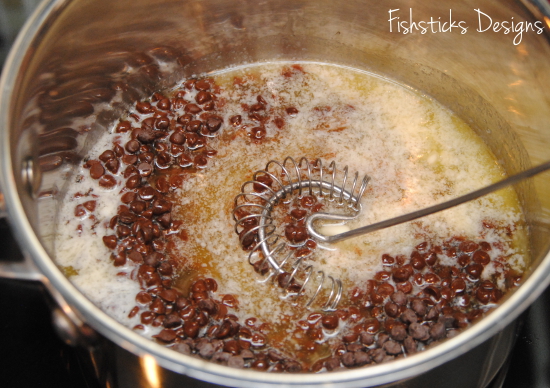 Once both are melted and smooth, remove from heat.
 Whisk in coconut oil and vanilla extract.
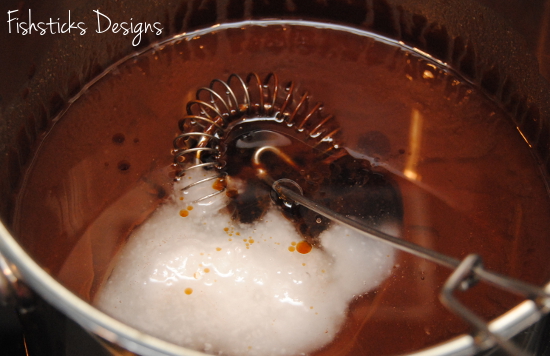 Pour the chocolate mixture into mixing bowl and mix well. Add maple syrup, then eggs, one at a time. Mix well with each addition or allow your stand mixer to do it for you.
 Grease a 9X13 baking dish. Pour batter into dish and spread evenly.
 Sprinkle the top with the remaining chocolate chips.
 Bake for 32-34 minutes at 350 degrees. Brownies are done when a knife inserted in the center comes out clean. Be careful not to overcook them!
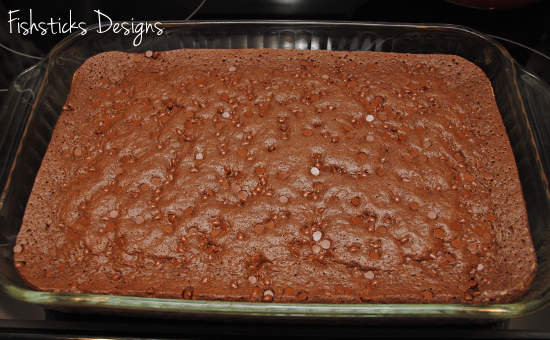 If you can stand to wait, allow them cool before cutting them so they’ll hold together nicely. If you’re like us and need them straight out of the oven, remove them very carefully so that they don’t fall apart . . . and don’t burn your tongue trying to eat them too fast! Enjoy!
 Last Saturday, I shared my version of the Indygo Junction Casserole Carry-All and offered a second IJ Casserole Carry-All pattern to one of you! I asked you to share your favorite thing to bring to potlucks, and every single response made me more and more hungry. Some of you even shared whole recipes! Thank you! I’m going to have to give a few of them a try. There were 80 total individual comments, and Random.org chose #72 as the winner. Huge congratulations to Fran who said that she likes to bring Chicken and Broccoli Casserole to potluck dinners! I’ll get in touch with you right away so I can ship this pattern and the wooden spoon handles to you!
Katie’s 2nd Birthday Celebration
 Our sweet granddaughter, Katie, turned 2 on the 4th of July, and we got to host her second birthday party right here on Saturday! We kept it small and simple, but fun and pretty. (Two-year-olds don’t really remember their parties, but they will love seeing the pictures someday!)
 I took on the responsibility of baking the cupcakes and sewing Katie’s party dress, and true to my wait-to-the-last-minute-to-do-everything nature, I didn’t start on either until after dinner on Friday night. Only a few minutes into mixing together the cupcake batter, I reached up into the cabinet above my work space and knocked out a glass jar. In the instant following, I chose to save my darling six-year-old who was standing in the chair next to me, and I sacrificed my favorite vintage yellow Pyrex mixing bowl. (Yes, one of the mixing bowls that I was so worried about in our move: Settling In.)
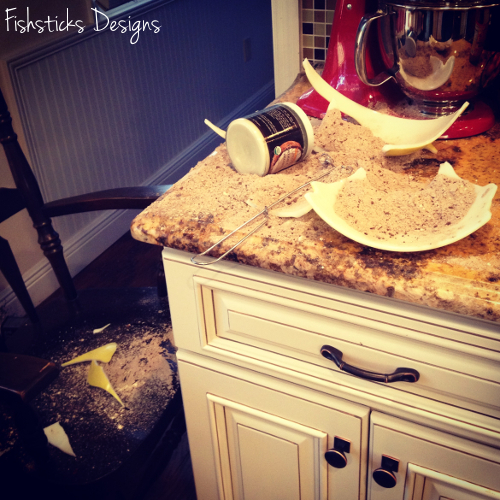 By the time the mess was cleaned up (Pyrex shards fly a long, long way!), and I was putting a new batch of cupcake batter into the oven, it was 8:00! And, I hadn’t even decided what exactly I was sewing! Thankfully, once I had a picture of what I wanted, it all came together quickly and beautifully.
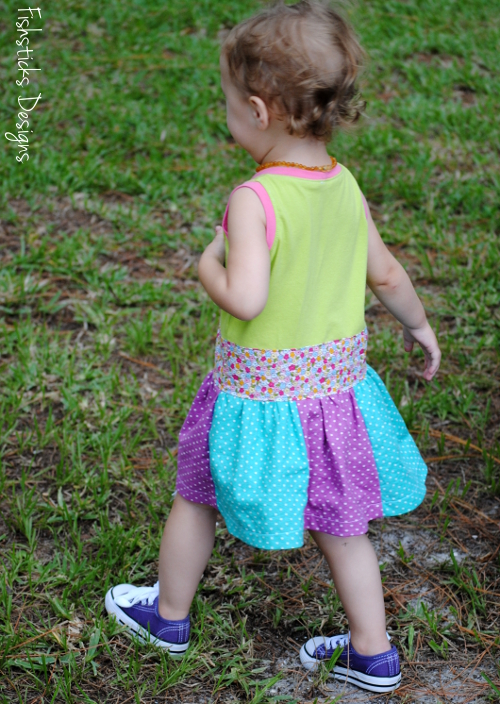 Morgan had asked for a polka-dotted tank-style dress in the colors that she’d picked out for the party decorations (colors which were chosen from Katie’s favorite cartoon, Dora the Explorer). A quick trip to Joanns on Friday morning turned up the three fabrics in the skirt and the trim pieces, and the buttons which look like they were made to go with the flower fabric! The fabrics in the knit bodice are those Riley Blake jerseys that I’m loving working with. I’m calling it the retro-modern Dora-ish party dress.
 As for the food, we served yummy, but not too unhealthy treats. I used this recipe for the cupcakes: Chocolate Gluten-Free Cupcakes, substituting coconut oil for the canola oil and whole husk psyllium for the xanthan gum. For the frosting, I made a standard butter-cream, and added natural pink food coloring using boiled raspberries! The raspberry flavor gave the frosting an amazing sweet-tart taste. Yum!
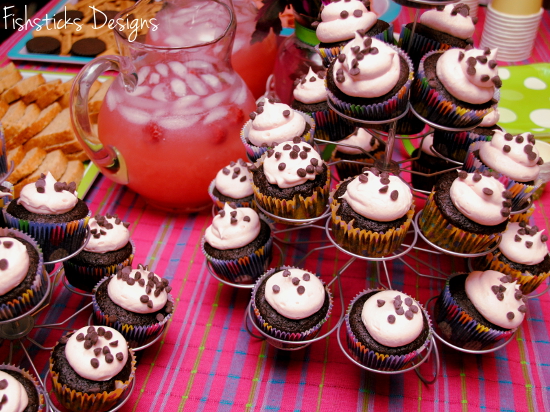 We sprinkled a few mini-chocolate chips on the top of the frosting just for fun, and then left the almost-full bag of chocolate chips too close to a certain birthday girl.
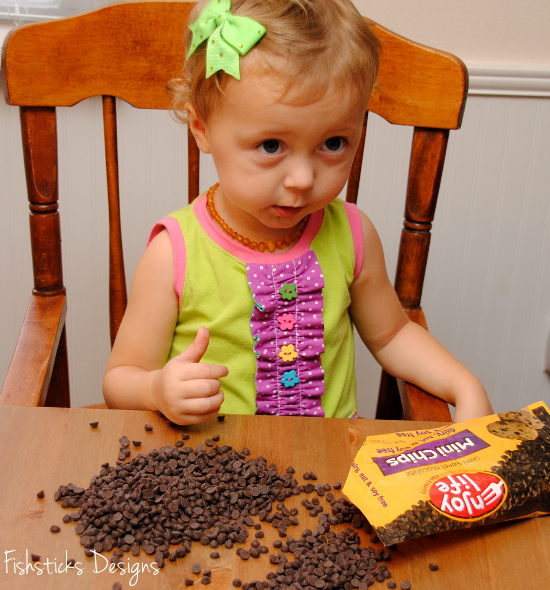 Other party fare included Unreal Unjunked candy-coated chocolates served in cute little snack cups, sliced strawberries, chocolate cookies, pink pomegranate chips and lemonade.
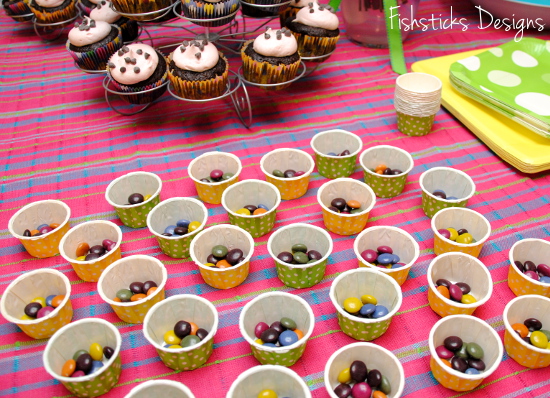 I also baked up a couple of loaves of Honey & Oat Gluten Free Bread which we sliced and served with honey butter (softened butter whipped with raw honey) and blackberry cream cheese (softened cream cheese whipped with no-sugar-added seedless blackberry jam).
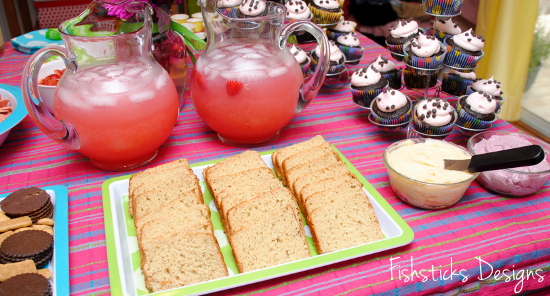 The kids all had a great time playing in the backyard on the swing and playground and blowing bubbles. Katie’s big brother, Austin, kept himself busy wiggling a tooth that wasn’t quite ready to come all the way out!
 Uncle Charlie got caught trying to open the presents and was not happy at all that I was taking his picture! (You can tell from this picture that the inside part of the party ended up taking place in my sewing studio. It was just the most convenient place since the sliding glass door to the backyard is right there.)
 Katie loved having everyone sing, “Happy Birthday” to her . . .
 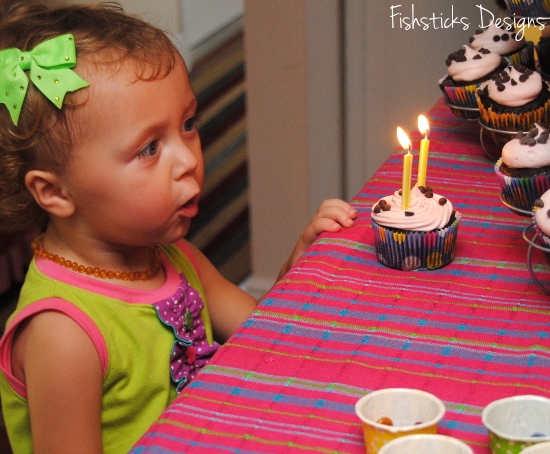 . . . but she couldn’t quite figure out how to blow out the candles by herself! It was okay, though, because Uncle Jamie jumped right in to help!
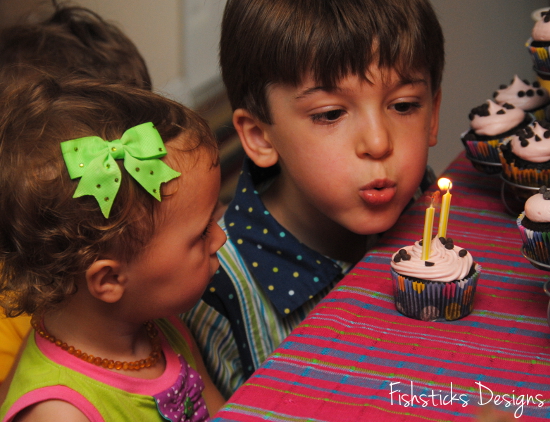
Dark Chocolate Peanut Butter Shell with Chocolate Banana Ice Cream
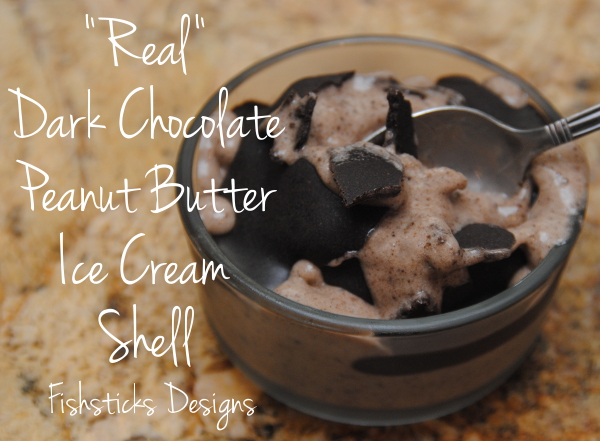 I have fond childhood memories of “Magic Shell” ice cream topping. I loved pouring it on thick and crunching down into it with a spoon . . . mmmmm. As sweet as those memories are, though, I prefer to feed my family healthier options now. I’ve been making the Healthy Chocolate Peanut Butter Fudge from Creating Naturally for quite some time. We love it! I skip the cupcake liners and just spread the liquid onto a parchment-paper-lined cookie sheet, freeze it and break it into pieces. It’s amazing straight from the freezer on a hot summer day . . . or really even on a cold winter night . . . it’s chocolate and peanut butter, and it’s good for you! Could you possibly ask for more?
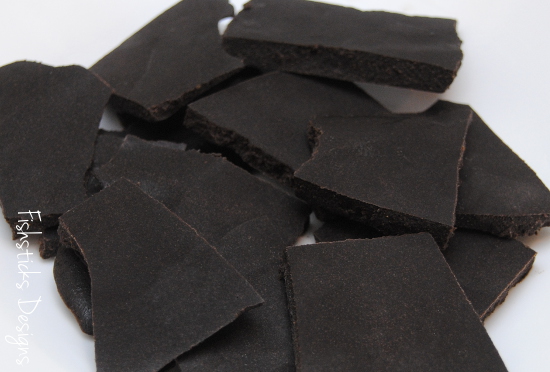 As I was sliding the cookie sheet into the freezer one day, I thought, “You know, this stuff is a whole lot like Magic Shell. I wonder if it would work the same way?” With a few little adjustments to make it a pourable sauce, it worked absolutely perfectly! And, with chocolate “ice cream” made from nothing but frozen bananas and a little leftover chocolate sauce, this is a treat that you’ll feel great about serving to your little ones again and again. I promise they won’t complain!
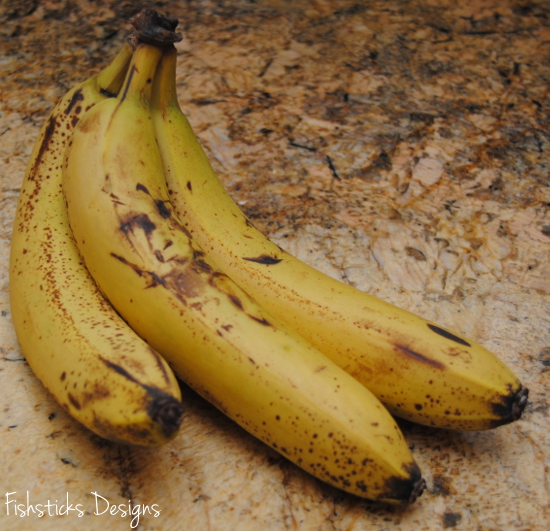 Start a few hours early by peeling and slicing ripe bananas and freezing them. I’ve found they process easily if they’re sliced about 1/2″ thick. One to 1 1/2 bananas makes a good serving size.
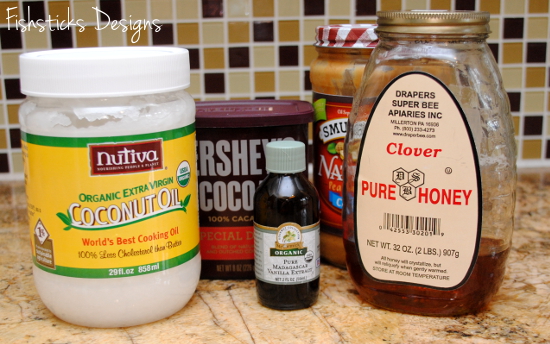
The “Shell” Ingredients
1/3 cup coconut oil, warm enough to be liquid (It only needs to be about 76 degrees to melt, so don’t heat it too much.)
1/3 cup dark cocoa or cacao powder
1/3 cup natural smooth peanut butter
4 tablespoons raw honey or real maple syrup
1/2 teaspoon vanilla
plus frozen sliced bananas for the “ice cream”
(If your maple syrup is stored in the refrigerator, warm it slightly to room temperature in a saucepan with the coconut oil. Otherwise, it will solidify your coconut oil too soon. I have used peanut butter straight from the refrigerator without a problem, however.)
The instructions for this are really, really simple. Just grab your food processor, dump in all of the ingredients (except for the frozen bananas, of course), and process it until it’s smooth.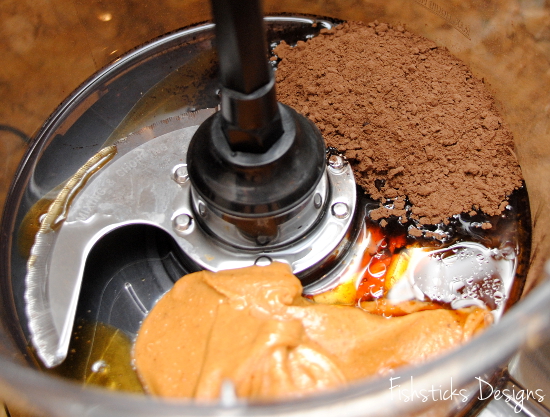 Pour the sauce into a container, but don’t wash the food processor bowl.
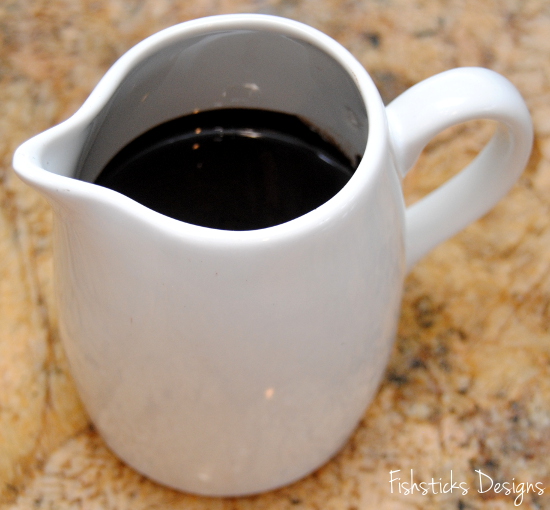 Grab your frozen bananas from the freezer and dump them into the food processor.
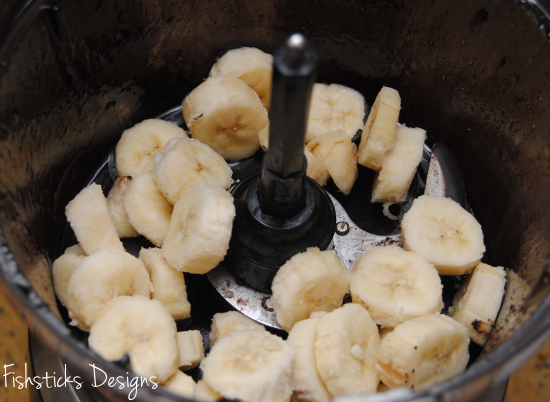 Process until you’ve reached the consistency of soft serve ice cream and dish it out. (It will turn to pea size crumbles first. Just keep processing!)
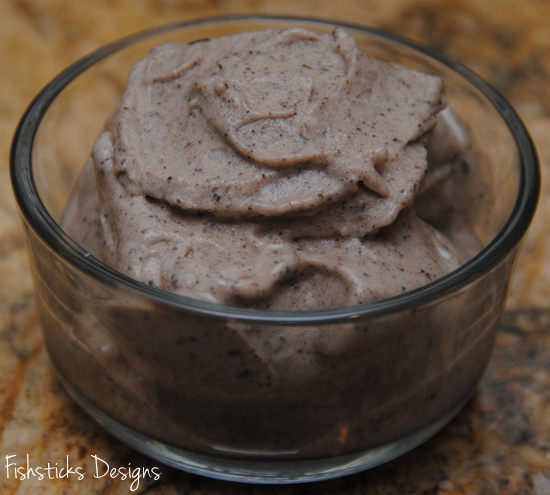 Pour on the sauce.
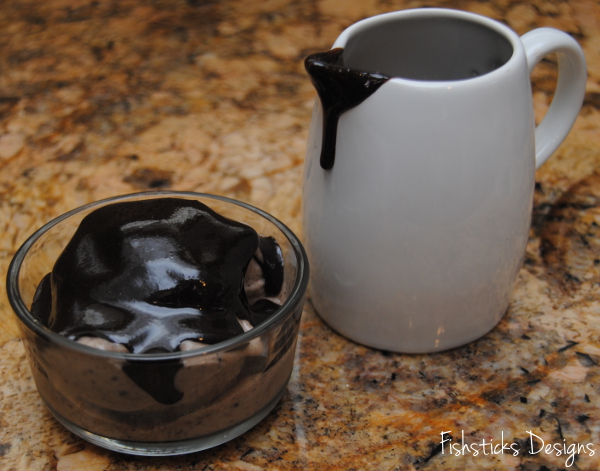 Let it harden.
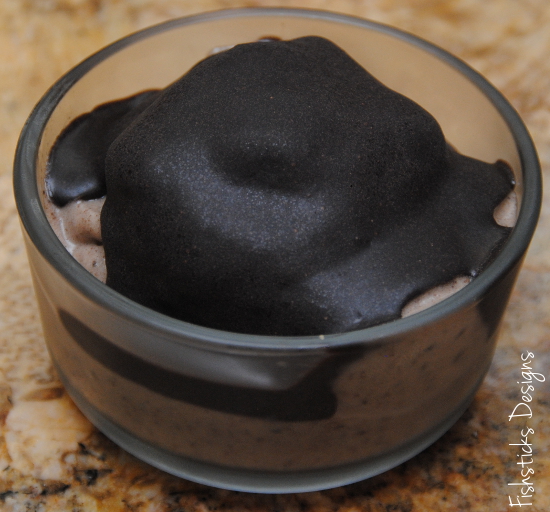 And enjoy that delicious and healthy snack!
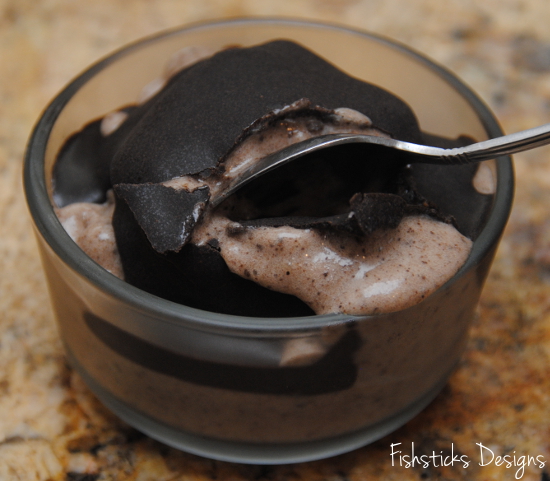 Crack!
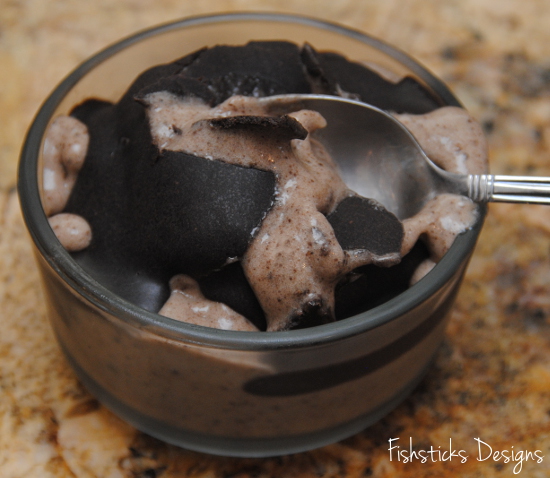 Yum!
Yum!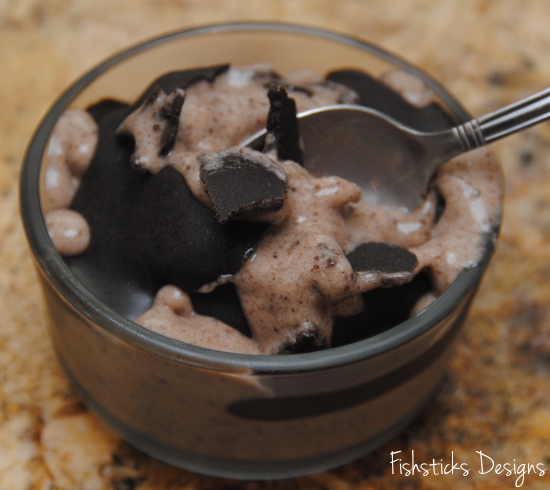
Bento Boxes for Real Food on the Road
 I have plans for a series on family travel to start soon, but I promised that I’d share this sweet little bento box this week! Isn’t it perfect for a family full of Lego-loving little boys?! I found it at Modes4U! It came in the same package as the fabric that I used for my little guys’ travel bags.

When you’re on the road or even just spending the day out at the park, it’s hard to take real foods with you. I had considered bento boxes before, but I hadn’t actually tried one until this trip, and now I think I need one for each member of the family. In case you’ve never heard of bento before, Lunch in a Box defines “bento” as a compact, balanced, visually appealing meal packed in a box. Historically, it’s a Japanese box lunch. And, a quick Pinterest search for “bento lunch” will make you gasp at the artistic talent that many people put into bento lunches! My bento lunch is very simple in comparison! The very top layer of this box has a freezer pack to keep the food in the top storage compartment cold. On this particular day, I packed a boiled egg, cucumber slices, grape tomatoes and cheese — a great real food lunch, and it’s gluten-free to boot!
 The divider between the top and bottom storage compartments holds a little set of chopsticks, in case you need utensils.
 The bottom storage compartment is just as roomy as the first. I really like that this bento box is BPA free and painted with food-safe lacquer. It’s really easy to keep clean and ready to go, and I trust that it’s safe storage for our foods. Because it was warm out the day I took these pictures, I didn’t have food packed in the bottom. Instead, I threw in a ziploc bag of ice and left out the middle divider to be sure that the eggs stayed cold! That was a great bonus to using a double-layer bento box!
 On other days, we packed the bottom layer with pretzels and crackers.
 We packed a lot of picnic lunches while we were traveling this time, and having this handy little box made at least one of our lunches a lot of fun. We’ll have to make sure that we have bento boxes for everyone next time! I love anything that keeps our kids excited about eating real food, especially when the vendors surrounding us are selling stuff that looks and smells good, but isn’t really at all what we want to put in our bodies!

My Blue Ribbon Gluten-Free Granola Cookies
 These cookies are addicting . . . so use caution! I spent some time experimenting with granola bar recipes and breakfast cookie recipes a couple of months ago in an attempt to come up with a recipe for a healthy-ish snack that I could take along to Allen’s track meets. It had to be something that uses real ingredients, it had to have chocolate and it needed to be gluten-free. What I ended up with is a recipe that is shaped like a cookie, but has the texture and taste of a granola bar. (My kids actually call these Granola Circles.) Everyone who has tried these has enjoyed them so much, I couldn’t resist baking up a batch and entering it into our county fair. And, it won a first place ribbon!
Ready to get started?
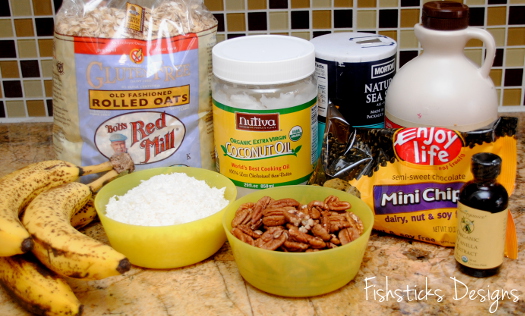
The Ingredients:
3 cups gluten-free rolled oats (If you don’t need these to be gluten-free, traditional rolled oats work perfectly, too!)
1 1/2 cups unsweetened coconut
1 tsp sea salt
1 1/2 cups of coarsely chopped pecans
3 large or 4 small ripe bananas (The riper your bananas the more banana flavor your finished cookies will have.)
1/2 cup coconut oil, warm enough to be liquid (It only needs to be about 76 degrees to melt, so don’t heat it too much.)
1/4 cup maple syrup
2 tsp vanilla extract
1 1/2 cups mini chocolate chips
Preheat oven to 350 degrees. Coarsely chop your pecans.
 In a large bowl, mix oats, coconut, sea salt and chopped pecans.

Puree your bananas. ( I use the blender. If you mash them by hand, be sure that you don’t have any chunks left.) Add pureed bananas and coconut oil to the dry ingredients. If your maple syrup is coming straight from the refrigerator, mix these ingredients in before adding the maple syrup and the vanilla. If your maple syrup is room temperature, you can mix all the liquid ingredients in at the same time. (If you pour the cold maple syrup onto the melted coconut oil before mixing it in, it will harden, and you won’t be able to mix it in. I speak from experience. )

Pour in the mini chocolate chips and mix it all well. Feel free to taste the “batter” and see what you think, but don’t eat it all!

Grab a cookie cutter and place it on your baking stone or on a baking sheet covered with parchment paper. I use a 2 1/2″ circle cookie cutter, but any cookie cutter in a similar size and shape will work. (Maybe hearts for Valentines Day or Christmas trees in December? How fun would that be?) Scoop out about 1/4 cup of the cookie batter and press it into the cookie cutter really well. It should end up being about 1/2″ thick.

Carefully remove the cookie cutter, leaving a perfect little circle (or heart or Christmas tree) behind.

Repeat until you’ve filled up your baking sheet.

Bake for 24 to 27 minutes or until they’re golden brown. Mine are always perfect right at 26 minutes.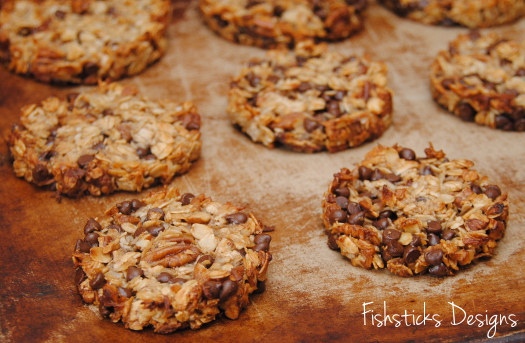
Slide the cookies off onto a wire rack to cool. You can eat them warm, of course, but I think they’re best when they’ve cooled to room temperature! 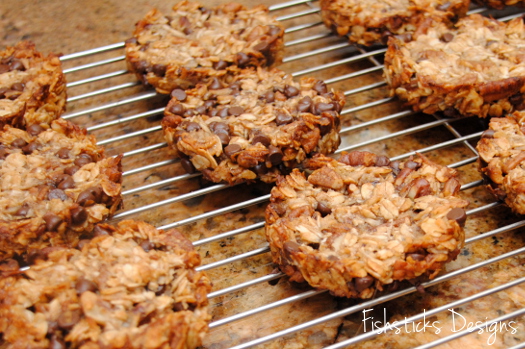
I would love to hear your feedback if you give this recipe a try! I’m thinking that it would be just as yummy if you substituted dried fruit for the chocolate chips and any other chopped nut for the pecans. I’ll be making a big batch for our family trip next month!
Project Run & Play: Signature Style with Superhero Appeal

The final Project Run & Play theme is Your Signature Style. As the weeks have come and gone, I’ve pondered what my “signature style” is and wondered what I could sew that would show it. The whole series flew by, though, and as usual, it was the last minute. There was no time left to think, only time to sew! Yesterday was Charlie’s third birthday, and since he was the recipient of this week’s sewing, I let him make the major design decisions.
Is that a superhero hiding behind that palm tree? Could it possibly be Captain America?!
  Charlie loves superheroes, especially The Avengers, or “The Avengers Assemble” as he calls them. His current favorite happens to be Cap’n ‘Merica!
 As I mentioned, time was short, so I grabbed two patterns that I know are quick and trustworthy — for the top, my Charlie Tee & Hoodie and for the bottom, my soon-to-be-re-released Mud Puddle Splashers. I wondered aloud as I was tracing Captain America’s shirt design onto my Charlie Tee pattern, how I was going to spin this as my signature style. Suddenly, I realized, though, that this is my signature style! In creating this outfit, I followed my normal routine: grab a pattern that you know and love, evaluate the needs and desires of the wearer, choose a few little extras, use what you have available (fabric, time, equipment) and create something practical and fun.
 The shirt was pieced together using the colorblocking method that I mentioned in Week 2. It just took a few more pieces than usual. I cut the red and white stripes at the bottom longer than I needed them to be, pieced them together, then cut the curve at the top before cutting the matching top piece. I used the ringer sleeves and the hood from the Charlie pattern, partially to add some character to the top, but also because I broke my walking foot last week. (I managed the hems on the shirt and the shorts without a walking foot, but there was no way I was going to try topstitching a neckline without one!)
 It was nearing 10:15 on Monday evening, and I’d promised myself that I’d be in bed by midnight, so the shorts got the Naptime Knit Mud Puddle Splashers treatment. I did add back pockets, but rather than turn and topstitch them, I trimmed off the seam allowance and just folded them wrong sides together. It’s interlock knit, so the edges aren’t going to fray, and that raw-edge look works great for little boys. (Why, yes! Yes, I did make TWO pairs of red shorts for Charlie during this PR&P series! I wondered for about half a second if I should, but red works well for him, so they’ll get plenty of wear.)
 Happy Birthday, Charlie! Oh, those eyes. Of course I’m biased, but aren’t they amazing? (I considered virtually cleaning up the bruise between his eyes and removing the grass from his hair, but this is so very Charlie! He’s not quite ready to save the world, but he works hard at conquering his own backyard.)
 Before I wrap up this post, I have to share one more little thing. I mentioned in yesterday’s post that I had to clean up a cake disaster, and I’m a little bit impressed with how it turned out. You won’t find me posting pictures of cakes here very often. I can sew really well, but cake decorating is not my thing. HOWEVER . . . I think this one might be encouraging to other harried moms like me.
I tried out a new cake recipe yesterday, and it was incredibly yummy: Paleo Chocolate Birthday Cake. The problem arose when I realized that I’d failed to remember to put parchment paper in the pans before pouring the cake batter into them. This is what I found myself faced with:
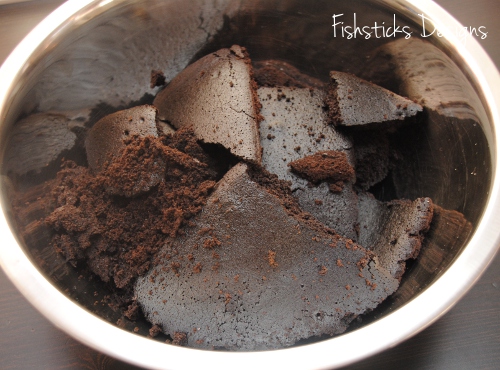 Not pretty, huh? Well, what’s a creative mother of a little boy who loves Captain America to do when she’s faced with a bowl full of broken cake? Why, build a cake mountain, of course! And, let everyone think that’s what she meant to do from the start!

Oh, the blueberries? Charlie not only loves Captain America, but he also loves blueberries. He’s been insisting for weeks that his cake had to be chocolate with chocolate frosting and blueberries. So there you go!
Our Family’s Favorite Pancakes

It’s Pancake Tuesday! I grew up in a United Methodist Church, and Pancake Tuesday was an annual tradition. The men of the church would gather together and make pancakes for everyone for dinner on that night once a year. Now that I’m a grown-up I know that Pancake Tuesday is really Shrove Tuesday or Mardi Gras, the day before Ash Wednesday, the first day of Lent. Historically, Christians chose to give up rich and fatty foods for the period of Lent, and serving the family a pancake feast was a way of getting things like milk, eggs and butter out of the house rather than letting them go to waste.
We love having pancakes for dinner. In fact, we probably have them at least twice a month because no advance preparation is required, and I always have the ingredients on hand. The recipe that we use is an adaptation of this one: Mom’s Buttermilk Pancakes.
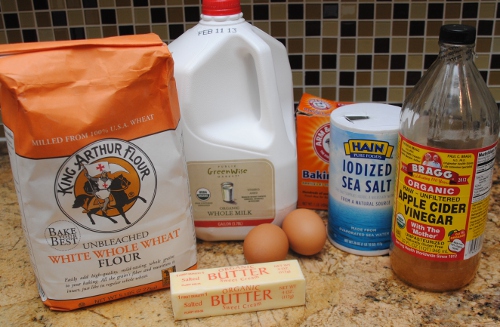 The Ingredients (for about 1 1/2 dozen 3 1/2″ pancakes):
2 cups white whole wheat flour
1 tsp. sea salt
1 tsp. baking soda
1/4 cup of real butter (not margarine)
2 eggs
1 1/2 cups of whole milk
1/2 cup of water
2 tbs. of apple cider vinegar
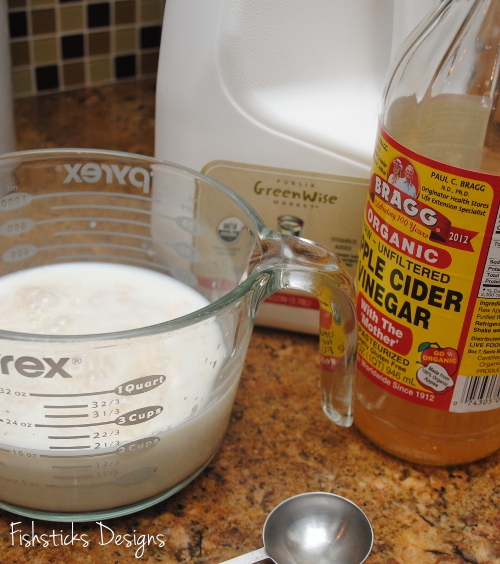
Measure 1 1/2 cups of whole milk into a measuring cup. Add 1/2 cup of water. Mix in 2 tbs. of apple cider vinegar. Set aside. (You can use 2 cups of buttermilk instead, but I never have buttermilk, and I always have milk and AC vinegar on hand.)
 Melt butter.
 Crack eggs into a small bowl and whisk them well.
 In a large mixing bowl, pour flour, salt and baking soda. Mix these together with a fork or a metal whisk and break up any lumps.
 Pour the wet ingredients into the dry and mix.
 Pour the batter into your preheated skillet. (Dripping batter on the side of the stove and the skillet handle is totally optional.) I usually make pancakes about 3 1/2″ to 4″ wide. They cook evenly at that size, and I can fit three in the pan at one time!
 Pancakes are ready to flip when they are bubbly on top and slightly dry on the edges.
 Serve them to your hungry crew with real maple syrup and real butter!
 Enjoy! (I’m off to see what I can do to recover a minor birthday cake disaster. Today happens to not only be Pancake Tuesday, but it’s also my Charlie’s third birthday! Be sure to check back tomorrow to see how much he loves Cap’n ‘Merica.)
“Real” Easy Chocolate Chip Banana Bread12 Days of Handmade Christmas Projects: Day 7
 It’s hard to resist yummy, rich baked goods when the Christmas season rolls around! This chocolate chip banana bread is one of our family favorites, and, except for the little bit of sugar in the chocolate chips, it’s made with all real ingredients. It makes a perfect gift for a friend or neighbor. And, since it doesn’t use eggs, it’s really easy to make it vegan, too!
 The Ingredient List
2 cups white whole wheat flour
1 tsp. baking soda
1 tsp. salt
1/4 cup real butter and 1/4 cup coconut oil (or use 1/2 cup of coconut oil for a vegan bread)
3/4 cup real maple syrup
1 tsp. real vanilla
2-3 very ripe bananas (about 1 1/2 cups total when mashed)
1 cup chocolate chips (We use the Enjoy Life mini-chips, primarily because they’re soy-free, but they’re also dairy-free and nut-free.)
Preheat oven to 350 degrees.  Mash or puree your bananas. (I don’t care for chunks of banana in my banana bread, so I throw mine into the blender or food processor.)
  Melt the butter.
  Remove the pan from the heat and add the coconut oil. If the coconut oil is solid, stir it into the butter until it’s melted.
  Stir in the maple syrup and vanilla.
  In a large mixing bowl, combine flour, salt and baking soda. (I like to stir these together with a fork to break up any lumps. It’s sort of pseudo-sifting.)
  Add the liquid ingredients including your mashed bananas to the flour mixture in your mixing bowl and stir.
  Fold in the chocolate chips
  Pour the batter into a buttered loaf pan (or into 12 muffins cups or 4 mini-loaves.)
  Bake at 350 degrees for 60 to 70 minutes or until a knife inserted into the center comes out with only melted chocolate on it. Let the bread cool completely before you cut it. (Really, let it cool! This is a really moist, dense bread. If you cut it while it’s hot, you’ll end up with a pile of mush, yummy tasting mush, but not pretty mush. If you want to eat it right away, make muffins! They cook faster, too: 23-25 minutes at 350 degrees.)


