Handmade Christmas
Quick Handmade Gift Ideas Using Go Fish Patterns
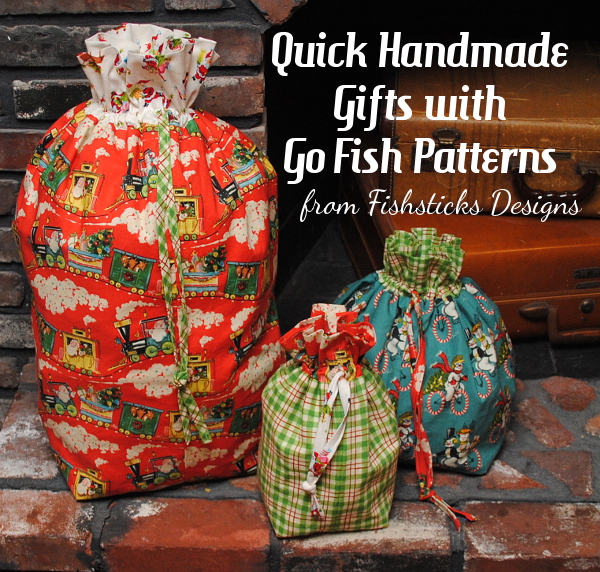 Do you love giving handmade gifts for Christmas? I do, too! But, who wants to spend the whole holiday season in their craft room sewing? Quick-sew projects that result in gifts the recipient will use and enjoy are the best! My Go Fish Patterns are some of the quickest around, and at a cost of only $4.25 each, they’re inexpensive, too! I thought I would take a bit of time to sew up a few Go Fish projects and share some gift ideas with you! Most of these combine a little something store-bought with something handmade. You don’t have to add extras, of course, but sometimes those little things round out a gift quite nicely.
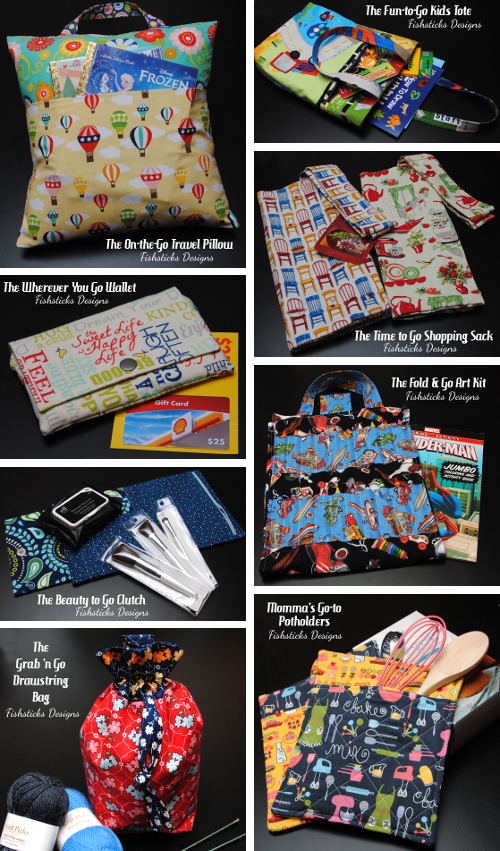 First up, check out those Grab ‘n Go Drawstring Bags in the title image above! Santa Sacks seem to be the “in thing” this year, and you can sew your own in no time at all! Use one to carry gifts to a party, or sew up one for each of your children to leave for Santa to fill on Christmas Eve. Drawstring bags make great reusable gift bags, too, and it’s really simple to change the dimensions to make whatever size you need!
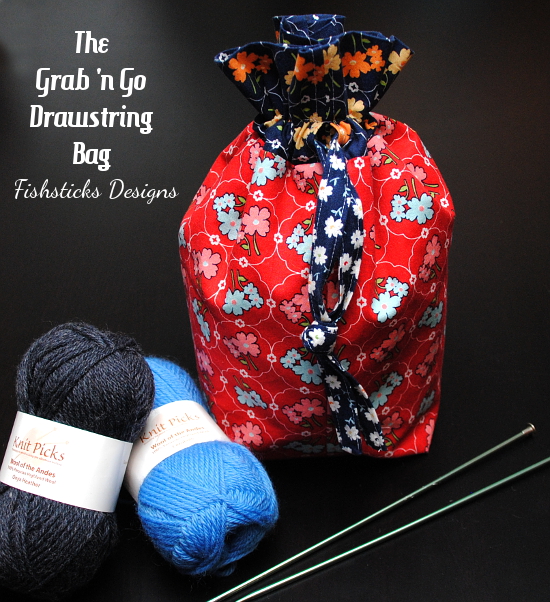 Since we’re already chatting about drawstring bags, they’re a gift that can work for many people on your list! Fill a pretty flowered drawstring bag with yarn and knitting needles for your daughter, or sew one using a transportation print to fill with Hot Wheels cars for your grandson. We have this silly annual Nerf gun battle on Christmas morning at our house, and I’ve learned that little drawstring bags are perfect for keeping track of those little foam darts! Once you start making these bags, you’ll start finding tons of uses for them.
 A teen or college-age niece would be thrilled to receive a handmade Wherever You Go Wallet with a gas card or even cash tucked inside! Choose a fabric that fits her personality, and maybe add a matching key fob using my free tutorial, too.
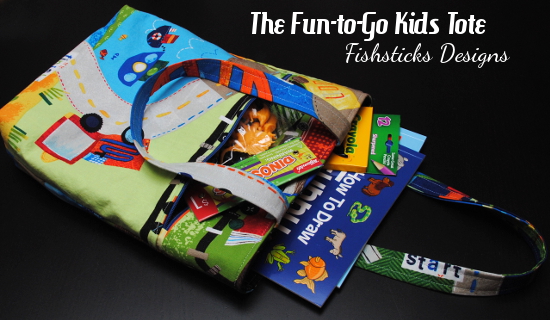 Pack a Fun-to-Go Kids Tote with activity books, little toys and snacks instead of filling a stocking, and you’ll have a gift that can be used all year long.
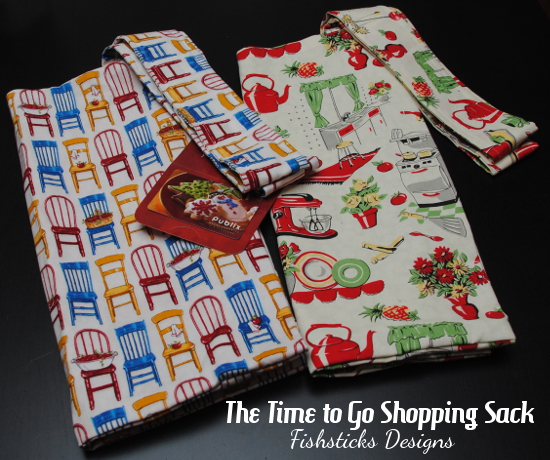 Give a set of Time to Go Shopping Sacks with a grocery store gift card for a practical and environmentally friendly gift. Don’t feel like you have to use traditional fabric on these like I did! One of my customers sewed Spiderman grocery sacks for her mom who loves comic book superheroes. It’s way more fun to shop when your bags make you smile!
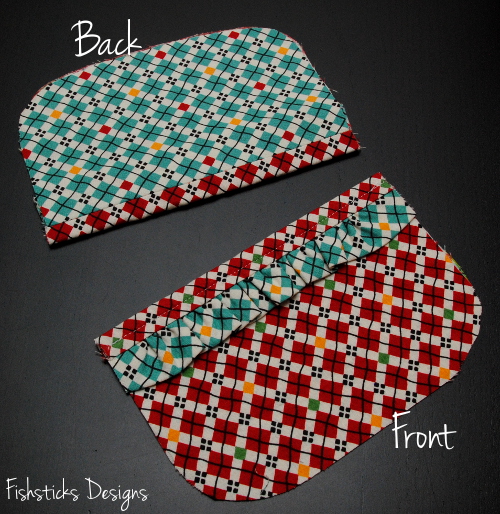
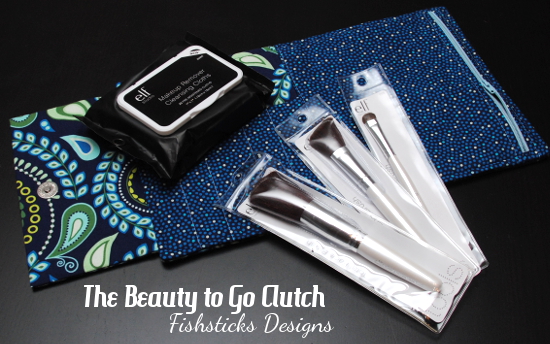 Sew a Beauty to Go Clutch and fill it with new makeup brushes, add your favorite facial wash and perhaps a gift card from your favorite independent beauty consultant or your local cosmetic store. (Support small business owners whenever you can!)
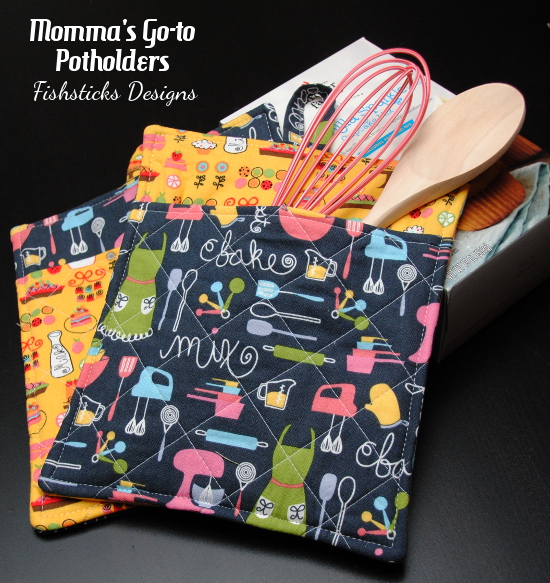 Potholders are a fairly traditional handmade gift, and you can really never have too many. What couple wouldn’t enjoy a gift basket that includes a set of Momma’s Go To Potholders, along with utensils and mixes for their favorite foods? You could even add a Go Bake Something Apron … or a matching set of aprons for husband and wife?
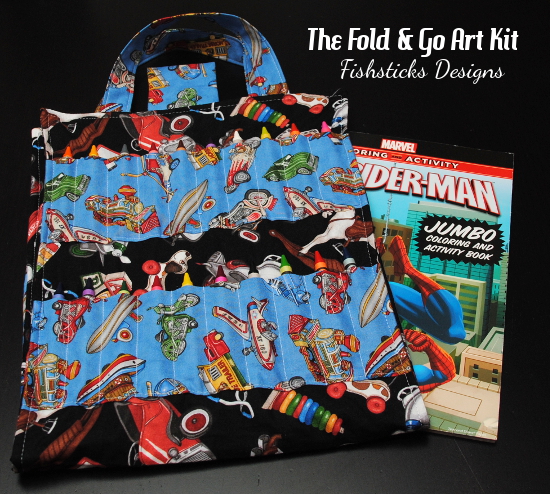 The Fold & Go Art Kit with crayons and new coloring books is a quick and useful gift for preschool through elementary. You could even substitute mini colored pencils or mini washable markers.
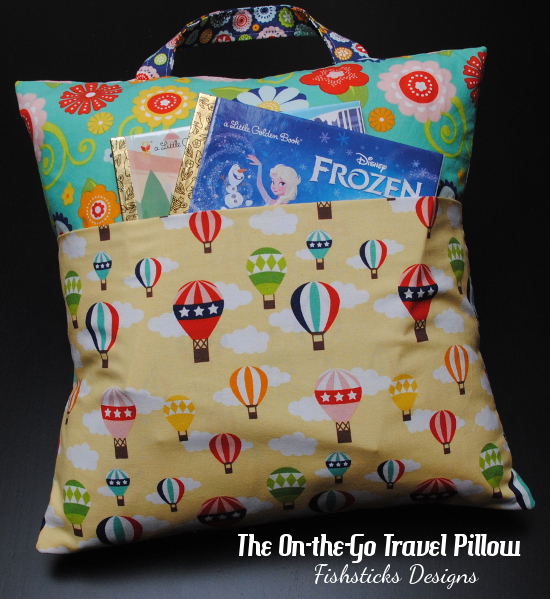 Finally, the quickest sew in my Go Fish series – the On-the-Go Travel Pillow! This one could easily become your go-to night-before-the-party project. Add a couple of age-appropriate books and this makes a great gift! These are new books, but be sure to check your local used bookstore to build up a stash. Ours carries Little Golden Books for $.50 each! Oh, and these pillows don’t just work for little ones, even teens need a place to rest their heads on trips and at sleepovers. Just choose a fabric that personalizes it for the receiver!
Now all you need to do is go buy your Go Fish patterns, find the perfect fabrics and set aside a little bit of time for sewing! I would love to see what you sew! Add a link in the comments, or come join us in the Fishsticks Designs Sewing Group to share!
SMS Handmade Holidays ~ Gifts for Boys
 Have you been following along with the 2014 edition of Handmade Holidays at Sew Mama Sew? I’m the guest curator today, and I’ve put together a list of tutorials just for those of you with boys (little and big) on your holiday sewing lists! Just click right here to read all about them!
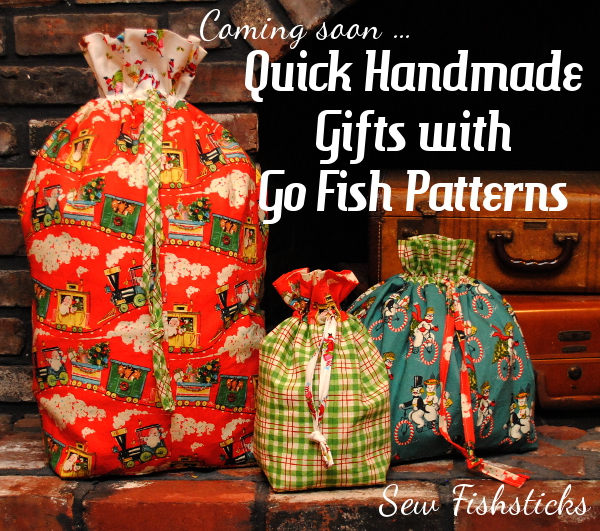 I’m also working on putting together some quick gift ideas for everyone on your list using my Go Fish Patterns. I’ll have those right here tomorrow morning. Don’t forget that all of my Go Fish Patterns are on sale through Saturday! You can find those details right here.
The Holiday Kitchen Gift Set Tutorial
 Thanksgiving and Christmas are right around the corner! I know, I know, I’m not sure that I’m ready to hear that either, but I love making handmade gifts, and every year I think if I just get started sooner, I won’t be sewing until 1 a.m. on December 25th! Maybe I’ll actually start early this year? At least I can help you start early! This tutorial is one that I shared at Skip to My Lou last year for the Holiday Bake, Craft and Sew-along, but I just finished putting the whole thing together for you in PDF form to make it easy to download, print and sew!
To download the tutorial, just click here: Holiday Kitchen Gift Set. Be sure to save the file to your computer before you print the pattern.
In case you prefer to read the tutorial here on my blog, here it is for you:
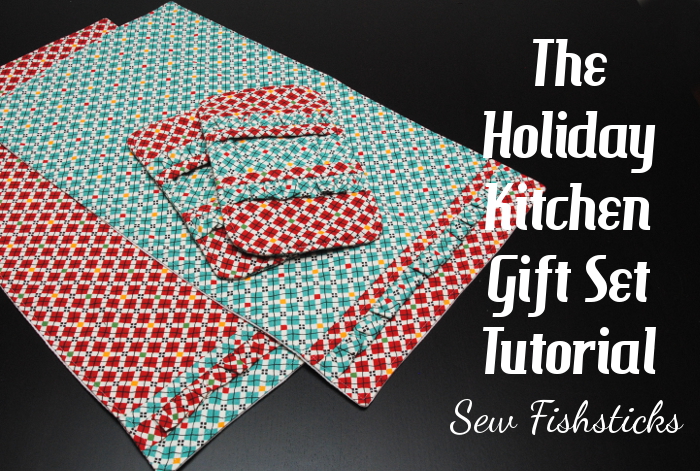
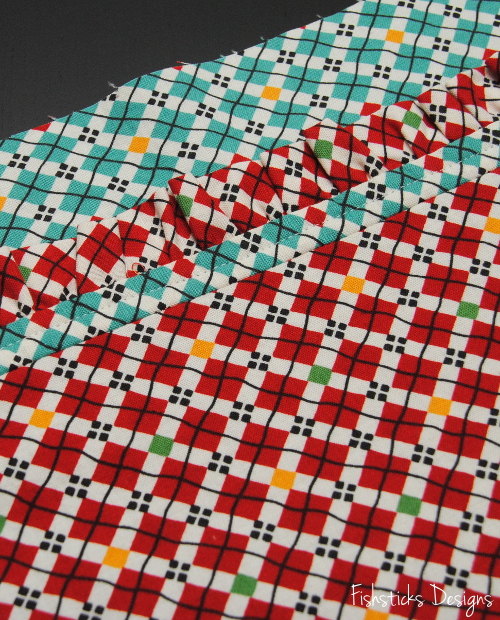
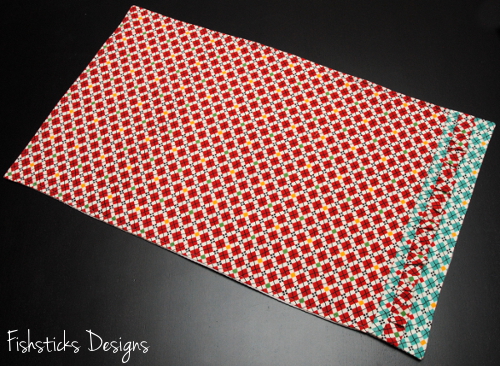
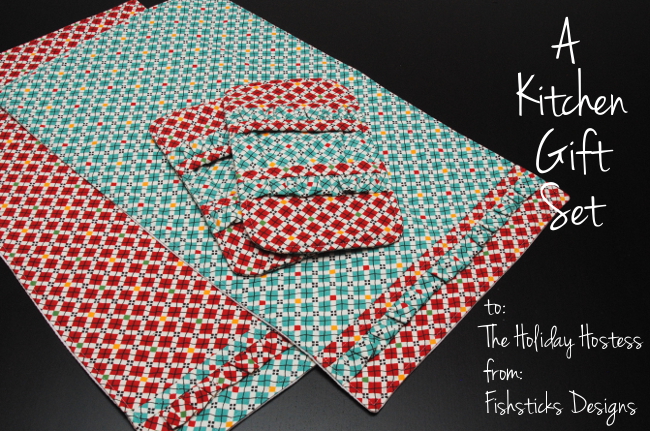
Are you looking for the perfect thank-you gift for all of those holiday party hostesses? The Kitchen Gift Set might be just what you need! The set includes fold-over, oven-mitt potholders (my favorite kind) and matching dishtowels.
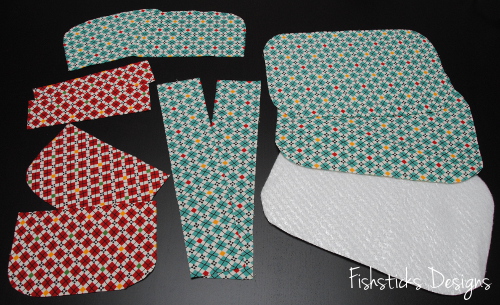
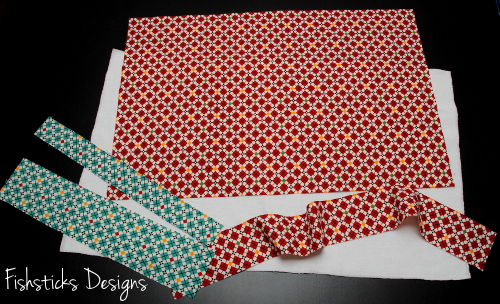
You’ll be able to get two matching potholders and two coordinating dish towels from one yard each of two coordinating cotton prints. You’ll also need 1/4 yard of Insul-Bright or another insulating fleece for the potholders and 1 yard of absorbent cotton fabric for the backing of the dishtowels (diaper fabric, waffle weave, pique, huck toweling, etc.) Let’s start with the potholders! You’ll need the pattern pieces found here: Potholder Pattern Pieces. (Be sure to print that “actual size” and check the measurement of the 2 1/2″ square.) Cut out all of your pieces. For each potholder, you’ll cut 2 pocket pieces of Fabric A, 2 pocket pieces of Fabric B, 2 base pieces of Fabric B, 2 base pieces of Insul-Bright, 2 trim pieces – 7″ x 2″, and 2 ruffle pieces – 12″ x 2 1/2″.
 Fold each of your ruffle pieces over with the wrong sides together and match up the long edges. Press well.
 Sew two rows of basting stitches (the longest stitching your machine allows) along the long raw edges — one at 1/8” and one at 1/4”—leaving the threads on each end 2 to 3 inches long.
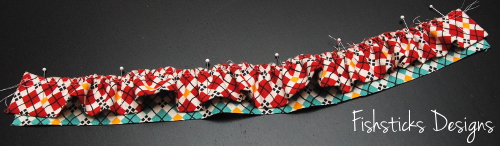
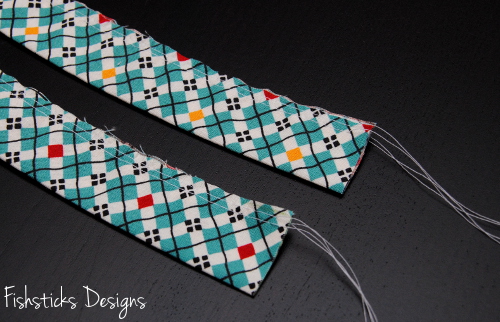 Pull the bobbin threads from each end to gather each ruffle until it is the same length as the trim piece.
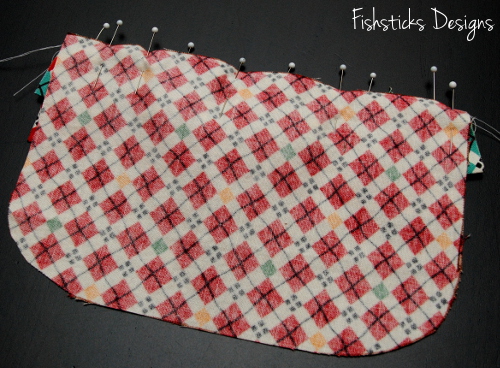
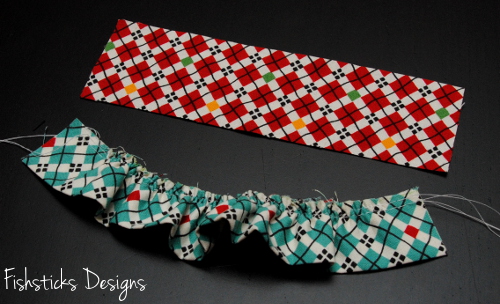 Set one ruffle aside. Pin the gathered edge of the remaining ruffle to the right side of one trim piece along one of the long edges. Check to make sure that your gathers are evenly divided. (You can baste here if you’d like.)
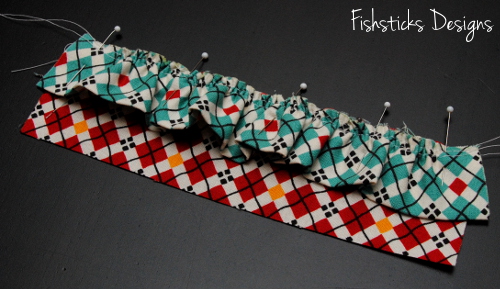 Place one of the Fabric A pocket pieces on top so that the right sides of the trim piece and the pocket piece are together and the ruffle is sandwiched between. Line up the edges as shown and pin in place.
 Sew the pinned edge.
 Flip the pieces to the right side and press the ruffle towards the curved edge of the pocket piece while pressing the seam allowance in the opposite direction. Topstitch 1/4″ from the top edge of the ruffle.
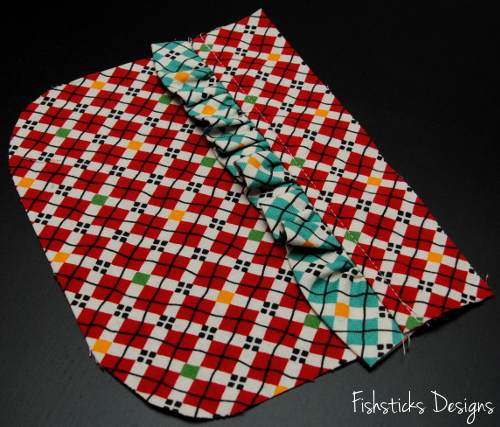 If you find that you have small spots on each side where the ruffle sticks out. Just flip the pocket piece over and trim those off.
 Pin the long edge of one Fabric B pocket piece to the remaining raw edge of the trim piece with the right sides together. Sew the pinned edge.
 Flip the pieces apart and press the seam allowance toward the ruffle.
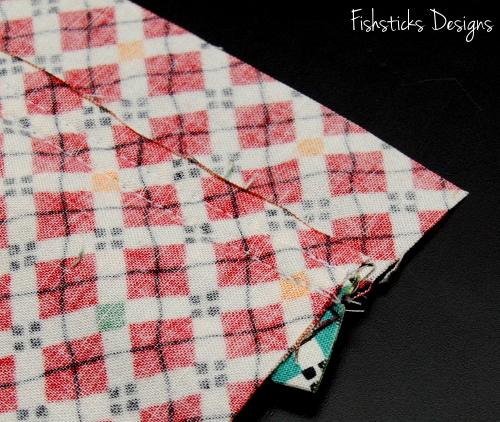
 Fold the pocket over so that the wrong sides are together and the curved edges are all lined up. Press well. Follow the same steps to assemble the remaining pocket.
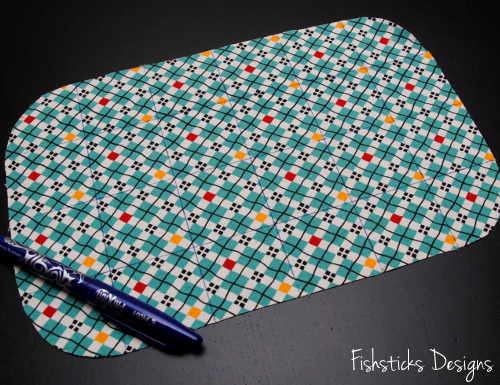
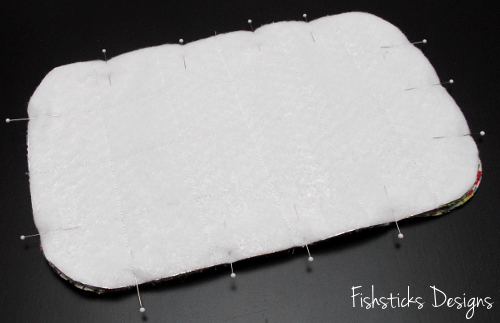
 Set your pocket pieces aside for now. Take one of your base pieces and draw a quilting grid on the right side of it. I used one of my Frixion pens to do this, but you can use a washable or disappearing marker, as well. I placed my lines 1 3/4″ apart, starting from the center in each direction.
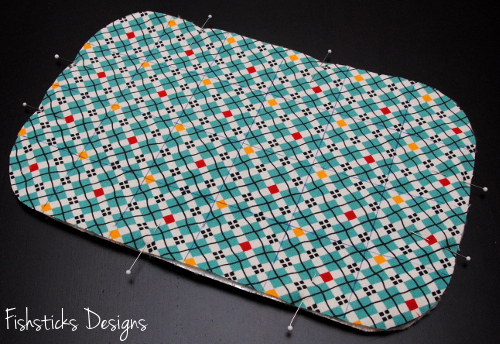
 Pin this piece on top of the two layers of Insul-Bright.
 Stitch down each line, starting with the center line and working out. (If your machine has a walking foot, use it for this step and the remaining steps to help keep your fabrics from slipping while you’re sewing.)
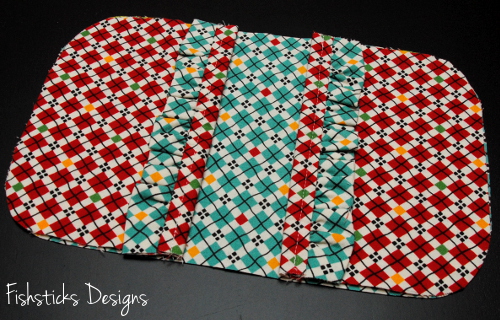
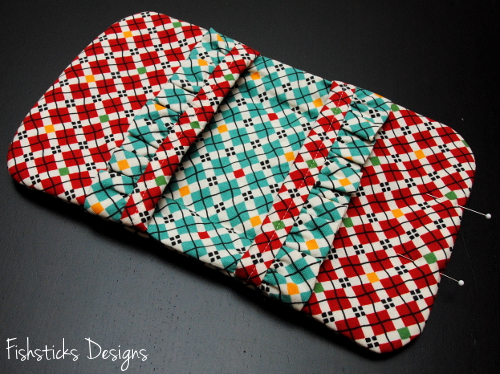
 Place your finished pocket pieces on top of the remaining base piece, lining up the curved edges as shown.
 Flip the quilted base piece/Insul-bright over on top of these so that the right sides are together and the pocket pieces are sandwiched between. Pin in place.
 Stitch all the way around, leaving an opening for turning in one short end. Clip or trim the curves before turning right side out.
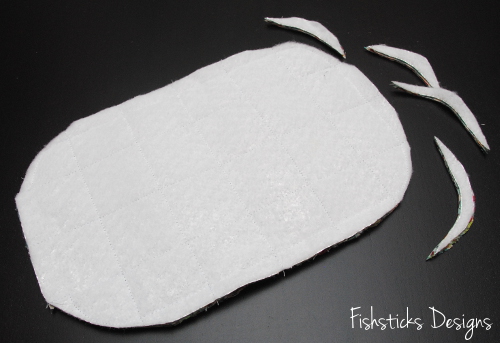 Turn through the opening and push the corners out neatly. Tuck the raw edges of the opening in and press well. Pin the opening closed.
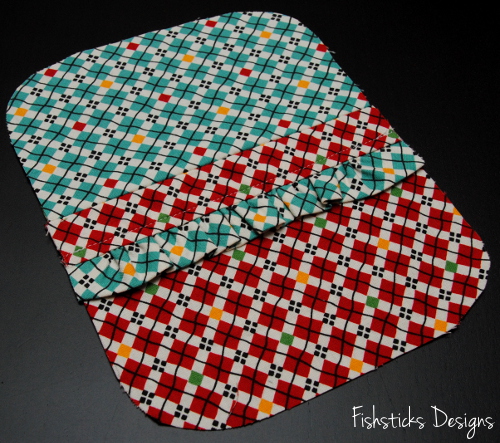
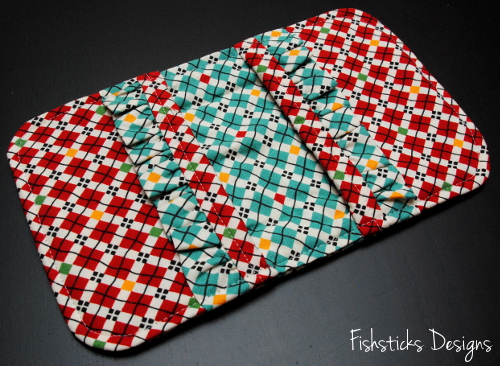
 Topstitch all the way around at 1/4″. (In addition to using your walking foot for this step, a denim needle will help to prevent skipped stitches when going over the thick areas.) Your first potholder is done! Now you just need to make it a mate.
 Let’s move on to the dish towels!
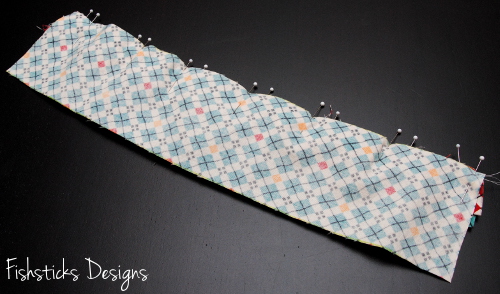
 Start by cutting out your pieces. You’ll need a layer or two of absorbent fabric. (I’m using two layers of diaper cloth from Joanns. Be sure to wash and dry all of your fabrics before getting started!) For each dishtowel, you’ll cut these pieces: 1 or 2 layers of absorbent fabric – 23 1/4″ x 14″ (if you cut two layers, you’ll treat them as one from here on), 1 Fabric A main piece – 21″ x 14″, 1 Fabric A ruffle piece – 22″ x 2 1/2″, 1 Fabric B large trim piece – 3″ x 14″ and 1 Fabric B small trim piece – 1 1/2″ X 14″.
 Follow the same steps that you used for the potholders above to create your ruffle.
 Pin the gathered edge along one long edge of the smaller trim piece on the right side.
 Place the larger trim piece on top so that the right sides are together and the ruffle is sandwiched between. Line up one of the long raw edges of the larger trim piece with the pinned edges of the ruffle and smaller trim piece and pin in place. Sew along the pinned edge.
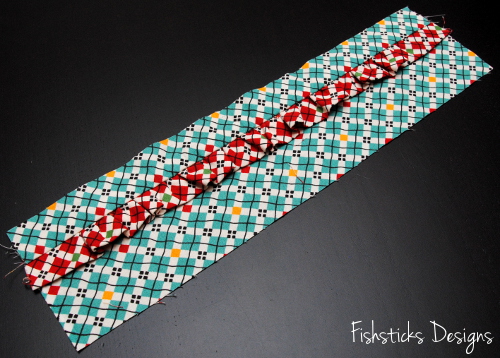
 Flip the pieces over to the right sides. Press the ruffle towards the larger trim piece with the seam allowance in the opposite direction, but do not topstitch yet.
 Line up the remaining long raw edge of the smaller trim piece along one short edge of the main towel piece with the right sides together. Pin and sew.
 Flip the pieces apart and turn to the wrong side. Press this seam allowance over the seam allowance from the ruffle.
 Flip back over to the right side and topstitch 1/4″ from top of the ruffle.
 Place the finished top face down on your absorbent layers so that the right sides are facing. Pin.
 Stitch all the way around, leaving a 4″ opening in one side for turning. Clip the corners.
 Turn the towel through the opening. Push the corners out neatly and tuck the raw edges of the opening inside. Press well and topstitch all the way around at 1/4″. Your dish towel is done! Make a second one if you’d like, and your Kitchen Gift Set will be ready to gift to your favorite hostess!
Book Bags for My Nieces
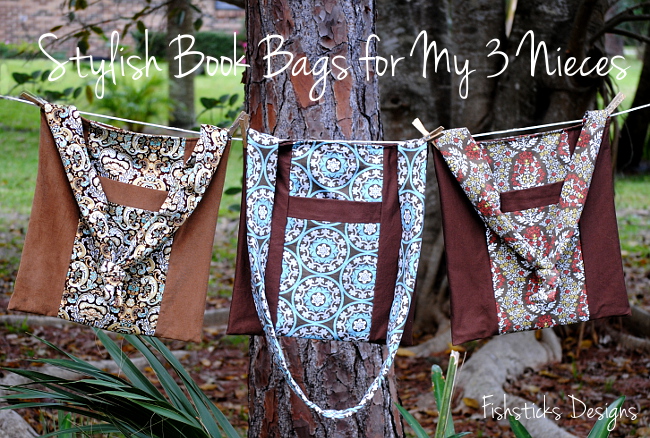 Finally, the last of my Christmas sewing! I have such fun designing new bags for my three nieces every Christmas. They’re building up quite the collection of bags, and I love that they use all of them. This year I went with a simple, but stylish book bag that I’ve wanted to design for ages.
The inside of the bag is generously sized for library books or school books, and the front of the bag has a nice big pocket. I made the strap super long so that the girls can wear them cross-body, or they can tie a quick knot in the center of the strap to wear them as shoulder bags.
 The sides wrap around to a wide strip centered on both the front and the back. I love how the sides frame the main fabric print.
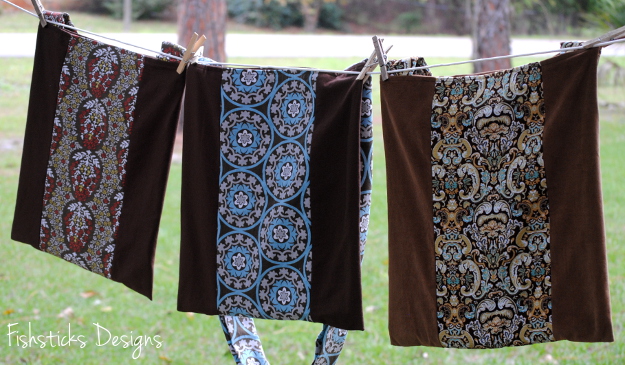 The bag is fairly unstructured or “slouchy”, so it’s easy to fold up and store away, but I used heavier weight fabrics so they have a good amount of substance to them. The two bags above are sewn with twill and home decor fabrics, and the bag below is sewn with fine wale corduroy. (All of the fabrics are from Joann Fabrics.)
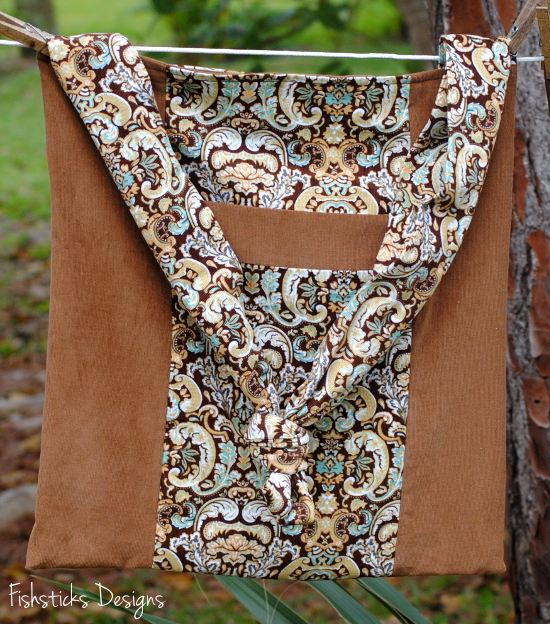 I think these practical, modern bags wrap up last year’s sewing list quite nicely, even if the finish is a bit late. Oh, and you might see this bag again as a pattern in this year’s line-up very soon!
A Three-Piece Theo Trio
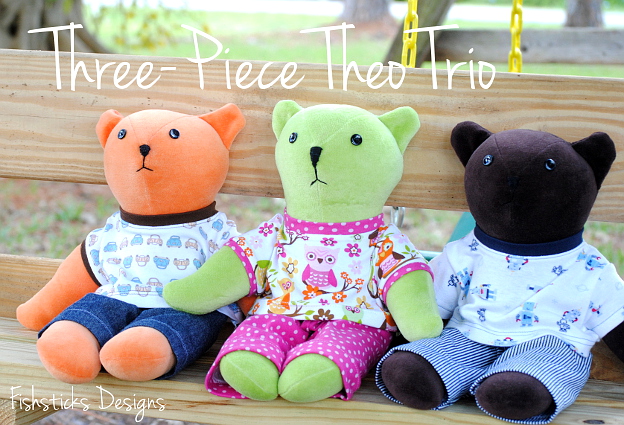 I’m still loving sewing new stuffies for my two little guys and our granddaughter for every holiday. (Eventually, they’re going to run out of room for new ones, aren’t they? But, maybe not before they outgrow them.) A few weeks before Christmas, I asked for pattern suggestions in an online PDF pattern group. Since I don’t generally design stuffie patterns, this is an area where I enjoy trying out patterns from other designers. Time was short so I needed something quick, but I wanted something really cute, too. Enter Three-Piece Theo from Tie Die Diva Sewing Patterns!
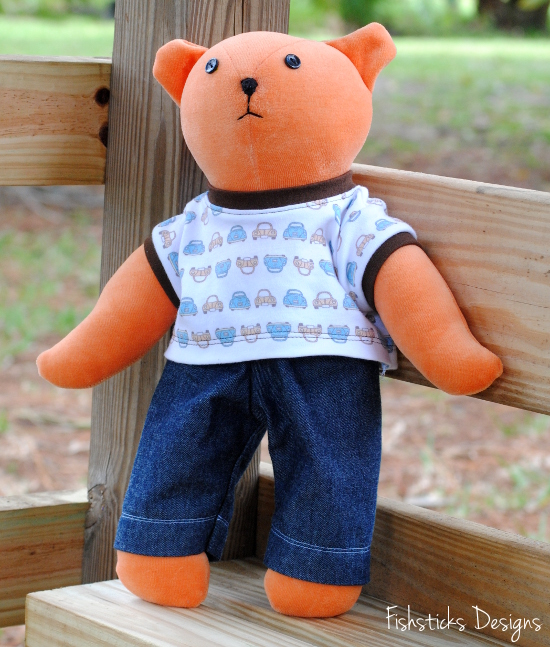 This pattern goes together so fast, and this bear is the cutest thing ever! I’m a bit of a naturalist when it comes to fabrics, so I used cotton velour rather than the suggested polyester fleece for the three bears that I made. I love how soft and squooshy they are, and the cotton velour makes them easy to wash, too.
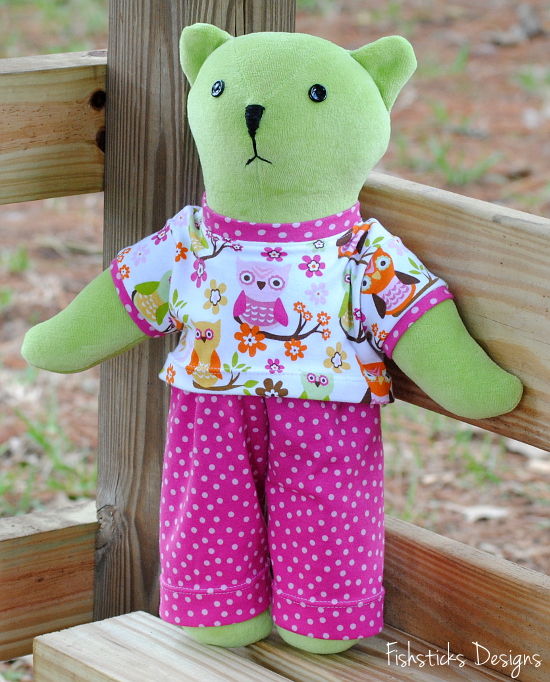 I chose to use buttons for the eyes and to embroider the faces for a more vintage-y look. The hand embroidery was definitely the hardest part for me. If you follow me on Instagram, you already know that I stitched the noses on the boys’ bears on Christmas Eve after everyone was asleep and the presents were under the tree. Then, I decided on Christmas afternoon that I really didn’t like the rectangular shape I originally used, so while the kids all played with their new toys, I ripped the bears back apart and gave them much nicer triangular noses!
 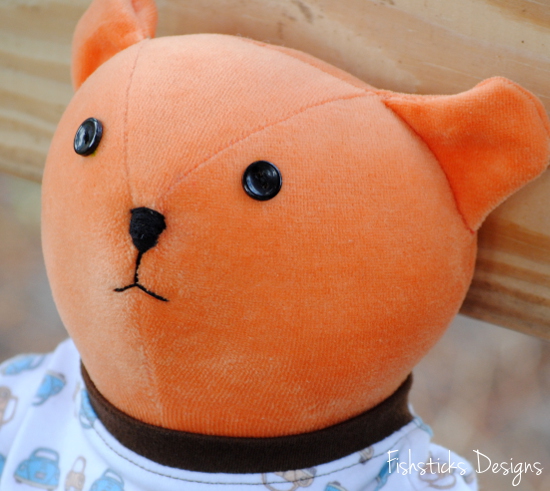 It’s pretty cool to see how much you can change the personality of the bear with a slightly different face. My kids think that Katie’s green bear looks like a koala because of its long nose.
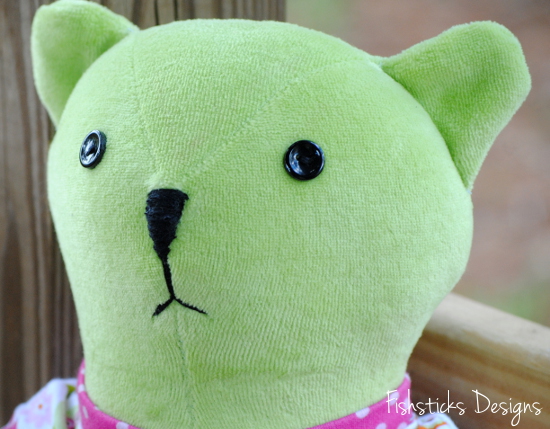 I used the pants pattern that comes with the bear for the pants, but I couldn’t resist downsizing my Charlie Tee pattern for the top! Wouldn’t it be fun to make matching bear/child clothes? My boys would probably roll their eyes, but I think Katie would love that!
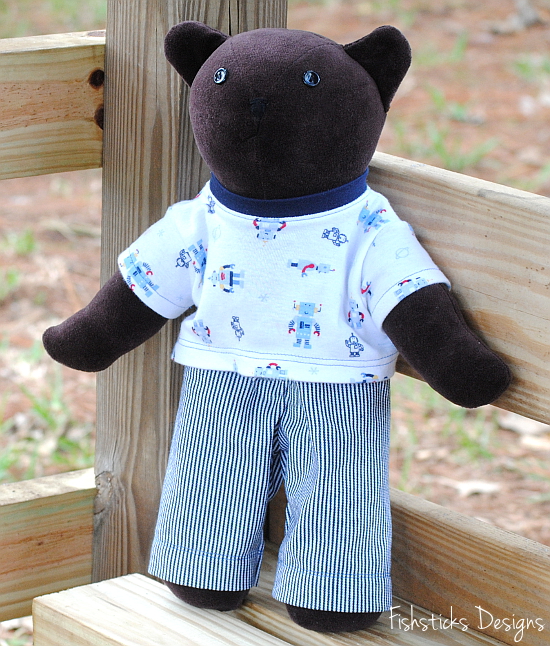 These were a hit with my littles. They even traveled with us on our mini Orlando vacation this past weekend. I think I’ll be turning to this pattern again in the future for more quick handmade and personalized gifts, too!
Stocking Up the Play Kitchen with Handmade
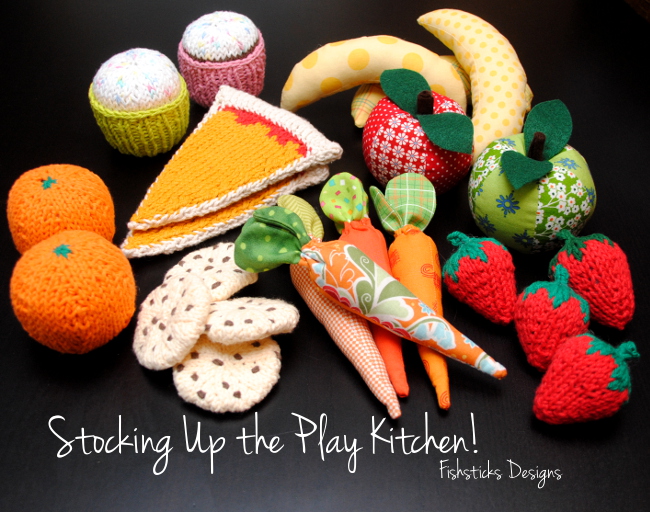 Our granddaughter, Katie, got a new play kitchen for Christmas, and I couldn’t resist filling it up with handmade play food! My 15-year-old daughter, Samantha, teamed up with me to make this set. She did the knitting while I did the sewing, and since much of our play food has seen its better days, we made a matching set for our youngest son, too.
Samantha knitted each item using cotton yarn and stuffed them with polyfil so that they’ll be washable — just in case. She started with oranges knit from this pattern: The Fruit Bowl – Oranges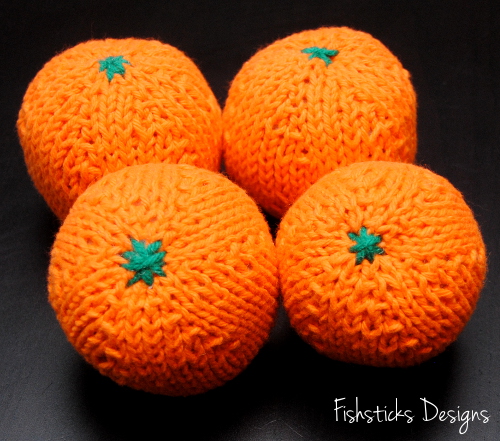 She added strawberries from this pattern: Strawberries by pezdiva.
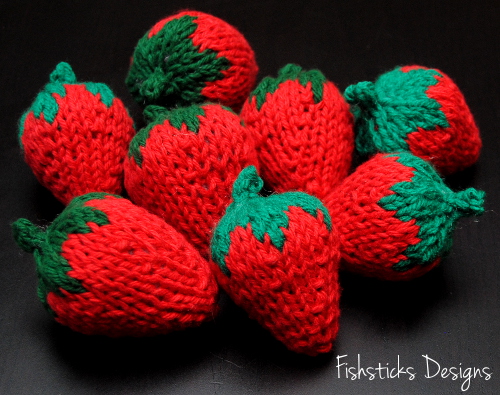 From Deborah’s Knitting, these chocolate chip cookies look good enough to eat! Chocolate Chip Cookies
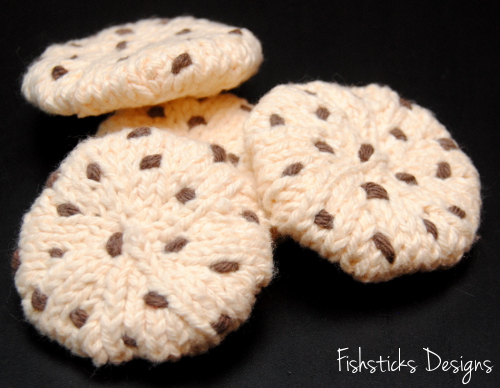 She used Bee Knit’s Cupcake Pattern for the cake part of these cupcakes. It includes a pattern for the cupcake liners, but Samantha wanted to knit them in the round, so she drafted a quick pattern for these liners herself. I love that the cupcakes and liners are separate!
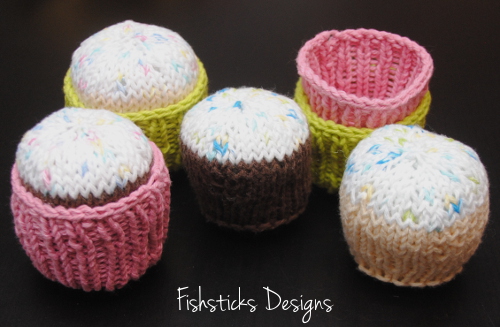 No play kitchen could be complete without pizza, right? This pattern is from Bittersweet Blog: Pizza Party!
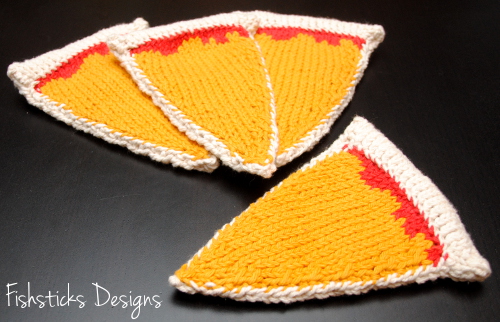 I used self-drafted patterns, cotton quilting fabric, polyfil and bit of felt to sew this pair of apples . . .
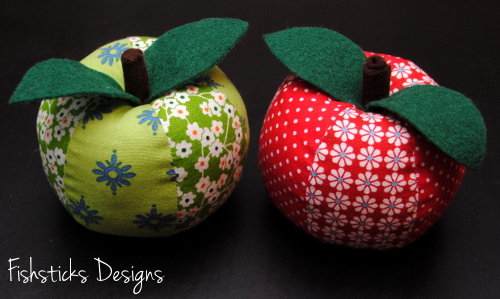 . . . and this bunch of bananas.
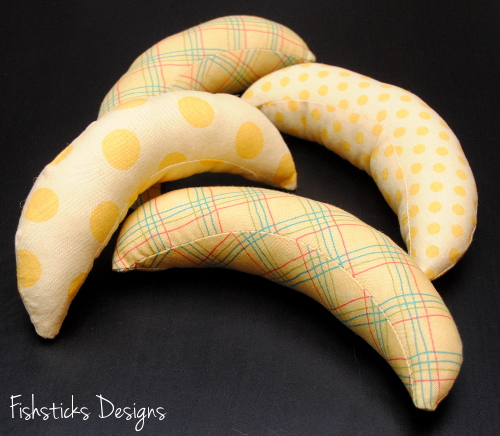 Finally, the Stuffed Carrots tutorial from Clares Craftroom turned out the cutest pile of handmade carrots ever!
 That should be enough to keep a couple of little chefs busy cooking for quite some time!
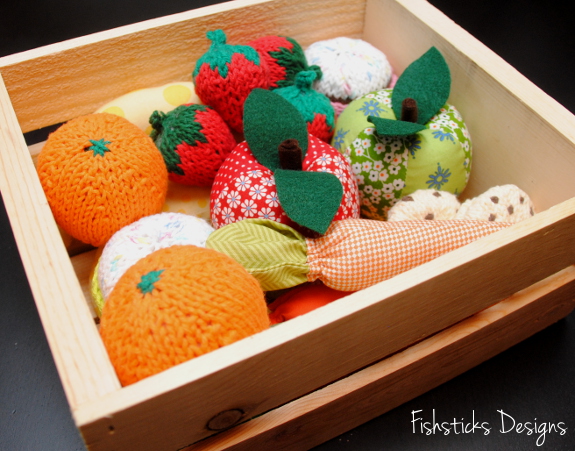
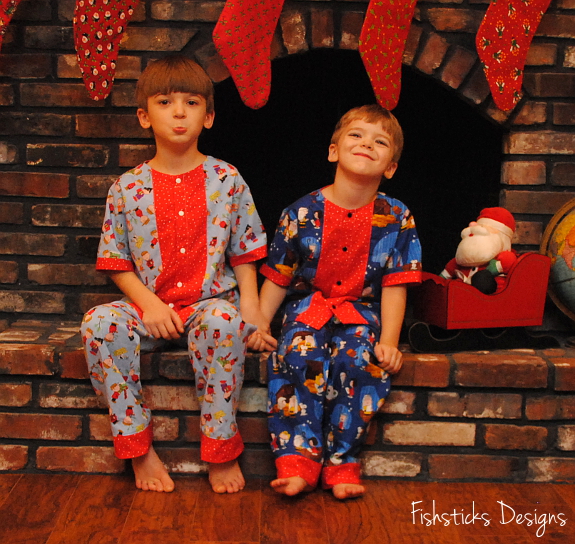
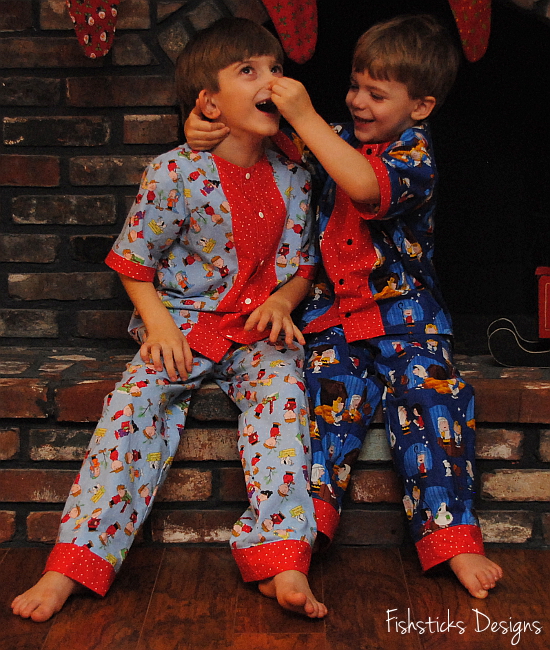
Handmade PJs & Christmas Wishes!
 It’s 10 p.m. here on Christmas Eve, and my little ones are all asleep in their freshly made Pajama Party PJs. Presents are almost all wrapped. Two stuffed bears that are hidden in my bottom desk drawer are waiting for what will likely be very quickly embroidered noses, hopefully sometime before the clock strikes midnight. I can’t wait for tomorrow morning!
My prayer is that your home is filled with the joy of that very first Christmas, lots of laughter, love that fills your heart to overflowing and a bit of silliness, too!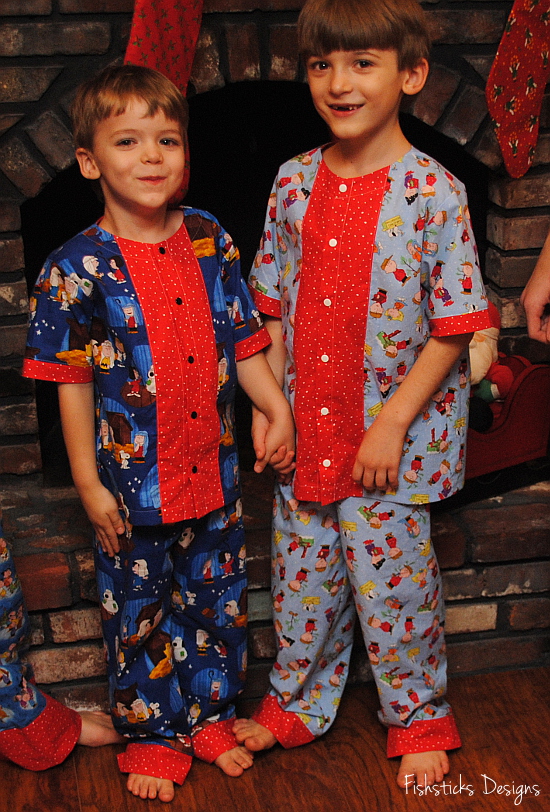

 I’m taking a bit of blog vacation for the rest of the week, but I’ll be back to share more handmade Christmas projects soon. My family is visiting early in January, so I still have time to wrap up my sewing list!
Handmade Christmas – Quick Pillow Cover Tutorial
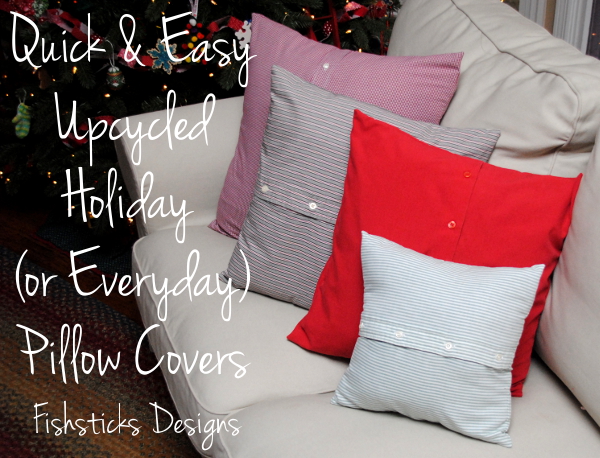 With Christmas less than two weeks away and my sewing barely begun, I needed a quick and simple project this past weekend to give our livingroom a little extra Christmas cheer. A few new toss pillow covers in Christmas red and green made from thrifted button-down shirts filled that need quite nicely! In colors to match your decor, these pillow covers would actually work as beautifully year-round as they do for the holidays. Want to make a few of your own? Just read on.
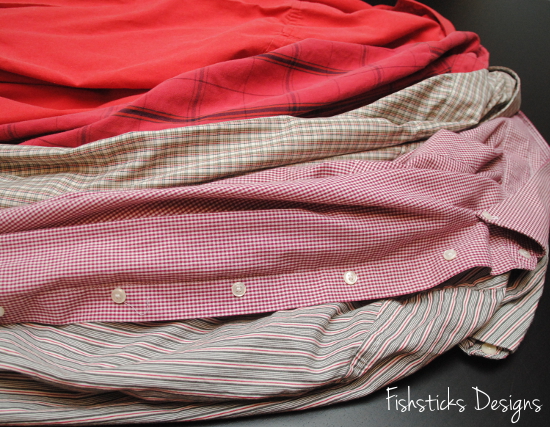 To get started, you need a pile of men’s button-down shirts. I found all of these at our local Goodwill store for around $2 a piece. For larger pillows, of course, you’ll need larger shirts. You also need toss pillows. I used the ones that were already on my sofa.
 The first step is to remove the pocket from the shirt that you’re working with. Just grab your handy seam ripper and carefully rip it off. (If you cut the stitches on the pocket side rather than the shirt side, you run less risk of damaging the shirt.) Once the pocket is off, if you have tiny needle holes remaining, either spray them down with water from a spray bottle and press well with a hot steam iron, or place a damp cloth over the area with the holes and press well with your steam iron. Cut the front and back of the shirt apart.
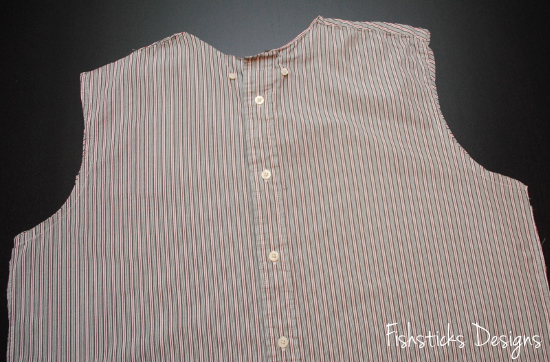 Measure your pillow. Mine measured 17″ square. Most shams are made to the exact size of the pillow, but since I like mine to be just a little bit snug, I’m going to make my sham 16 1/2″ square. Because I’m using a 1/2″ seam allowance, I’ll add 1″ to that measurement (seam allowance times two), and cut my front and back pieces 17 1/2″ square.
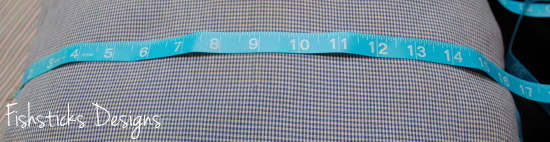 With the shirt front buttoned, measure and draw your piece. I centered my button placket, but you could place it off-center if your shirt is large enough. You will want to center the individual buttons, however. To do this, I just move my see-through ruler up and down until I have the correct full measurement and an even amount above the top button and below the bottom button. Be careful not to get the top and bottom buttons too close to your seam allowance. You want them to be at least 1 1/2″ in.
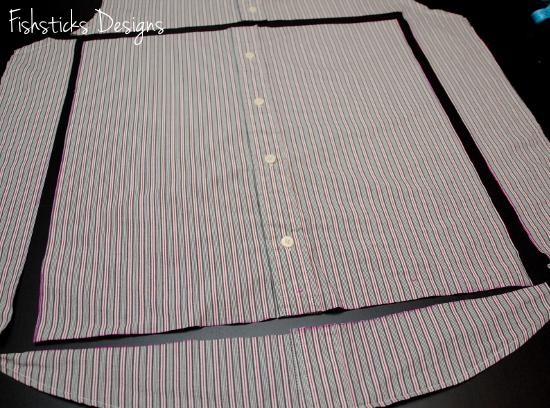 Cut a second piece from the back of the shirt for the back of your pillow sham.
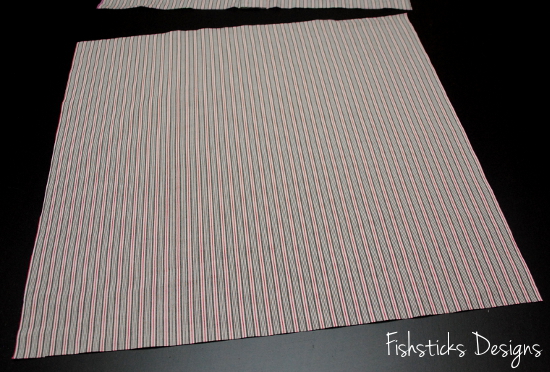 Pin the front and back pieces right sides together.
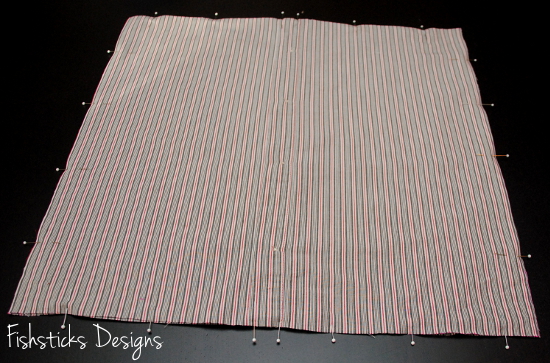 Sew all the way around at 1/2″. I serged the edges after sewing, but since no one is likely to see inside these shams, you don’t really need to.
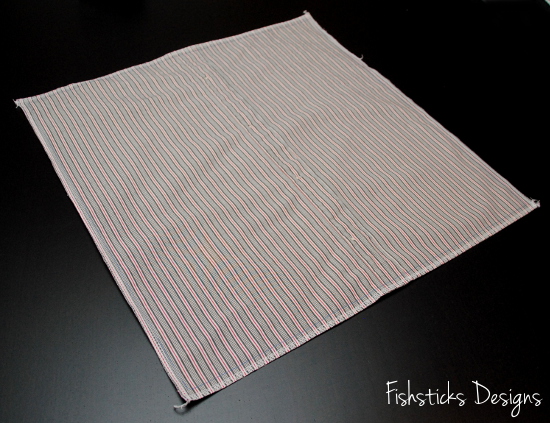 Once the two pieces are sewn together, just reach through between two of the buttons and unbutton one to turn the sham right side out. Push the corners out neatly, unbutton the cover completely, slide your pillow in, button it back up and toss it on your couch!
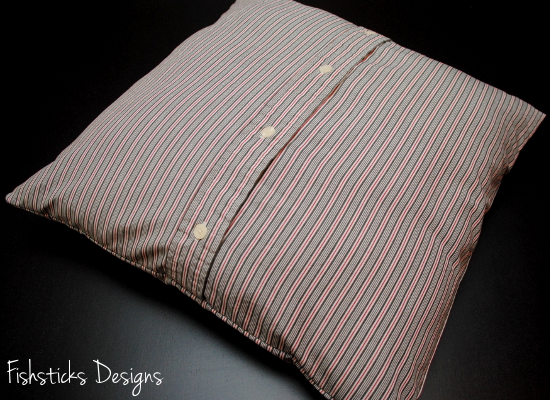
Christmas 2013 Advent Activities
 I’ve sort of made a tradition of sharing my list of Advent activities each year to help inspire you to make your own. I’m a bit late this year, but you know what? As busy moms, sometimes things just don’t happen on a perfect time schedule. That doesn’t mean, though, that we can’t find time to make memories with our children and teach them about the important things in life while we’re doing it. The season of Advent is the perfect time to slow down a bit and do just that!
On to this year’s list:
1. Decorate the Christmas Tree
2. Make Handmade Cards for Grandparents
3. Check Out Christmas Books from the Library
4. Make Ornaments
5. Visit the Zoo
6. Attend the City Christmas Tree Lighting
7. Act in a Christmas Play
8. Visit a Craft Show
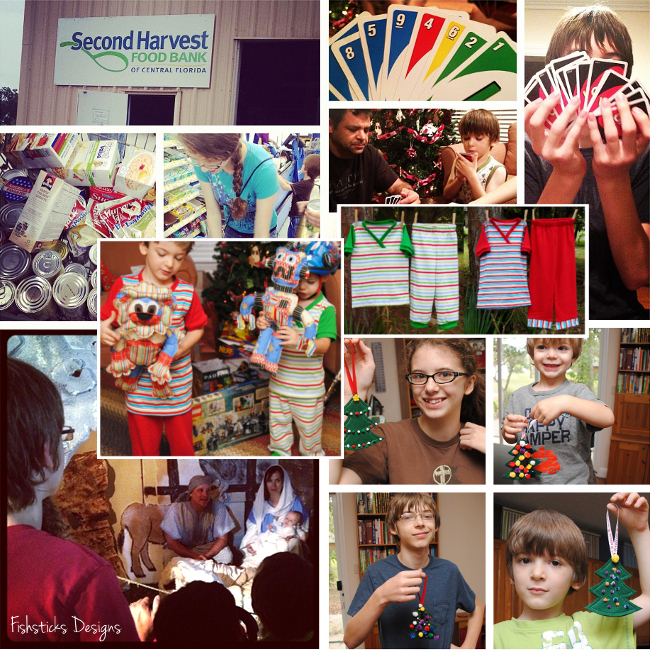
9. Shop for the Local Food Pantry
10. Enjoy a Family Game Night
11. Shop for Toys for Children in Need
12. Bake Cookies Together
13. Walk Through a Living Nativity
14. Watch a Christmas Parade
15. Host a Cookie Exchange
16. Shop for Sibling Christmas Gifts
17. Drive around Town to See the Christmas Lights
18. Ring the Salvation Army Bell
19. Have Ice Cream in PJs at a Local Ice Cream Parlor
20. Visit Family Out of Town for the Weekend
21. Eat Out for Dinner
22. Go Caroling
23. Watch Christmas Movies Late into the Night
24. Bake a Birthday Cake for Jesus and Sleep in New Christmas Pajamas
We’re very flexible with our list. Other opportunities will likely pop up during the month and plans will change. I keep this list handy in case I need to switch out activities before the kids pull them from their pockets each day. 
I would love to hear what your favorite activities for Advent are! And, I’m on the hunt for a great Christmas ornament project, too. Do you have any suggestions?
A Kitchen Gift Set Tutorial & a Huge Giveaway
 I am over at Skip to my Lou today with a tutorial for a Kitchen Gift Set for the Holiday Bake Craft Sew Along.
 I think you are going to love this gift set! It is perfect for any of your holiday hostesses. The set includes these sweet fold-over, oven-mitt pot holders . . .
 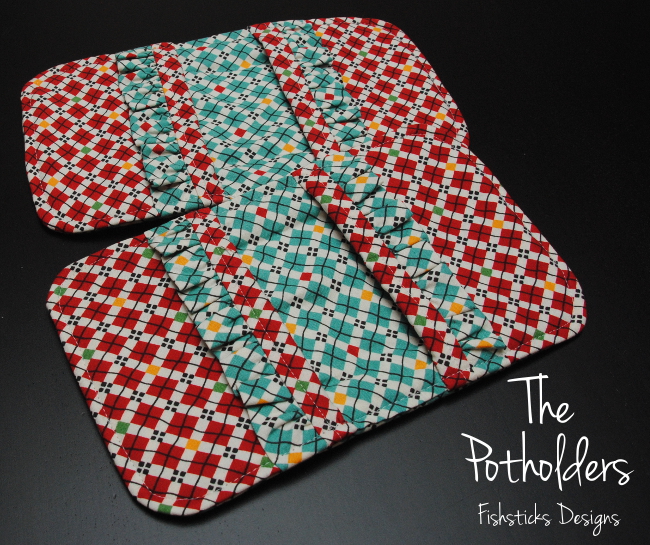 . . . and this pair of pretty, but practical dish towels.
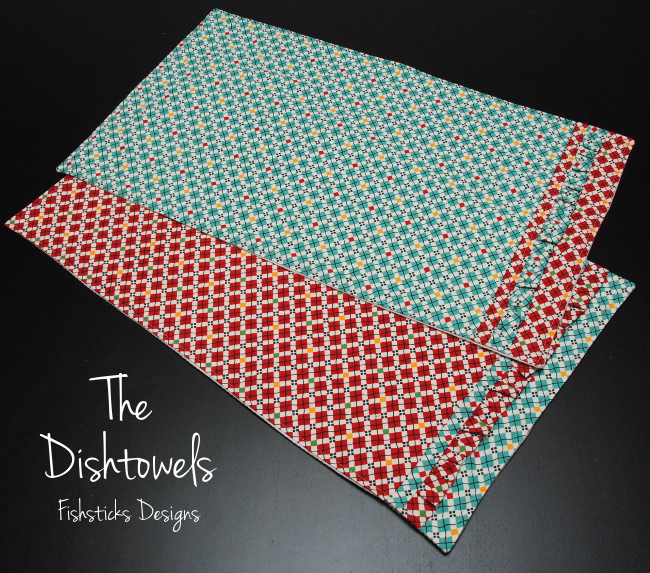 It’s a little early Christmas gift from me to you! But, wait! That isn’t all! I also get to treat you to a SEW Amazing Giveaway as part of our crafty series.
This is one AMAZING giveaway!
We are giving away a fabulous Prize Package worth more than $1000!
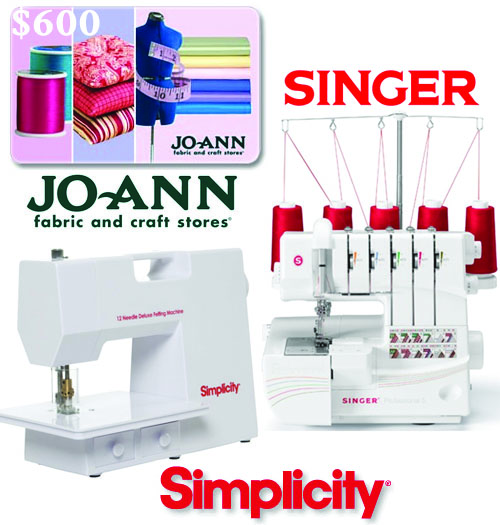 One lucky winner will receive…
$600 JoAnn Fabric and Craft Stores This will get your sewing room stocked and ready to create! Can you imagine?
This singer professional serger will bring your sewing to a whole new level. True to SINGER you will enjoy…
- 2-3-4-5 stitch capability-provides more stitch variety
- 1,300 stitches per minute-professional speed for faster results
- Fully automatic self-adjusting tension system-keeps stitches balanced and even
- Easy threading diagram-easy threading saves time
- Stitch width adjustment-keep seams strong and prevent bunching on any type of fabric.
Simplicity Deluxe Felting Machine Simplicity 12 Needle Deluxe Felting Machine creates felting with ease. Removable needles & foot pedal allow felting with greater speed and precision. Includes: power supply w/ foot pedal, 2 allen wenches, needle shaft with 12 needles inserted (sz 38 needles), 3 replacement needles, tweezers, lint brush, needle guard, instruction book. So cool!
Simply wait for RaffleCopter to load and enter there!a Rafflecopter giveaway
Be sure to check out all the fabulous sewing projects shared this month for this Holiday Bake Craft Sew series going on all month long!


