Tutorials
The Totally Terrific Tie Tutorial
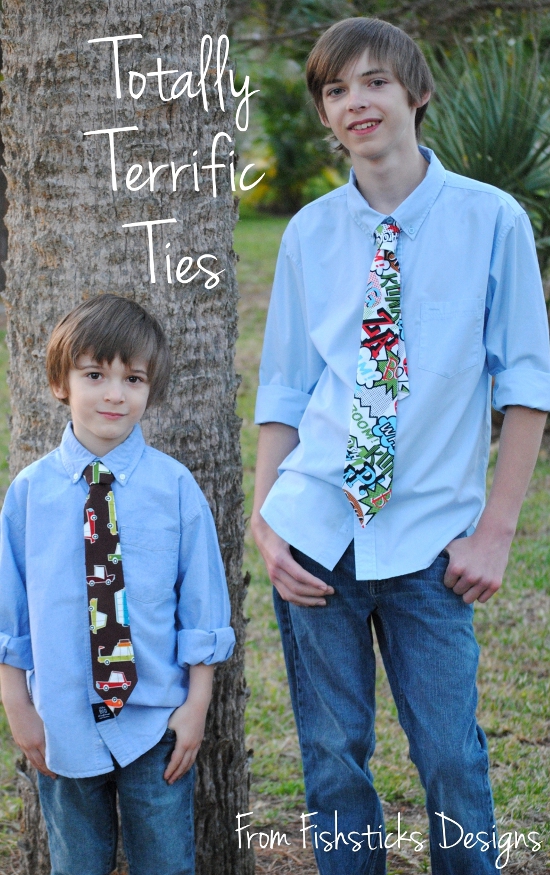 Easter is coming soon! And, Easter tends to bring beautiful handmade dresses for all the pretty little girls. Piles of flowery fabric and stacks of frilly patterns have made their way to sewing rooms everywhere. Boys, on the other hand, are so much harder to sew for when it comes to dress-up clothes! Most of us tend to go for simple and traditional button down shirts and dress pants for our little guys. How about dressing up those plain tops with a fun, personalized, handmade tie . . . or two . . . or a dozen!
 Ties are so fast and easy to sew, even ties that fasten with hook & loop tape (like Velcro) or pull on over the head with elastic!
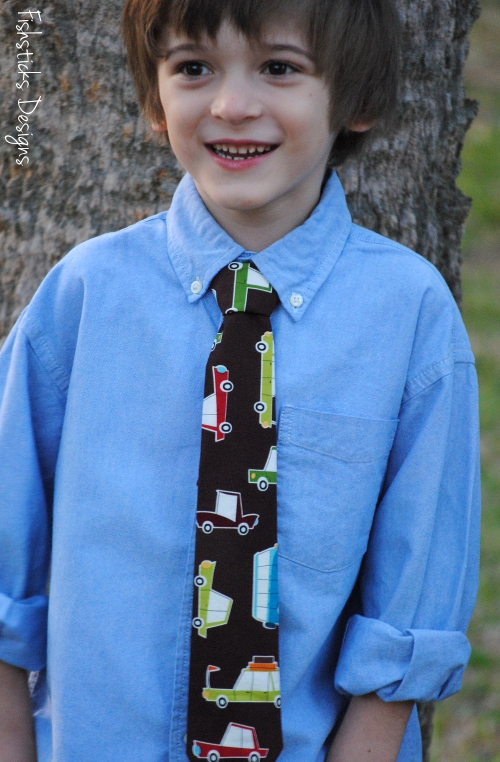 You might even find that your teenage boys will get excited about wearing something mama-made, if it’s a tie made with a great fabric! (I can’t believe how grown-up my Allen looks in this picture! And, for the record, he not only said, “That’s pretty cool,” when he saw the tie, but he also wore it to his writing class this morning.)
 Don’t they look handsome? (Even if they all really need haircuts!)
 I had to try these ties out with my Everyday Camp Shirts! I wasn’t sure at all how they would work since the Camp Shirt pattern is really meant to be worn as a more casual top. (It doesn’t even have a top button!) I think they look adorable, though! What do you think?
 I did find that they look much nicer with the Velcro-type fastener than with the elastic, though. I think that’s because the Camp Shirt has a wider neckline than a traditional button-down dress shirt. How can you resist a sweet little guy in a matching top and tie?!
 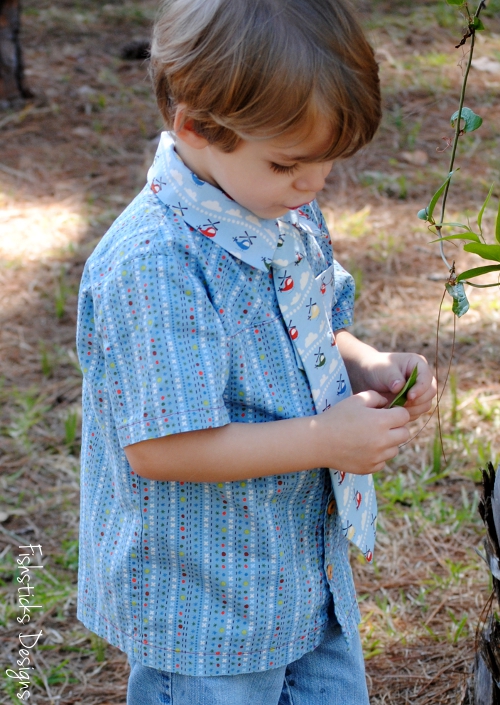 I’d say my little guys approve! (Or maybe big sister, Samantha, was making faces behind my back while I was photographing?)
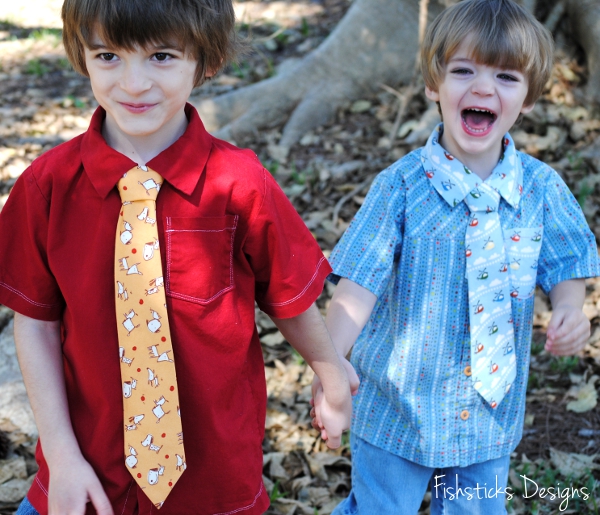 Ready to sew up a batch of ties for all the little boys and young men in your household? I’ve got a tutorial all ready for you! The tutorial includes patterns and instructions for Velcro and Elastic Ties in sizes to fit little ones from 2-4 and from 5-8, and it includes the pattern and instructions for a Traditional Tie for your bigger boys from ages 8 to about 14. You’ll find the tutorial right here: The Totally Terrific Tie Tutorial. If you sew one or two or more, I would love to see!
 Addition/Correction: It’s been brought to my attention that I did not specify the seam allowance on the original tutorial. 1/2″ seam allowance is included. So sorry about that!
Upcycled Grown-Up Bibs!
 This month’s Dinner for 2 project at Hopeful Threads is all about bibs. If you’ve been reading along, you already know that here in Florida, we’re collecting handmade bibs for the Hidden Treasures Foster Home in China. (You can read more here: Big Kid Bibs for Hidden Treasures.) The project is actually called Dinner for 2, though, because over in Louisiana, Anita is collecting bibs for the residents at Grace Nursing Home! I couldn’t let the month pass by without sewing a few adult bibs to send her way.
Remember how I said that I had collected a pile of thrifted men’s button-down shirts in anticipation of the Upcycled Men’s Shirt Challenge at Project Run & Play? Well, guess what I did with the extra shirts? I turned them into bibs for a few of the men at Grace Nursing Home! First up, the plaid dress shirt version: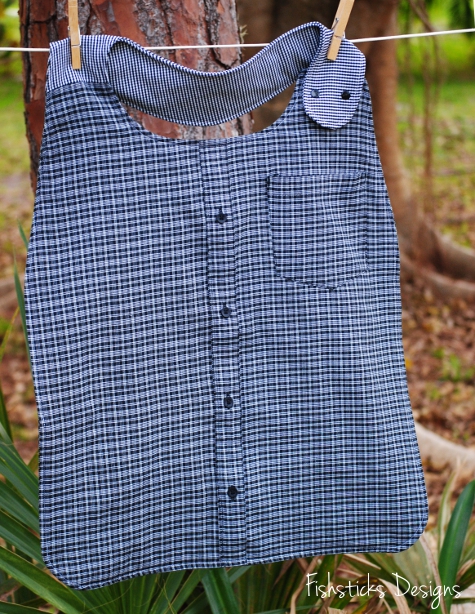 Here’s the fun-loving, novelty version:
 Finally, the casual flannel shirt version.
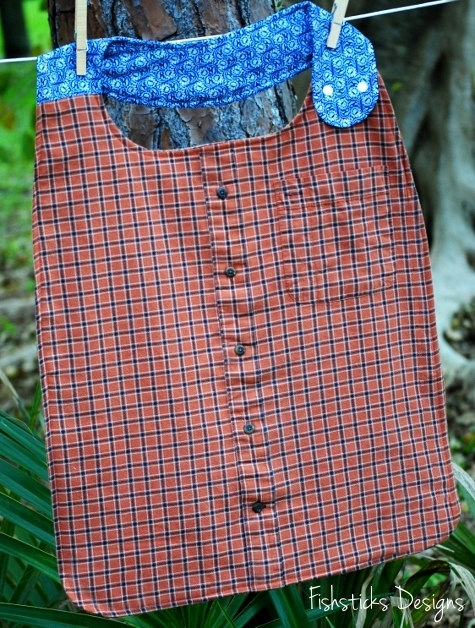 Aren’t they fun? Using thrifted shirts in good condition saved on fabric costs and gave them a more grown-up look! Sewing them was really easy, too. I scaled my Big Kid Snap Bib pattern up to adult size, using my husband as my model. For each bib, I cut the front and back body from the front and back of a men’s large button-down shirt. To add some absorbency, I also cut a hidden body layer of flannel. Before I started sewing things together, I stitched the button placket on the front shut. For the wraparound neck piece, I used coordinating fabric, cutting the same three layers. Once I stitched each neck piece to each body piece, I just followed the instructions from the Big Kid Snap Bib pattern, making the diameter of the neck about 7 1/2″. Easy peasy, right?
I had planned to just blog about these adult bibs, but I couldn’t resist drawing up a pattern for you to use. There’s still time to add to the collection heading to Louisiana! You might even want to sew them for other things, too! Wouldn’t they be perfect for the tasters at a chili cook-off or maybe the contestants at a pie-eating contest or even just for the grown-up messy eaters at home? Okay, here’s the link to the pattern: The Grown-Up Bib. This is only the pattern. For the instructions, you’ll need to go download this pattern and follow the steps I mentioned above: The Big Kid Snap Bib.
If you sew for Dinner for 2, be sure to add your pictures to the Flickr album, and if you haven’t already entered the It’s a Snap Source Giveaway from Monday, be sure to do that, too!
The Big Kid Bib: Serged & Snapped in Seconds

Have you peeked over at the Dinner for 2 Flickr Group lately? There are some seriously great-looking bibs showing up already, bibs for kids and adults alike. Have you sewn a bib or two yet? What are you waiting for? A quicker method of sewing perhaps? Do you have a serger? Well, then the Serged & Snapped in Seconds Bib tutorial is just for you! (Okay, so it really takes minutes, but seconds make up minutes and without seconds you don’t get the alliteration.)
Let’s get started! First, hop over to this post: Hopeful Threads & Dinner for Two. Read all about why we’re sewing bibs this month, print the Big Kid Snap Bib Pattern and get your three fabric pieces cut out: I have a front piece of cotton quilting fabric, a hidden inner layer of cotton flannel and a backing piece of PUL. (This method works well with PUL because the slippery side is hidden when you serge. Ripstop may be too slippery, but you can certainly try it!)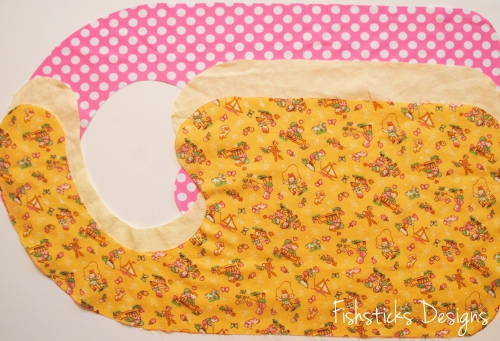
Grab a glue stick from your school supply closet or your junk drawer. A fabric glue stick will certainly work, but regular glue stick is cheaper and easier to find, and as long as it’s washable, it works just as well. You do want a glue stick that is new and not gummy at all. It needs to spread quickly and in a thin layer. Rub that glue stick all over the shiny side of your PUL. You want plenty of glue so there won’t be any slipping and sliding. Carefully place your hidden layer on top, line up all the edges and smooth it out.
 Now glue the wrong side of your front fabric piece to the top of the flannel using the same method. It is much easier to spread the glue stick glue on cotton quilting fabric than on flannel. Flannel leaves icky fuzzy stuff on your glue stick.
 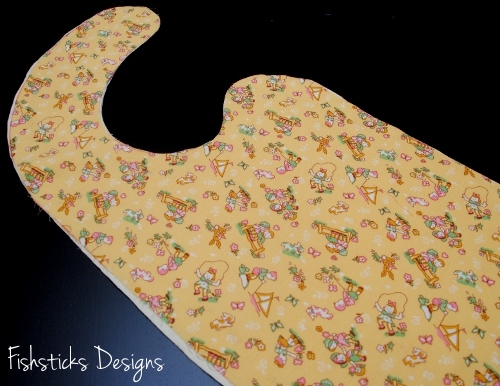 Check to see if you have any areas where the fabrics are overlapping and square them all up.
  Now you’re ready to serge.
  Just one second before you head to the serger, though. Do you have one of these baskets? These beautiful colored spools of Woolly Nylon have been sitting in this basket since Joanns clearanced them quite some time ago. If you have a basket like this, you might consider pulling one of those pretty colors through your upper looper. If you don’t, white will work just as well!
  Now, off to the serger! The seam allowance is 1/2″ so you want to cut off 1/2″ or close to that with your serger blade. It’s hard to keep that exact when you’re going around curves, but get it as close as you can.
  I started and stopped my serging at the back of the neckline since that’s the spot that will be least likely to be seen when the bib is worn.
 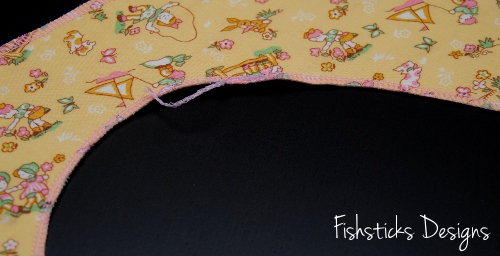 Zip, zip, round the corners, and all you have left to do is add the snaps.
 Refer back to the pattern for snap placement. Press the snaps in place.
 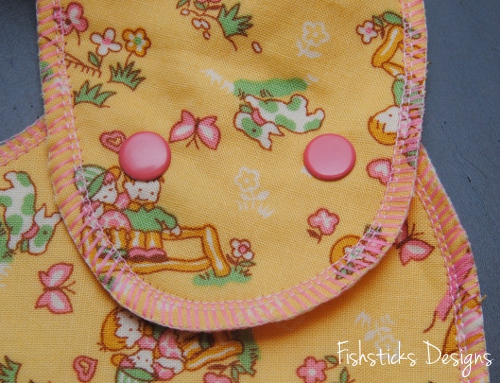 And you have a bib ready to send off with love to a sweet little one who will be so excited to receive it! Now wasn’t that fast?! Fast enough that you have time to make another one? Super! Go serge some more!
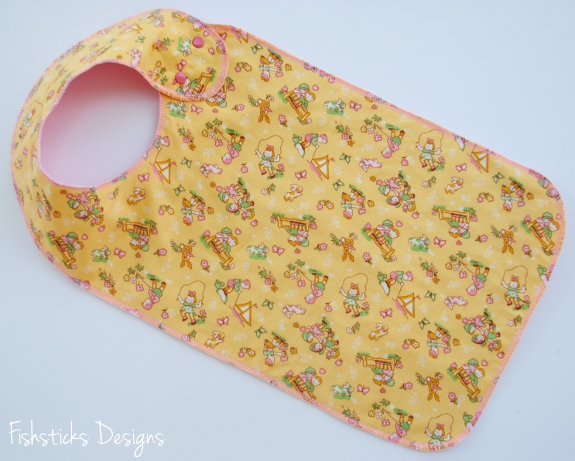
Hopeful Threads, Dinner for Two & Big Kid Bibs for Hidden Treasures
 Woohoo! It’s February! I have been bubbling over with excitement about today for weeks now! Not only do I have the magnificent privilege of getting to work with Kristy and all of the incredibly giving Hopeful Threads followers this month, but I get to be involved in a project that I know is going to be a huge blessing to everyone involved, from those who contribute their sewing talents to the beautiful children and caregivers who receive these handmade gifts.
 I was visiting with my friend, Heather, several weeks ago, and she mentioned that she was getting ready to sew some waterproof bibs to send to China with her daughter, Ransley. Actually, I think she simply asked me if I thought diaper-making PUL would work as a waterproof backing for the bibs that she was making. I thought it would be perfect and offered her some scraps that I had in a box in my garage. A few days later, she texted me about the PUL, and I called her to ask some more questions. The more I heard, the more I was sure that this was a great project for all you sewists who are so kind and generous about offering your time and talents each month to give to those in need! A quick email to Kristy and an even quicker response from her, and I was busy at work putting together everything that you would need to start sewing!
 First, though, a little bit about the children who will be receiving your gifts. This is Ransley, above, on her last visit to the Hidden Treasures Home just outside of Fuzhou, China. Ransley is leaving in the next few months to go serve on staff at Hidden Treasures for the next few years. She shared with me that God showed her such peace, love and joy on her last journey there. The home is filled with children, many of whom have special needs, but it’s also filled with love and fun and hope. You can read many of the children’s stories and browse through photos on the homes’ official website right here: Loaves and Fishes International and the Hidden Treasures Foster Home. I urge you to take a few minutes to read about these sweet little ones.
 When I asked Heather to tell me about the bibs she was sewing, she shared that she’d been asked to sew some when Ransley last journeyed to China. The older special needs children often need bibs to keep their clothing clean and dry, but larger bibs are harder to come by, especially in China. The staff at Hidden Treasures actually sent her a pattern drawn up on a paper bag and suggested that she sew them with cotton fronts and vinyl shower curtain backing.
 Heather sent over about a dozen sewn that way, but she heard they didn’t hold up as well as she’d hoped. I was so excited to jump in and offer suggestions that I hope will produce bibs they will be able to use for years to come! And, after reading this inscription on the original paper bag pattern, I feel so incredibly blessed to have the opportunity to offer my experience!
 Are you ready to get sewing?
 I have two different bib options for you, but let’s start with a little about fabrics and notions. For the waterproof backing, I highly recommend diaper-making polyurethane laminate. You’ll find it labeled PUL in most fabric shops. (Natures Fabrics is offering a 10% discount on PUL for participants. Just type in the code loavesfishes1 when you checkout. You must only have PUL in your cart to check out with the code.) Rip-stop nylon is an alternative waterproof backing.
These bibs will be packed into spare suitcases for the trip to China, so they need to be absorbent, but not too thick. I’m suggesting sewing them with cotton woven quilting fabric or flannel on the front and a hidden flannel layer for a little extra absorbency without too much thickness. Please pre-wash all cotton fabrics.
One last thing, the staff at Hidden Treasures has specifically asked for bibs with no Velcro (or other hook and loop) because the children tend to rub their heads against it, and it can be irritating. The first bib pattern is a traditional tie bib. These work really well for the needs of the children at Hidden Treasures. (Now that this project has ended, this tie bib tutorial is no longer available, but be sure to grab my tutorial for the snap bib in four sizes here: The Bibs in All Sizes Tutorial.)
 The second bib pattern is a snapped bib with a wrap-around back. These are very quick to make and great for both the needs of the children at Hidden Treasures and perfect for your little ones at home, too. (My favorite tool for attaching metal snaps is The Snap Source Snapsetter. It’s what I use for campshirts, pajamas, overalls, anything that needs metal snaps, and at only $9, it’s quite economical, too!) Just click this picture for the Snap Bib PDF pattern download.
 Be sure to add pictures of your bibs to the Flickr album: Dinner for 2 Album. Thank you so much for giving your talents, your time, your stash, yourselves for these little ones!
A Christmas Tee in a Twinkling: A Tutorial

Have you been following along with the Holiday Bake & Craft Sew Along over at Skip to my Lou? There are some great sewing tutorials already posted and lots more to come, AND today is my turn to share! Be sure to click over and check out A Christmas Tee in a Twinkling!
")
I also get to treat you to a SEW Amazing giveaway as part of our crafty series.
This is one AMAZING giveaway!
We are giving away a fabulous Prize Package worth more than $700!
 One lucky winner will receive…
- Singer ONE Sewing Machine this is Singer’s easiest sewing machine! True to SINGER, it is easy to learn on, simple and has basic stitches for crafts.
The perfect machine for stitching home made goods or something fun this holiday season! - Simplicity SideWinder Quickly and easily fill bobbins without having to un-thread and re-thread your sewing machine. The SideWinder transfers thread from spool to bobbin effortlessly and quickly; works with most bobbins, metal or plastic. An adjustable tension knob accommodates different thicknesses of thread! So cool!
- Simplicity Bias Tape Maker This Simplicity Bias Tape Maker will Create customized single fold bias tape with the push of a button!
- and so you have something beautiful to sew, $100.00 of fabric from Riley Blake!
Simply wait for RaffleCopter to load and enter there! Be sure to check out all the fabulous sewing projects shared this month for this Holiday Bake Craft Sew series going on all month long!
The Sunny Days Waterproof Pool & Beach Bag A Tutorial & 52 (Family) Projects in 2012: #13

The Sunny Days Waterproof Pool & Beach Bag is #13 on my 52 Family Projects list, and I put together a tutorial so you can make one for your family, too!
Do you feel like you have to pack a zillion things when you head out to the pool? I made this bag huge so it holds everything you could possibly need to have on hand . . . towels, sunscreen, water bottles, goggles, snacks, flip flops, sunglasses . . .

I’ve been using mine for our daily trips to swim lessons the last two weeks, and I can’t tell you how much I love it! The outer body and the outside of the pockets are sewn with Michael Miller’s new PUL (polyurethane laminate) so everything inside the bag stays nice and dry, and, if you happen to throw something damp inside the bag, the seat on your car isn’t going to end up getting wet on the way home either! (Of course, you can substitute cotton woven quilting fabrics for the PUL for a non-waterproof bag, if you’d prefer.)
These criss-cross pockets in the front work great to organize those things that you need to be able grab quickly. They look really cool, too!

I put the tutorial together in an easy to read and print pdf. You can find it right here: The Sunny Days Waterproof Pool & Beach Bag.
The Fabric I-Spy Book Tutorial

Have a pile of scraps waiting for a good use? Need a quick last minute gift for the toddler or preschooler on your list? How about sewing up a Fabric I-Spy Book? I originally created this tutorial for the Holiday Bake, Craft and Sew-Along over at Skip to My Lou. If you’re looking for more Christmas cooking and crafting ideas, there are some great recipes and tutorials over there that you have to go check out!
This Fabric I-Spy Book is a perfect gift for toddlers to preschoolers, and it’s a great way to use up those scraps that you’ve been hanging on to! The book is folded accordion-style so your little one can read it like a book:

or unfold it to seek and find on multiple pages all at once:

Can you find a white measuring tape? a dalmation with spots? #18 celebrating? two barbecue grills? a swimming dinosaur with rainbow dots? a mama with six little babies?


Ready to get started? Gather up the busiest, most colorful fabric scraps you can find and click here for the downloadable pdf tutorial: Downloadable I-Spy Book Tute.
Enjoy! If you make one of these, I’d love to see!
New Free Projects on the Stitch Website

The Fall 2011 Stitch Magazine is due to be on the shelves of your favorite fabric store on Tuesday, and I have several projects included! (You can actually purchase the downloadable digital version in the Interweave Store already.)

Two of my projects are free web extras this time which means you can go grab them right now and sew! Both are projects designed for your sewing room. The Embroidery Hoop Pockets above are a great way to show off a few favorite fabrics and keep your sewing notions close at hand. Below, The Pretty Pattern Weights look beautiful holding your patterns and fabric in place while you trace or cut.

I have one more pattern in the magazine. I’m hoping my copy will come tomorrow, and I’ll share more about it then. As always, if you sew something from one of my designs, I’d love to see it! You can share in my Flickr group here: FD Flickr Pool or on the Fishsticks Designs Facebook page: FD Facebook.
Skirt Week Guest Post at crafterhours: The Upcycled Hem-less Tee-Skirt

The incredibly creative crafterhours’ ladies, Adrianna and Susan, are hosting Skirt Week over on their blog, and they so kindly let me join in with a new tutorial! You’ll find some incredible tutorials over there from earlier this week, too. Go check them out and sew yourself (or someone else) a new summer skirt. If you sew really fast, you might still be able to meet the 8 p.m. deadline tonight for entering the challenge. If you can’t sew that quickly, then spend a bit of time checking out the flickr pools for some inspiration instead. There are some beautiful skirts to browse through!

If you know me well, then you know that I love putting old things to new use again, and this new tutorial does just that! Dig those old, unused tees out of that box in the closet and put them to work again: The Upcycled Hem-less Tee-Skirt.


It’s Time to Celebrate the Boy!
JUMP FOR JOY! It’s my turn to Celebrate the Boy!

Our four boys keep our home overflowing with all things boy all the time! If this is your first visit to my blog, WELCOME! I love creating patterns for little boys because, well, that’s who primarily enjoys the results of my sewing.
In honor of Celebrate the Boy 2011, I’ve created a free downloadable tank top pattern for all the fun-loving little guys in your life. With only two pattern pieces plus a few rectangles, this tank is quick and easy. The pattern includes sizes 12 months to 5T, and it pairs perfectly with my recently released Undercover Bottoms Boxer Briefs for cold-weather layering or warm weather snoozing.


This pattern (and almost all of my other patterns) is sewn using cotton knit fabrics. If you’ve never sewn with cotton knits or you could use a few tips to improve your results when sewing knits, be sure to check out my blog series: Knit Knowledge.
This is my youngest little guy, Charlie. He turned 1 recently, but being the youngest of six has him convinced that he’s really 11! I’ve had the Sweet Pea fabric that I used for his pjs in my stash for years, and I thought it would be perfect for him.

The other members of my family, however, have been trying to convince me that the red trim looks really pink and matched up with the lavendar of the main fabric, they think it looks not so boyish. I promise you, it’s red, not pink. I’m pretty sure putting pink in a post during Celebrate the Boy is grounds for permanent banning . . .
Since Charlie’s only one and obviously still wears a diaper, I sized up his boxer briefs two sizes so he could wear them over a disposable to bed. I love the cute little sleeping Sweet Pea on the bum panel!

My four-year-old, Jamie, answers the question, “What do you want to be when you grow up?” the same way everytime. “A motorcycle man . . . with a motorcycle.” (Cause, really? What would a motorcyle man be without a motorcycle?) When this checkered-flag jersey showed up in a swap package that I received last month, I knew right away that it would be the perfect coordinate for the motorcycle knit that was already lined up for this project.

I used my Easy Applique tutorial to do the appliques. It is really easy! You have to try it!

Ready to sew a tank and some boxer briefs? You’ll find the full-size pdf pattern and the instructions for the tank top here: The Tank. (Like all of my instructions, you’ll find word-instructions coupled with picture-instructions of every step!) You can find the boxer brief pattern right here in my store: The Undercover Bottoms Boxer Brief. And, I’ve added a 15% discount code that you can use on any of my patterns through the end of March: “TheBoy”.
What are you waiting for? Go sew! Soon your little guys will be jumping for joy in celebration, too!


