Bonnie
The Katie J. Jumper!
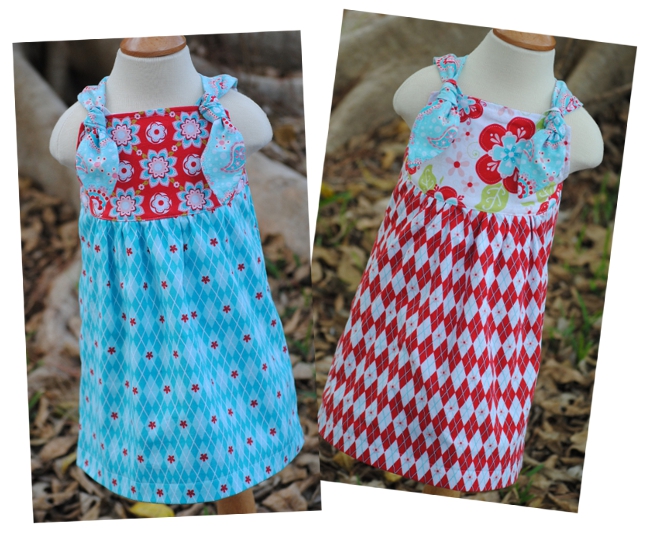
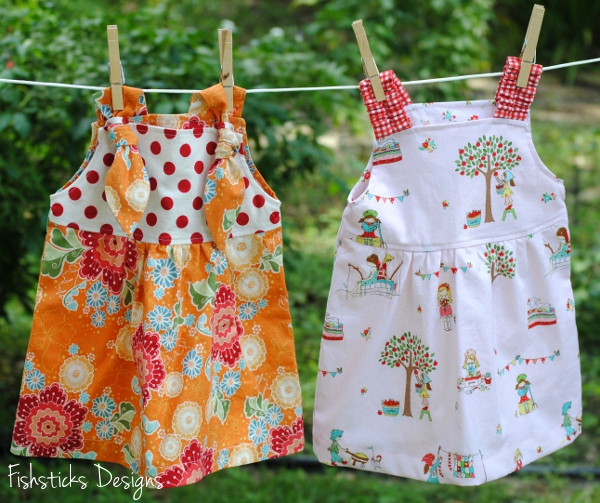 My three newest patterns are all ready for you and available now as downloadable e-patterns in the Fishsticks Designs Pattern Store! First up is the Katie J. Jumper. I love all the options that this simple little dress offers! You can see the two strap options above. The stretch strap is elasticized and has a pretty gathered look. My oldest daughter, Morgan, loves this one for our granddaughter, Katie, because it’s cute and easy to get on and off!
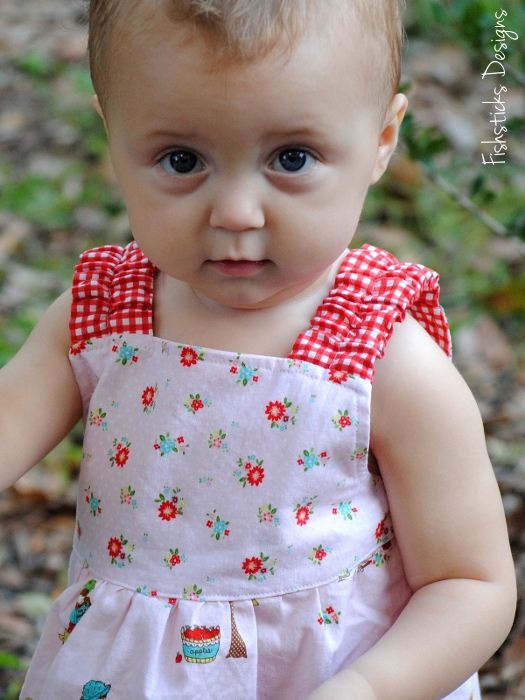 The knotted strap dresses the jumper up a little and adds a bit of modern style. The strap pulls through a loop that is attached to the bodice rather than through a button-hole. This gives the bodice a comfortable fit.
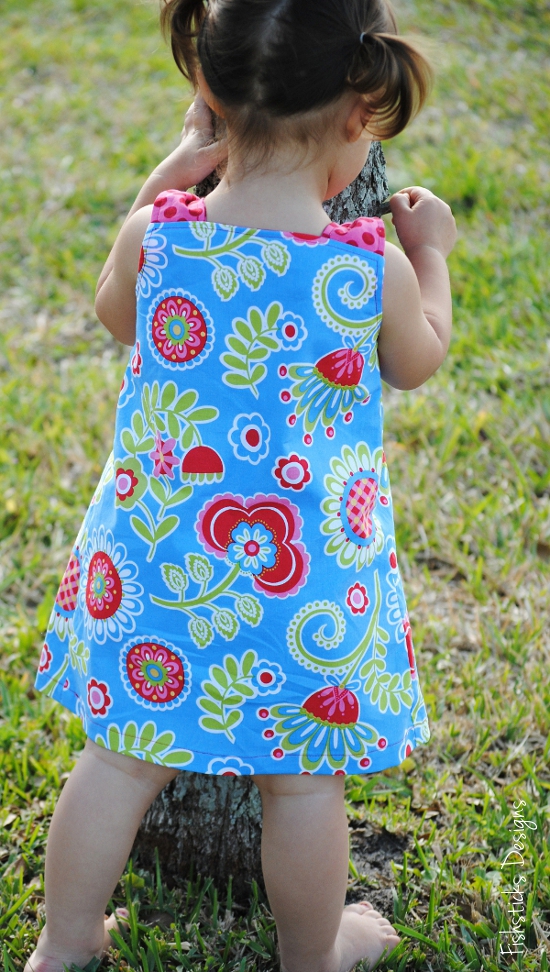
 There are two back choices for the jumper. The one-piece back on the basic jumper gives it a contemporary feel. (This pictures also gives you a good idea of where the basic jumper hem falls. It’s right at or just below the knee. )
 The gathered back is really just a repeat of the front bodice and skirt, and it gives the jumper a fuller, more traditional finished look.
 There are two reversible options for this dress, too! (You can peek at the second option in that picture just above.) The first reversible option is the basic reversible jumper. It’s a straight-forward reversible option that you can make with either back choice.
 The second reversible option is the Double-Layer Reversible Jumper. The Double-Layer Reversible Jumper is slightly longer than the Basic Jumper, falling about 2″ below the knee. The reverse side of this jumper is finished with a bottom band which peeks out under the hem on the main side.
 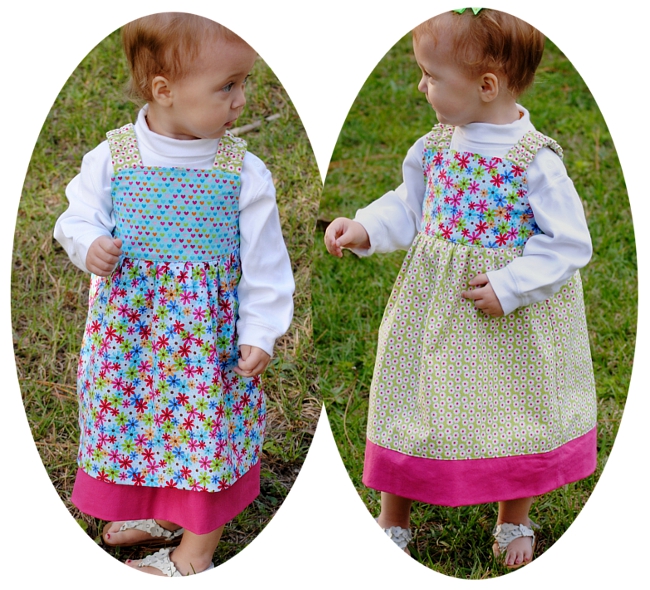 That wraps up the details on the Katie J. Jumper. You can find it right here: The Katie J. Jumper E-Pattern. I’ll be back in a bit to share more about the Mud Puddle Splashers and the Scrappy Sack!
The Snapsource SnapSetter Winners are . . .

The winners of last week’s Snapsource SnapSetter Giveaway are Carla, Paula and DM! Congratulations to all three of you! I’ll be in touch with you via email or Facebook later today.
a Rafflecopter giveaway
New patterns are coming late this afternoon!
Indygo Junction’s Fabric Flowers Book Tour (and Giveaway!)
 I can’t tell you how excited I was to be asked to be on the book tour for Amy Barickman’s new book, Indygo Junction’s Fabric Flowers! There are so many fun little embellishments packed in here that use tiny scrap pieces of fabric. I chose to make one that even uses recycled fabric! (I love putting previously-loved clothing to new use.)
  Amy’s instructions made turning these two pairs of my 13-year-old son’s old jeans into a beautiful Ragged Edge Rose so simple! My 15-year-old daughter, Samantha, pinned this rose to her denim library bag, and it went from simple to “That is so cool, Mom!” instantly.
 Since I gave up my first rose, I had to make a second one. I happen to own a denim jacket like the one in the book photo, and it was looking a little boring. It needed a Ragged Edge Rose made with colored denim! A quick run out to a local thrift store turned up the perfect pair of pink jeans. And now, look at my jacket! (I hope we have at least a few more days cool enough here for me to wear it!)
 Want to take a peek at some of the other flowers in the book?
Are you inspired to start ripping up some old jeans and digging through your scrap pile to make some fabric flowers of your own? Great! You have a chance to win your own copy of Indygo Junction’s Fabric Flowers AND some fun tools from Clover: Fuse ‘n Gather & Wrap ‘n Fuse Piping!
 To enter, just leave a comment telling me which flower you’d like to try out first and/or what you would embellish with your own handmade fabric flower! I’ll leave the giveaway open through Wednesday, February 27th at 10 p. m. EST and announce the randomly-chosen winner on Thursday, 2/28.
Wait! That’s not all! You get a prize without even entering! Everyone who reads this can go shopping right now in the Indygo Junction Store and receive 20% off of your whole order! Just use the code: FFBK15. This code is valid through 5/1/2013. 
A flower a day & 25 chances to win! Don’t miss a stop on Indygo Junction’s Fabric Flowers Blog Tour:
2/2/13 – Indygo Junction Kick Off Post
2/4/13 – Kollabora
2/5/13 – CraftFoxes
2/6/13 – Sewing Secrets
2/7/13 – Princess Lasertron
2/8/13 – Dollar Store Crafts
2/11/13 – Tatertots & Jello
2/12/13 – Family Ever After
2/13/13 – This Mama Makes Stuff
2/14/13 – Amy’s Creative Side
2/15/13 – Today’s Creative Blog
2/18/13 – Lazy Girl Designs
2/19/13 – Skip to My Lou
2/20/13 – The Sewing Loft
2/21/13 – The Crafty Cupboard
2/22/13 – Fishsticks Designs <—— Today’s tour stop!
2/25/13 – Taradara
2/26/13 – Diary of a Quilter
2/27/13 – Craft Gossip
2/28/13 – How Joyful
3/1/13 – Lindsay Sews
3/4/13 – Flamingo Toes
3/5/13 – In Color Order
3/6/13 – See Kate Sew
3/7/13 – Handmade Charlotte
3/8/13 – Sew Caroline
3/9/13 – Indygo Junction Wrap Up Post, Bonus Giveaway & Free Flower Project
Comments are now closed, and a winner has been chosen!
A Few Spring Pattern Previews!
Three new Fishsticks Designs patterns are coming on Monday! It’s been a really long time, hasn’t it? I thought you might enjoy seeing a few little sneak peeks. First up the Mud Puddle Splashers!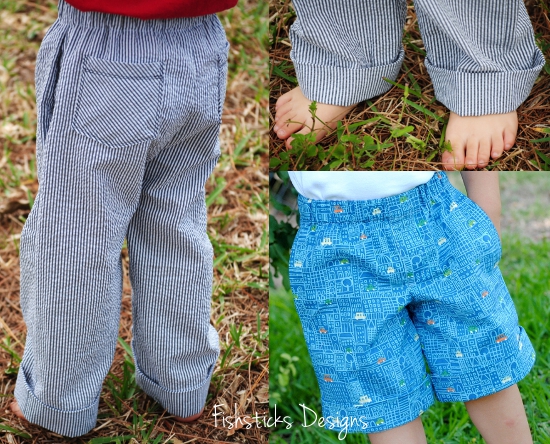
You may remember that the Mud Puddle Splashers was a shorts pattern that I created in a select group of sizes for last July’s Hopeful Threads Boys’ Shorts Month. I received so many great reviews and so many requests to put together a full pattern, and it’s finally almost done! I personally love this pattern for great basic little kid pants! The final pattern will include sizes from 12 months all the way to size 12. A portion of the profits from the Mud Puddle Splashers pattern will go to charity . . . more on that Monday.
The second pattern is my first girls’ release since the now-retired Emmy Dress. (I do have a granddaughter to sew for now. I can’t possibly leave her out, can I?) Take a little peek at the Katie J. Jumper!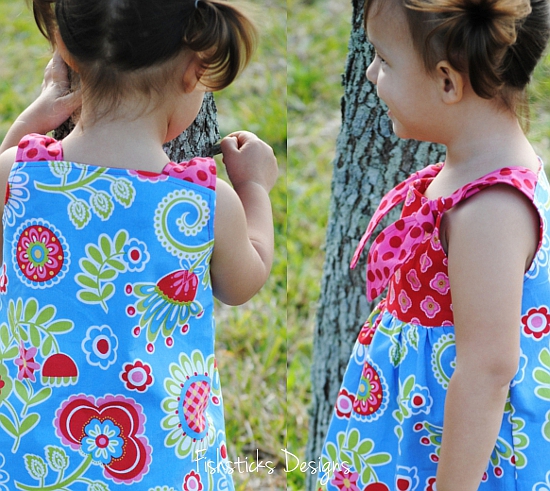 In sizes 6 months to 5, this jumper has so many options! There are two strap options, two basic jumper options and two reversible jumper options! I love giving you patterns with options!
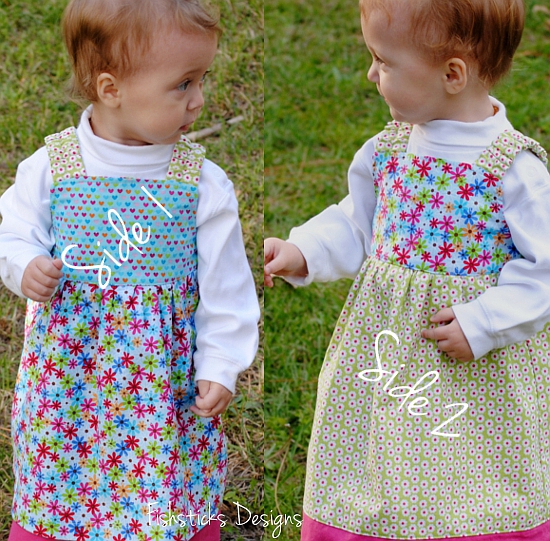 Finally, here’s the Scrappy Sack! If you read my blog posts at Christmas time, you’ve seen the prototypes of this bag. With the help of my amazing group of testers, I’ve added a some options that I think will make this a fun and funky bag that you and your teenage daughters (or granddaughters) will adore!
That is all for now, but I’ll have lots of pictures, more information and the patterns for you on Monday morning! In the meantime, be sure that you’ve entered the It’s a Snap Source Giveaway, AND don’t miss tomorrow’s post! I’m so excited to be a part of the blog tour for a new book. There will be another great giveaway and a discount code for the book author’s store!
Upcycled Grown-Up Bibs!
 This month’s Dinner for 2 project at Hopeful Threads is all about bibs. If you’ve been reading along, you already know that here in Florida, we’re collecting handmade bibs for the Hidden Treasures Foster Home in China. (You can read more here: Big Kid Bibs for Hidden Treasures.) The project is actually called Dinner for 2, though, because over in Louisiana, Anita is collecting bibs for the residents at Grace Nursing Home! I couldn’t let the month pass by without sewing a few adult bibs to send her way.
Remember how I said that I had collected a pile of thrifted men’s button-down shirts in anticipation of the Upcycled Men’s Shirt Challenge at Project Run & Play? Well, guess what I did with the extra shirts? I turned them into bibs for a few of the men at Grace Nursing Home! First up, the plaid dress shirt version: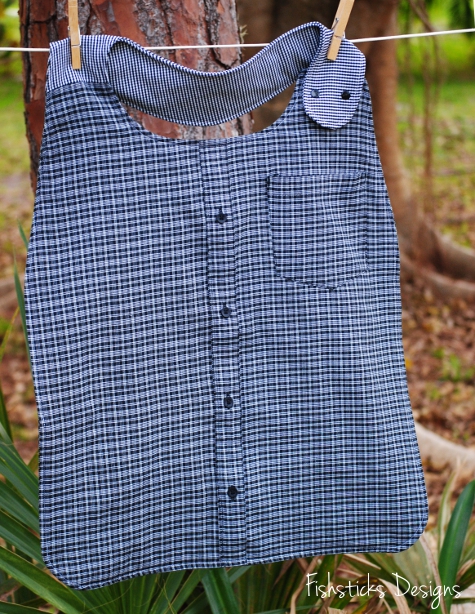 Here’s the fun-loving, novelty version:
 Finally, the casual flannel shirt version.
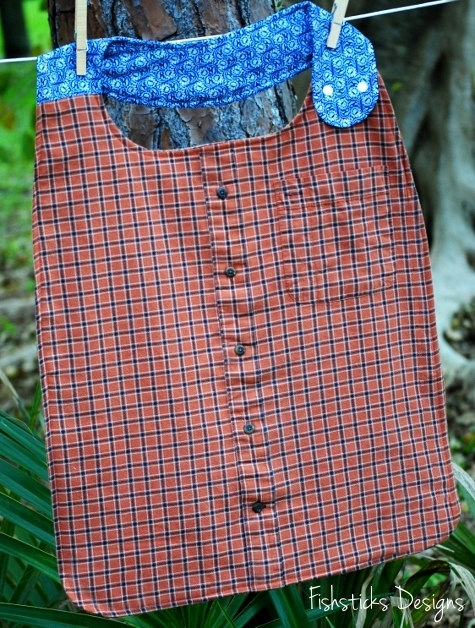 Aren’t they fun? Using thrifted shirts in good condition saved on fabric costs and gave them a more grown-up look! Sewing them was really easy, too. I scaled my Big Kid Snap Bib pattern up to adult size, using my husband as my model. For each bib, I cut the front and back body from the front and back of a men’s large button-down shirt. To add some absorbency, I also cut a hidden body layer of flannel. Before I started sewing things together, I stitched the button placket on the front shut. For the wraparound neck piece, I used coordinating fabric, cutting the same three layers. Once I stitched each neck piece to each body piece, I just followed the instructions from the Big Kid Snap Bib pattern, making the diameter of the neck about 7 1/2″. Easy peasy, right?
I had planned to just blog about these adult bibs, but I couldn’t resist drawing up a pattern for you to use. There’s still time to add to the collection heading to Louisiana! You might even want to sew them for other things, too! Wouldn’t they be perfect for the tasters at a chili cook-off or maybe the contestants at a pie-eating contest or even just for the grown-up messy eaters at home? Okay, here’s the link to the pattern: The Grown-Up Bib. This is only the pattern. For the instructions, you’ll need to go download this pattern and follow the steps I mentioned above: The Big Kid Snap Bib.
If you sew for Dinner for 2, be sure to add your pictures to the Flickr album, and if you haven’t already entered the It’s a Snap Source Giveaway from Monday, be sure to do that, too!
Handmade Decor: Handmade with History
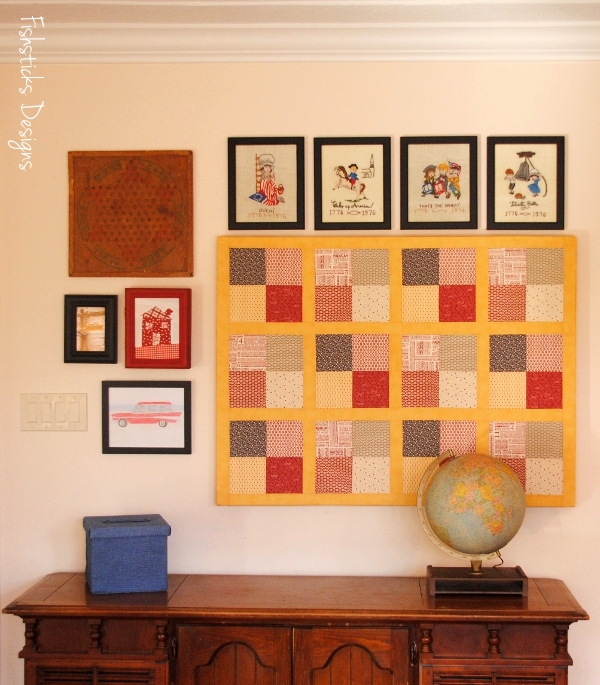
 I’ve been sharing the pieces that make up the TV gallery wall in our livingroom over the last few weeks, and I’m wrapping things up today with a couple of handmade things that I didn’t make myself. Ray and I ran across this set of six Bicentennial embroidery pieces in a thrift store many years ago, and we couldn’t pass them up. We’re always drawn in by patriotic handmade pieces, especially pieces as beautifully done as these.
 All six designs were framed in these plastic wood-look frames, and they’ve been displayed here and there around our various homes since we purchased them. I finally decided, though, that it was time for the outdated frames to go.
 The backs of a few of the pieces were inscribed with the name of the embroiderer and the date that they were done. I was curious, so I Googled her name and found a Catherine Bischoffberger who was born about 1914 and lived in Kings, New York when the 1940 census was taken.
  I have no idea, of course, if it’s the same Catherine Bischoffberger, but it’s possible since she would have been about 61 in 1975. I love decorating our home with pieces that have a story, but I’ll admit that it saddens me sometimes to run across things like this in a thrift store. I wonder what happened to her family. What would lead them to give up a treasure like this? I can almost see her rocking in a comfortable chair, cup of tea by her side, needle in hand, hour after hour, pouring herself into these beauties. I hope that she would be glad to know how much I enjoy looking at her work each day, how much I appreciate the time and the skill put into each piece. I wish I could ask her why she made them. Did she make them purely for love of country? Were they a gift for someone? One thing, I know for sure, she probably never imagined that someone someday would be sharing pictures of them on something called a blog on this thing known as the Internet!
 A few of you have pointed out the vintage Chinese Checkers board in the upper left-hand corner of the wall. That was a thrift store find, as well. I like the bit of whimsy that it adds to the gallery.
 The last handmade piece is this sweet drawing that I commissioned Samantha to complete for me. A few months back, we ran across a restored Chevy Nomad in a parking lot, and she snapped a picture with plans to sketch it later. When I asked her to draw something for me, she went right to that picture and asked what I thought. I think it’s perfect!
 And, that wraps up this wall, for now. I’d love to switch out the slightly cheesy “F” picture for something different, but I’m still looking for the perfect replacement. I think it needs something else, too, on the credenza to the right of the box. Something tall and red, maybe? Like a tall candle stick or a bird cage? I’ll let you know when I run across whatever it is!
 If you haven’t yet, be sure to click over to yesterday’s post and enter the It’s a Snap Source Giveaway!
It’s a Snap Source Giveaway!
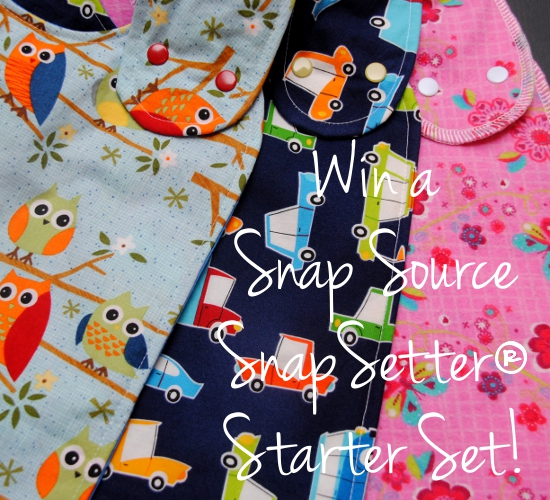 Guess what?! When the folks over at The Snap Source heard that we were joining with Hopeful Threads to sew bibs for two different charities this month, they offered to send me THREE SnapSetter® Starter Sets to give away! How cool is that?
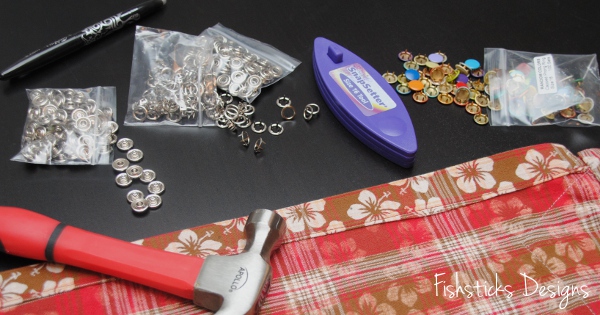 I love using the SnapSetter® for clothing. The snaps are high quality, affordable and long-lasting, and applying them is fast and easy! Simply position the snap components and fabric in between the layers of The SnapSetter® and hammer into place.
 How many things can you think of that could use snaps? (Snaps, by the way, are far easier for little hands to manage when dressing themselves than buttons. My six-year-old, Jamie, requests them on all of his camp shirts!)
 Each starter set comes with the standard size 16 SnapSetter®, six open-ring snap sets and 40 capped snap sets! And, did I mention, that THREE people will win?
 To enter, just follow the instructions on the Rafflecopter below! I’ll announce the winners on Monday, 2/25, and the winners will have 48 hours to respond. Both domestic and international entries are welcome!
a Rafflecopter giveaway
Project Run & Play: Signature Style with Superhero Appeal

The final Project Run & Play theme is Your Signature Style. As the weeks have come and gone, I’ve pondered what my “signature style” is and wondered what I could sew that would show it. The whole series flew by, though, and as usual, it was the last minute. There was no time left to think, only time to sew! Yesterday was Charlie’s third birthday, and since he was the recipient of this week’s sewing, I let him make the major design decisions.
Is that a superhero hiding behind that palm tree? Could it possibly be Captain America?!
  Charlie loves superheroes, especially The Avengers, or “The Avengers Assemble” as he calls them. His current favorite happens to be Cap’n ‘Merica!
 As I mentioned, time was short, so I grabbed two patterns that I know are quick and trustworthy — for the top, my Charlie Tee & Hoodie and for the bottom, my soon-to-be-re-released Mud Puddle Splashers. I wondered aloud as I was tracing Captain America’s shirt design onto my Charlie Tee pattern, how I was going to spin this as my signature style. Suddenly, I realized, though, that this is my signature style! In creating this outfit, I followed my normal routine: grab a pattern that you know and love, evaluate the needs and desires of the wearer, choose a few little extras, use what you have available (fabric, time, equipment) and create something practical and fun.
 The shirt was pieced together using the colorblocking method that I mentioned in Week 2. It just took a few more pieces than usual. I cut the red and white stripes at the bottom longer than I needed them to be, pieced them together, then cut the curve at the top before cutting the matching top piece. I used the ringer sleeves and the hood from the Charlie pattern, partially to add some character to the top, but also because I broke my walking foot last week. (I managed the hems on the shirt and the shorts without a walking foot, but there was no way I was going to try topstitching a neckline without one!)
 It was nearing 10:15 on Monday evening, and I’d promised myself that I’d be in bed by midnight, so the shorts got the Naptime Knit Mud Puddle Splashers treatment. I did add back pockets, but rather than turn and topstitch them, I trimmed off the seam allowance and just folded them wrong sides together. It’s interlock knit, so the edges aren’t going to fray, and that raw-edge look works great for little boys. (Why, yes! Yes, I did make TWO pairs of red shorts for Charlie during this PR&P series! I wondered for about half a second if I should, but red works well for him, so they’ll get plenty of wear.)
 Happy Birthday, Charlie! Oh, those eyes. Of course I’m biased, but aren’t they amazing? (I considered virtually cleaning up the bruise between his eyes and removing the grass from his hair, but this is so very Charlie! He’s not quite ready to save the world, but he works hard at conquering his own backyard.)
 Before I wrap up this post, I have to share one more little thing. I mentioned in yesterday’s post that I had to clean up a cake disaster, and I’m a little bit impressed with how it turned out. You won’t find me posting pictures of cakes here very often. I can sew really well, but cake decorating is not my thing. HOWEVER . . . I think this one might be encouraging to other harried moms like me.
I tried out a new cake recipe yesterday, and it was incredibly yummy: Paleo Chocolate Birthday Cake. The problem arose when I realized that I’d failed to remember to put parchment paper in the pans before pouring the cake batter into them. This is what I found myself faced with:
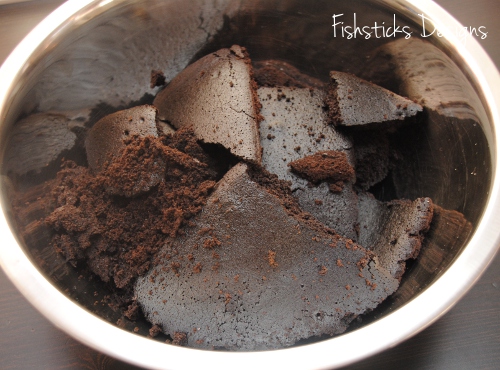 Not pretty, huh? Well, what’s a creative mother of a little boy who loves Captain America to do when she’s faced with a bowl full of broken cake? Why, build a cake mountain, of course! And, let everyone think that’s what she meant to do from the start!

Oh, the blueberries? Charlie not only loves Captain America, but he also loves blueberries. He’s been insisting for weeks that his cake had to be chocolate with chocolate frosting and blueberries. So there you go!
Our Family’s Favorite Pancakes

It’s Pancake Tuesday! I grew up in a United Methodist Church, and Pancake Tuesday was an annual tradition. The men of the church would gather together and make pancakes for everyone for dinner on that night once a year. Now that I’m a grown-up I know that Pancake Tuesday is really Shrove Tuesday or Mardi Gras, the day before Ash Wednesday, the first day of Lent. Historically, Christians chose to give up rich and fatty foods for the period of Lent, and serving the family a pancake feast was a way of getting things like milk, eggs and butter out of the house rather than letting them go to waste.
We love having pancakes for dinner. In fact, we probably have them at least twice a month because no advance preparation is required, and I always have the ingredients on hand. The recipe that we use is an adaptation of this one: Mom’s Buttermilk Pancakes.
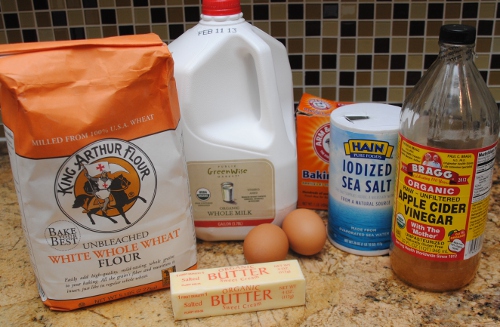 The Ingredients (for about 1 1/2 dozen 3 1/2″ pancakes):
2 cups white whole wheat flour
1 tsp. sea salt
1 tsp. baking soda
1/4 cup of real butter (not margarine)
2 eggs
1 1/2 cups of whole milk
1/2 cup of water
2 tbs. of apple cider vinegar
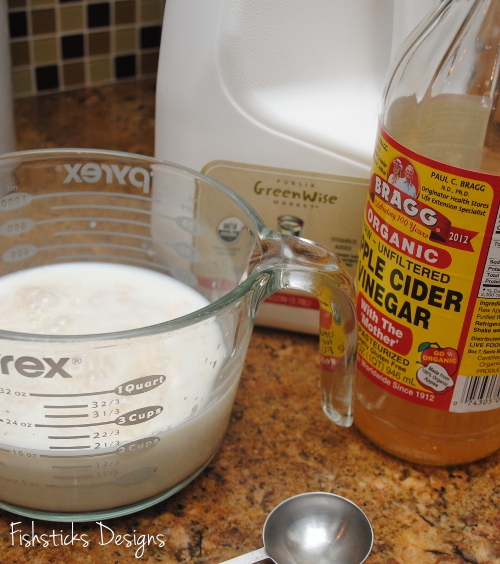
Measure 1 1/2 cups of whole milk into a measuring cup. Add 1/2 cup of water. Mix in 2 tbs. of apple cider vinegar. Set aside. (You can use 2 cups of buttermilk instead, but I never have buttermilk, and I always have milk and AC vinegar on hand.)
 Melt butter.
 Crack eggs into a small bowl and whisk them well.
 In a large mixing bowl, pour flour, salt and baking soda. Mix these together with a fork or a metal whisk and break up any lumps.
 Pour the wet ingredients into the dry and mix.
 Pour the batter into your preheated skillet. (Dripping batter on the side of the stove and the skillet handle is totally optional.) I usually make pancakes about 3 1/2″ to 4″ wide. They cook evenly at that size, and I can fit three in the pan at one time!
 Pancakes are ready to flip when they are bubbly on top and slightly dry on the edges.
 Serve them to your hungry crew with real maple syrup and real butter!
 Enjoy! (I’m off to see what I can do to recover a minor birthday cake disaster. Today happens to not only be Pancake Tuesday, but it’s also my Charlie’s third birthday! Be sure to check back tomorrow to see how much he loves Cap’n ‘Merica.)
Handmade Decor: The Hidden Thermostat
 I showed you my TV wall last week along with my solution for making the television disappear: The Great TV Cover-up. Before we even placed the TV on the wall, though, there was another eyesore to deal with.
  Who put that thing there and why? There are so many more appropriate places for the thermostat. How about the stairway wall right across from here or maybe one of the hallways or almost anywhere else? Ray and I did discuss cutting holes in the wall and dragging the thermostat closer to the edge of the wall to make it a little less noticeable, but late one evening, inspiration struck!
We have this little box that is designed to hang on the wall and hold your keys. I didn’t take a picture of the inside, but inside there were little knobs mounted to a solid back. I enlisted Ray’s help to remove the back while I headed down to my sewing studio.
 First, I removed the glass and the print from the box, then I took a few minutes to paint the box red. While the paint was drying, I dug through my stash and pulled out a pile of red and white fabrics. In no time at all, I had pieced together a wonky house block, just the right size for the frame on the front of the box. (How is it that sewing something so small, can result in a mess this big?)
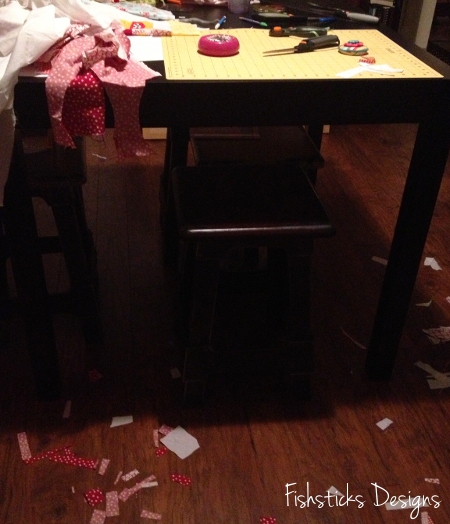 What do you think? Oh, how I love re-purposing something old into something beautiful with purpose!
 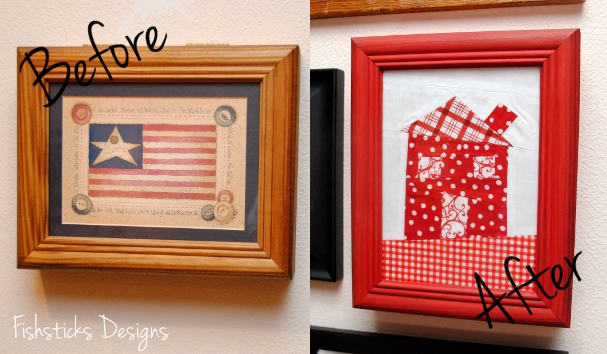 With the back removed, I simply placed a few screws right above the thermostat for the top of the box to sit on, and the door allows us to access the thermostat whenever necessary.
 Here’s one more look at our TV wall with the television and the thermostat hidden away. (Next week, I’ll share a little about the framed embroidery pieces above the television!)