SMS Handmade Holidays ~ Gifts for Boys
 Have you been following along with the 2014 edition of Handmade Holidays at Sew Mama Sew? I’m the guest curator today, and I’ve put together a list of tutorials just for those of you with boys (little and big) on your holiday sewing lists! Just click right here to read all about them!
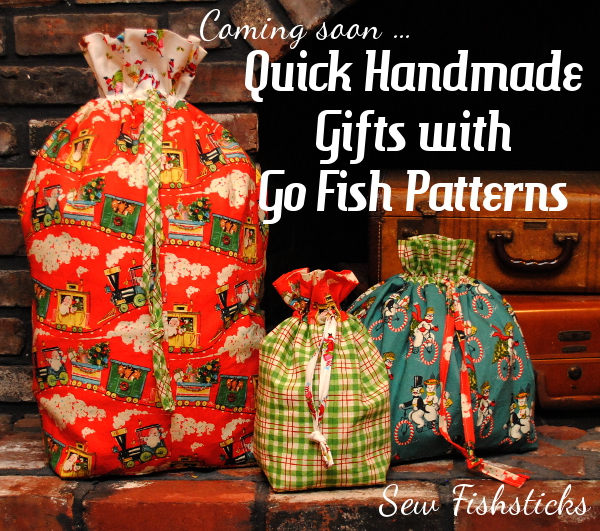 I’m also working on putting together some quick gift ideas for everyone on your list using my Go Fish Patterns. I’ll have those right here tomorrow morning. Don’t forget that all of my Go Fish Patterns are on sale through Saturday! You can find those details right here.
Four New Go Fish Patterns … and a Go Fish Sale!
 Ready to do a little Christmas-is-almost-here sewing? I’ve got four new quick-as-a-flash Go Fish patterns ready for you to sew! And, because now is the time to get those holiday sewing lists moving along, I’m running a choose-your-own-six-pack sale on all of my Go Fish patterns for one week!
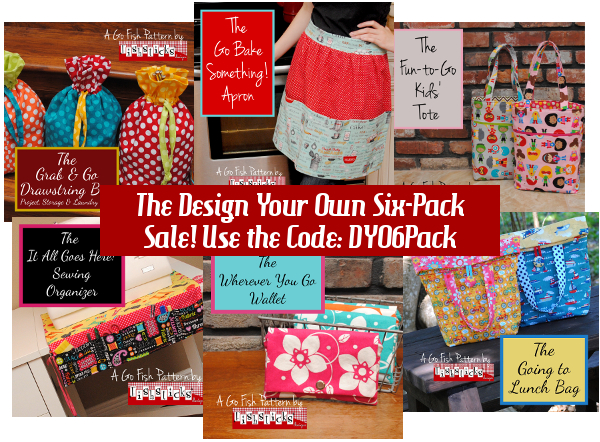 To take advantage of the sale, just choose any six Go Fish Patterns, add them to your cart in the Fishsticks Designs Pattern Shop or Fishsticks Designs at Etsy, then use the code DYO6Pack to receive the discount. (Etsy is the best choice if you’re mobile.)
On to the new pattern introductions!
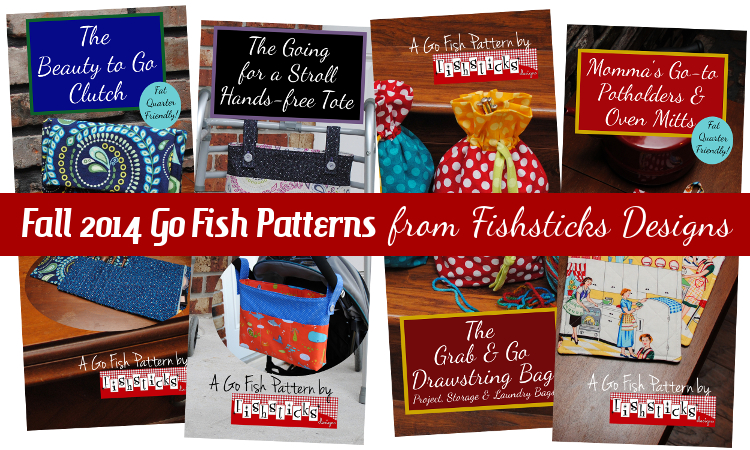
 First up is the Beauty to Go Clutch. This little organizer is perfect for keeping your cosmetics and cosmetic brushes organized and ready to take along with you!
 The Beauty to Go Clutch opens to reveal a zippered compartment, as well as a divided pocket for brushes.
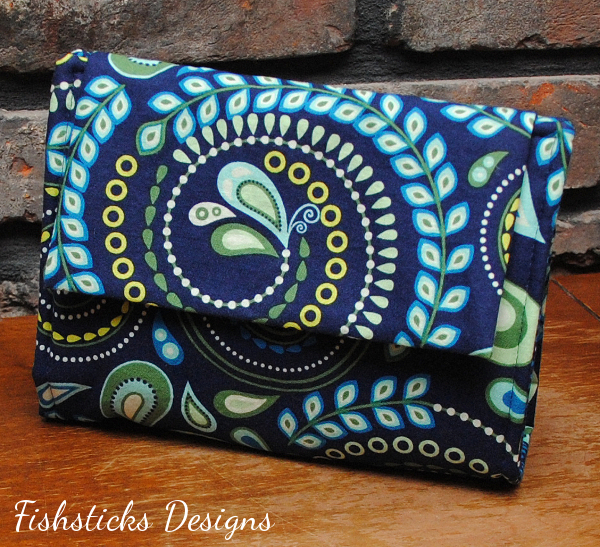 Once everything is packed away, it rolls up and fastens with a magnetic snap to keep everything neatly in place.
 The Grab & Go Drawstring Bag pattern includes instructions to sew three different size bags – a project size, a storage size and a laundry size bag.
 These bags go together really fast, and they’re useful for so many things. From gift giving to taking along sporting equipment and yarn crafting to Lego storage, you’ll find this bag incredibly handy to have around!
 Potholders are practical and thoughtful gifts for all sorts of occasions, and having a quick and simple one in your pattern arsenal is must! Momma’s Go-to Potholders and Oven Mitts pattern is just the one to keep handy.
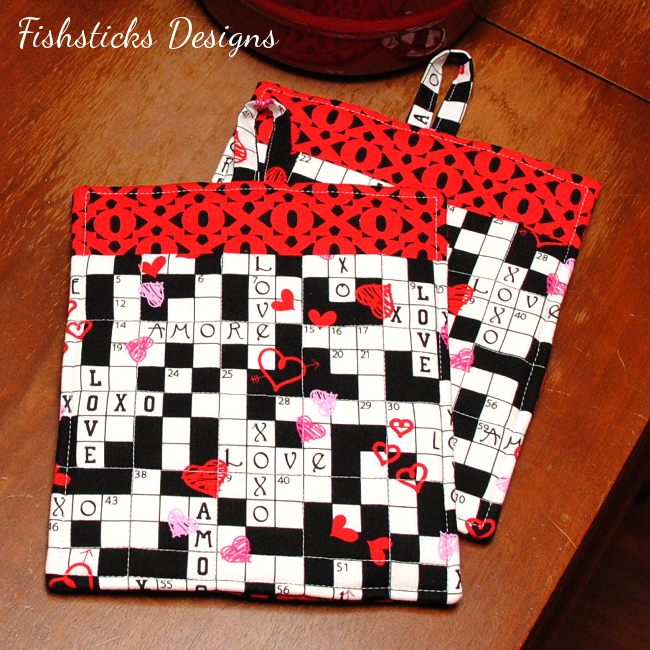 This generously-sized potholder features a large front pocket that allows it to double as an oven mitt.
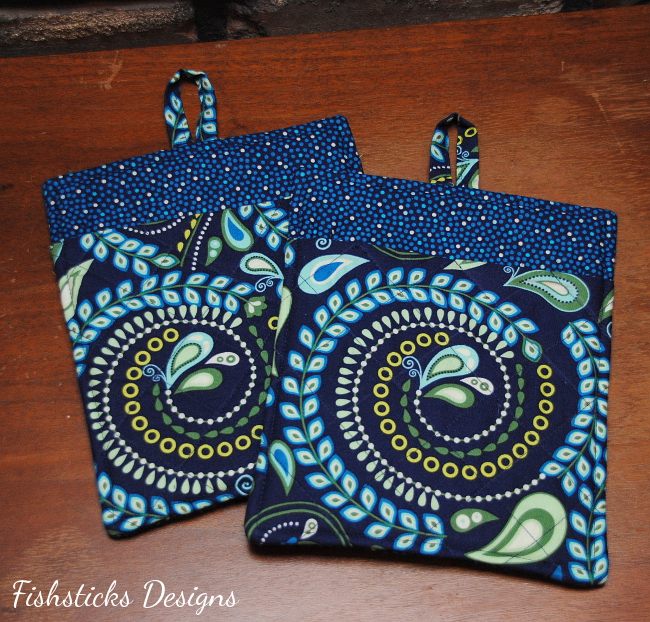 Sew it up with a pretty fabric, and it’ll add some beauty to your kitchen, too.
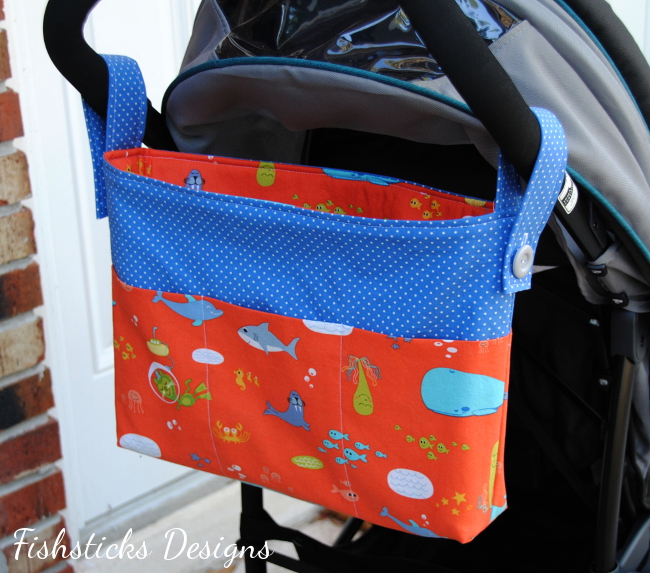
 Finally, the Going for a Stroll Hands-free Tote! This pattern is one that was requested by several shop owners when I was at the Checker Distributors’ Open House in August, and I’m so happy with how it turned out!
 The Hands-free Tote is filled with pockets for storing your essentials, and it’s designed to work with a walker, a stroller or a wheelchair.
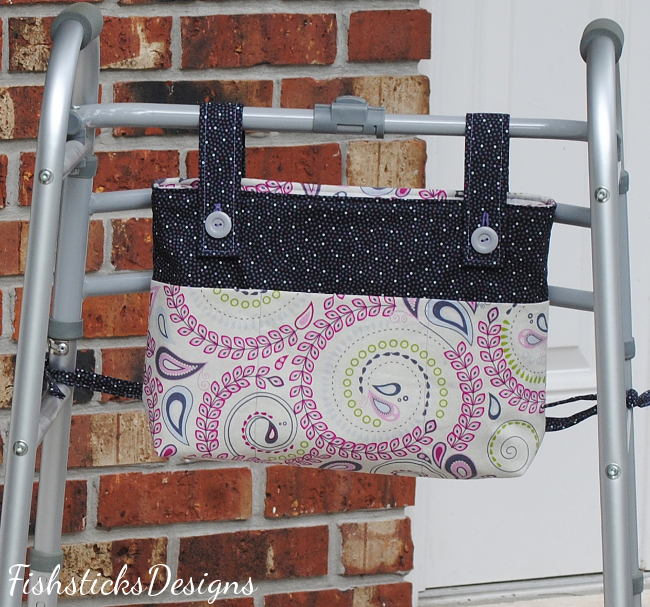 The tote features straps that can be sewn on in the center of the bag to button over a full handle, or they can be attached to the sides so that they can fasten over double handles.
 You can find all four new patterns available now in my main pattern store, my Etsy shop and on Craftsy! I’ll be back on early next week with some ideas for using my Go Fish patterns for Christmas gifts that will be loved by everyone on your list.
The Daphne Bag from Clover & Violet {Pattern Parcel}
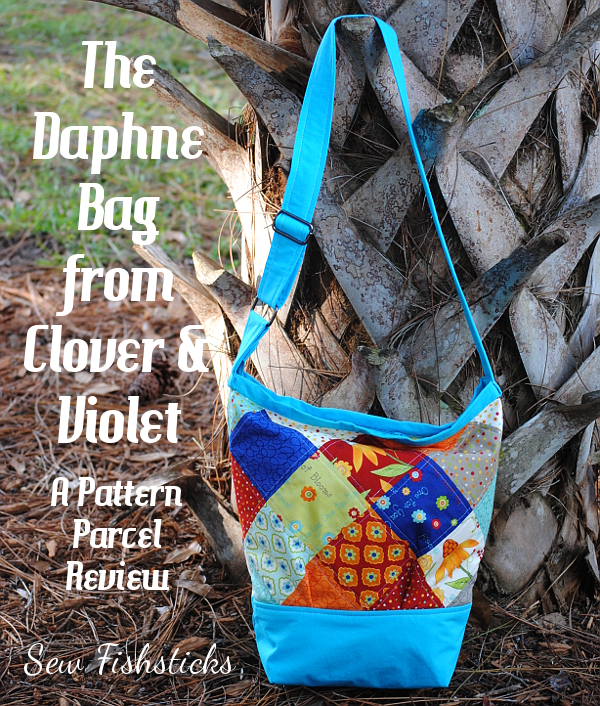 Have you seen the great collection of handbag patterns that are included with Pattern Parcel #7? You can pop over and check them all out by clicking the image below, and read on to see my version of the Daphne Bag from Clover & Violet!

How Pattern Parcel Works:
Here at Perfect Pattern Parcel, we believe in supporting independent pattern designers. It’s our opinion that indie patterns are just, well, better than big box patterns, and we’re pretty sure our customers think so too. So, we allow customers to show their support in naming their own price for each Parcel. We also encourage customers to allocate part of their Parcel price to the charity Donorschoose.org in order to help classrooms in need. Pattern Parcel donates all profits after expenses from Parcel sales to the charity as well. Its our goal to raise over $20,000 for Donors Choose this year.
Here at Perfect Pattern Parcel, we believe in supporting independent pattern designers. It’s our opinion that indie patterns are just, well, better than big box patterns, and we’re pretty sure our customers think so too. So, we allow customers to show their support in naming their own price for each Parcel. We also encourage customers to allocate part of their Parcel price to the charity Donorschoose.org in order to help classrooms in need. Pattern Parcel donates all profits after expenses from Parcel sales to the charity as well. Its our goal to raise over $20,000 for Donors Choose this year.
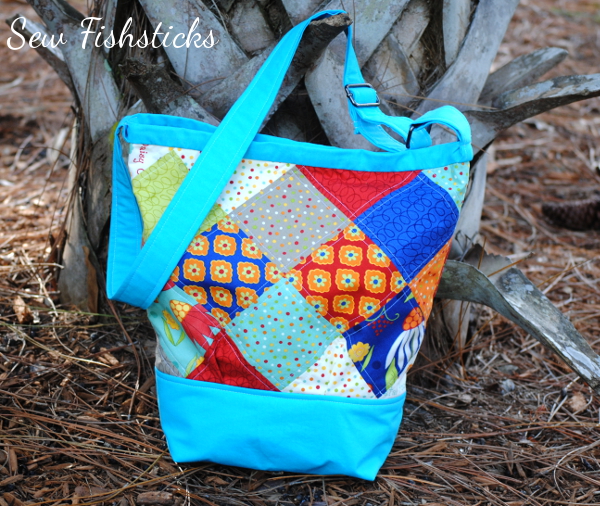 I mentioned in my post yesterday that I’ve really been enjoying quilting lately, so it’s no surprise that the patchwork design drew me to this bag. I used a charm pack of Pat Sloan’s fabric line, “One for You, One for Me“, in the pieced section and American Made Brand solids for the rest of the bag.
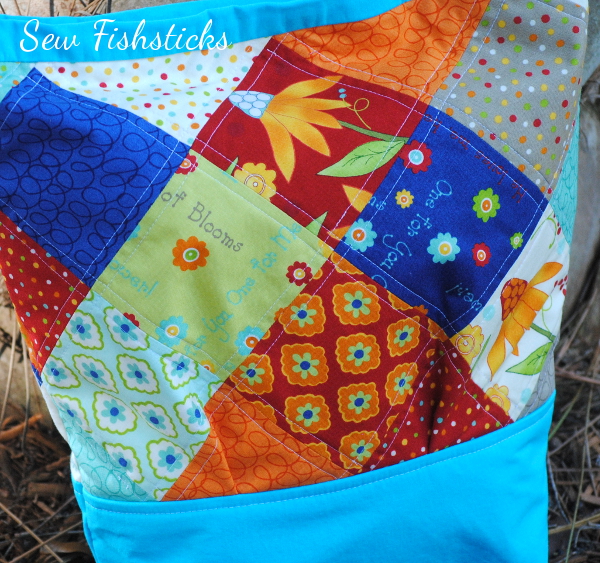 This slouchy satchel features an adjustable strap and a zippered top closure.
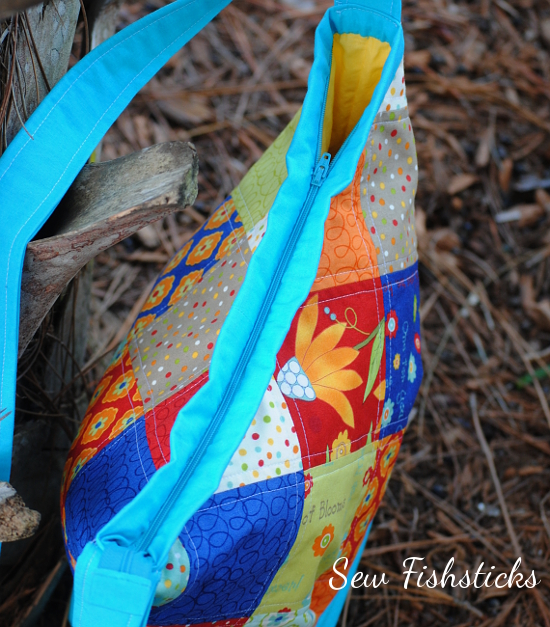 Inside, there’s a zippered pocket …
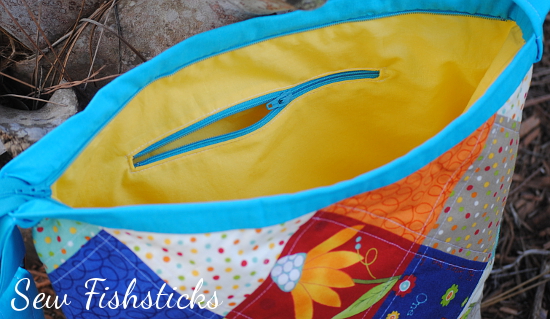 …and a slip pocket. (I divided my slip pocket in half so that I would have a place to keep my cellphone.)
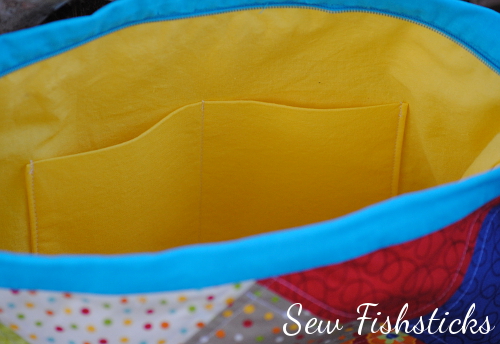 I love how this bag turned out! I originally thought maybe I would give it away as a gift, but now I think I’ll keep it! I even have enough charm squares left to make a little wallet to match.
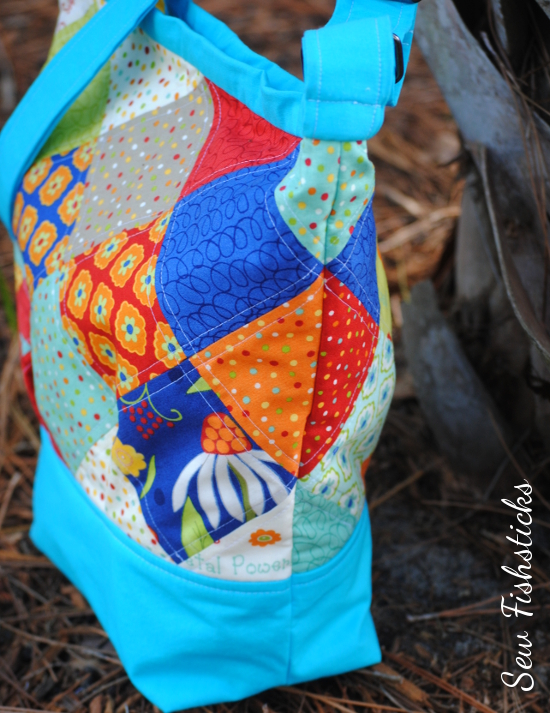
Friday, November 7
Stitched ||
Sew Exhausted
Saturday, November 8
Made by Sara ||Oliver’s Fancy ||
Strawberry Patch Ramblings
Sunday, November 9
from a box ||
Mia’s Creations ||
MOMENTS
Monday, November 10
owen’s olivia ||
While she was sleeping
Tuesday, November 11
Nutta ||
Radiant Home Studio ||
La Pantigana
Wednesday, November 12
Sew Fishsticks ||
Stacy Sews ||
Stitching Insane ||
GnomeAngel
Thursday, November 13
Needle and Ted ||
Patchouli Moon Studio ||
Sprouting JubeJube ||
The Crazy Tailor
Friday, November 14
Casa Crafty ||
A Jennuine Life ||
‘So, Zo… What do you know?’
Saturday, November 15
Stitches by Laura ||
Rebekah Sews ||
Serger Pepper
Sunday, November 16
Blogs Like A Mother ||
Vicky Myers creations ||
Blossom Heart Quilts
Monday, November 17
Shanni Loves ||
So Sew Easy ||
GYCT Designs ||
Tiger In A Tornado
Tuesday, November 18
The Nosy Pepper ||
Keep Calm and Carrion ||
There & Back ||
Sewing Sober
Wednesday, November 19
Sew Like My Mom ||
Knot Sew Normal ||
Stacy Sews ||
sewVery
Thursday, November 20
Mimi’s Mom ||
Our Family Four ||
shades of BOLD ||
Modern Handcraft
Friday, November 21
Shawnta Sews ||
Lulu & Celeste ||
Amanda Rose ||
Robin’s Fabric Nest ||
House of Pinheiro
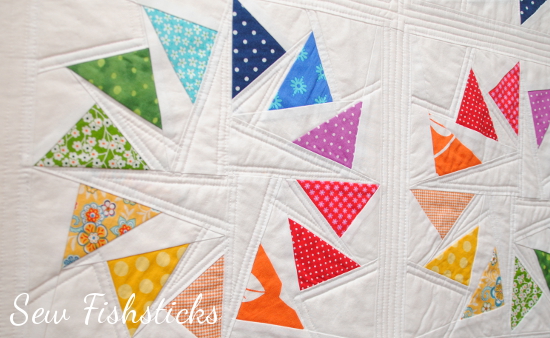
How I Learned to Paper Piece with a Circle of Geese Quilt
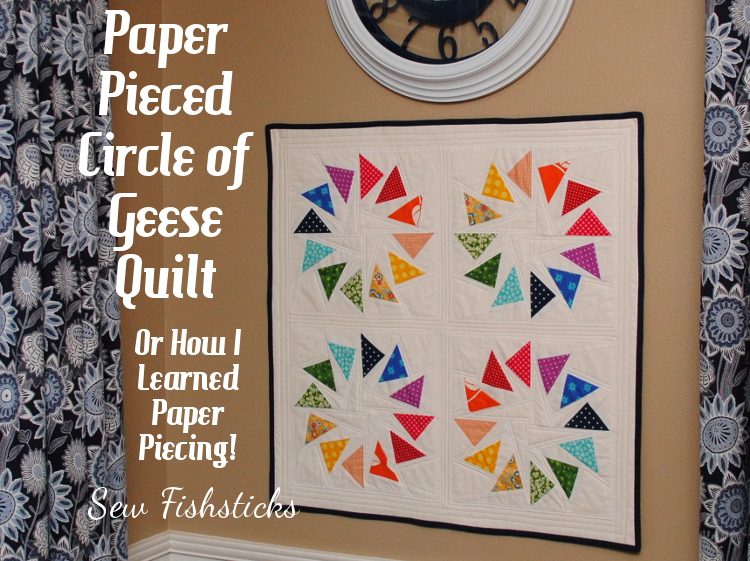 I learned paper-piecing, and I love it! AND, it’s not hard!! You should give it a try, too.
Last month, the folks at Soak Wash put together a quilter’s photo-a-day challenge on Instagram. I thought I would join in because I really like the motivation that a challenge offers, and while I don’t do a ton of quilting, I’ve really been enjoying it lately. (For tons of inspiration, check out all of the photos that were shared during the challenge by searching #soakphotochallenge on Instagram.)
The first lesson teaches you how to sew a traditional courthouse steps block using basic paper piecing, and I was able to finish it really quickly. You can see my sweet little block above. Once I felt like I had a grasp on what paper piecing involved, I cheated a little and jumped ahead to lesson #4, and I made this!
From there, I pieced it all together, backed it and did some straight line quilting using my regular sewing machine.
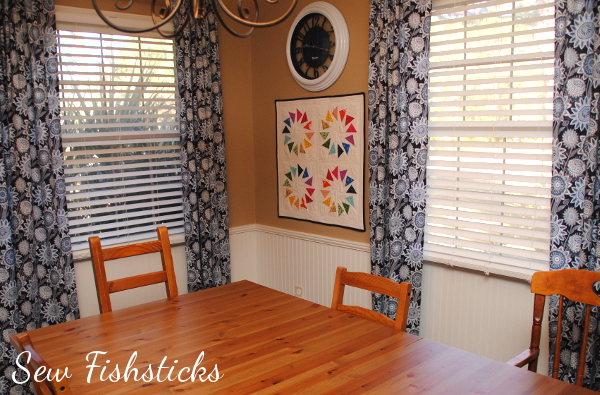
 I finished it with navy blue binding to match the clock above it and hung it up on the dining room wall.
Just for You ~ A Lovely Long Skirt and a Giveaway!
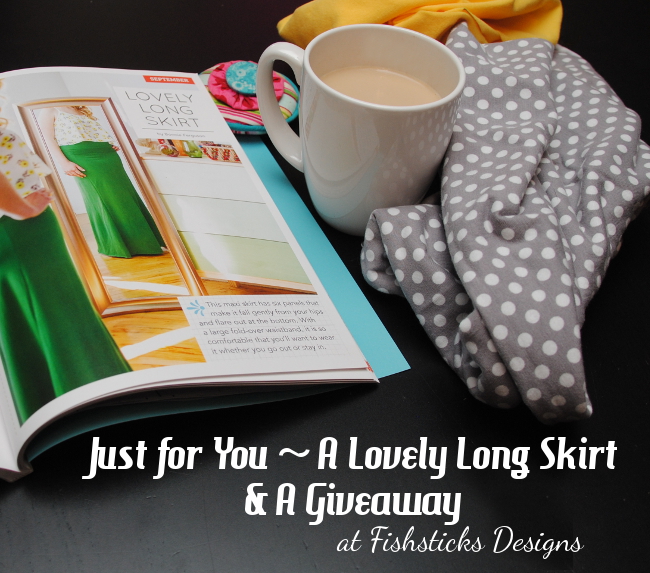 I’m so excited to introduce you to my newest sewing pattern, the Lovely Long Skirt. You can find it in your favorite quilt shop and book store … in a book written by my friends, Caroline Critchfield of Sew Can She and Sarah Markos of Blue Susan Makes. The book is called Just for You – Selfish Sewing with Your Favorite SewCanShe Bloggers, and I’m thrilled to be a part of it! (Keep reading to the bottom to find out about the giveaway … actually two giveaways!)
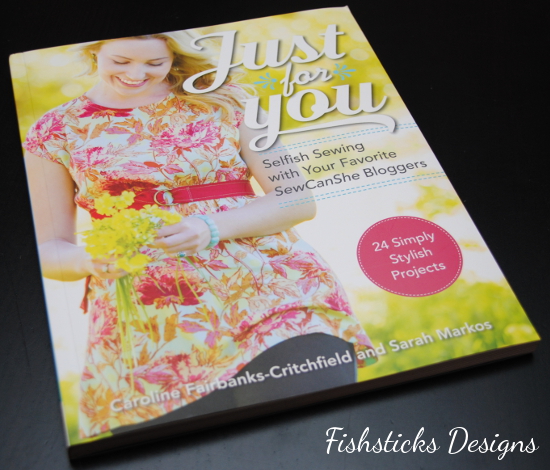 This new book is filled to the brim with great patterns designed by some of your favorite bloggers, and they’re all patterns for you to sew for you!
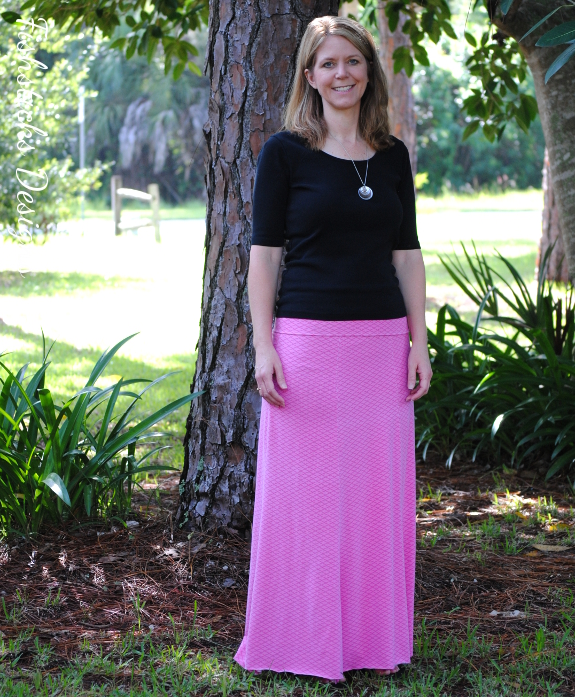
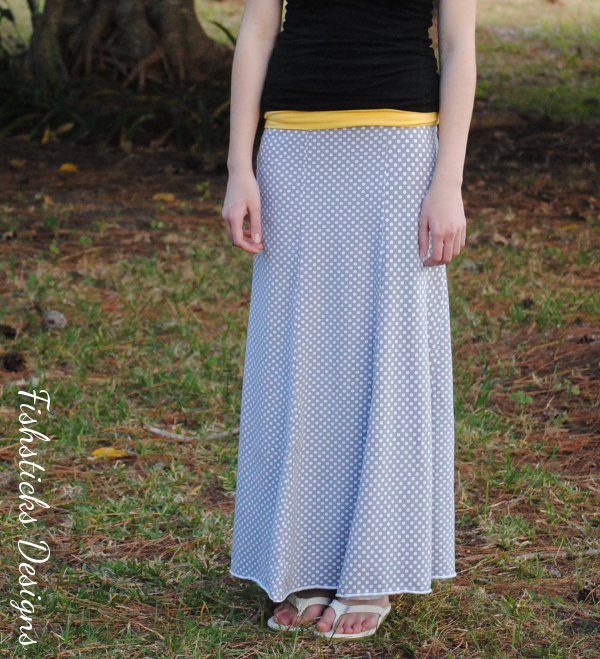 The maxi skirt pattern that I designed for the book works perfectly with all of the lovely designer jersey knits on the market. I absolutely love sewing with knits, and I’m a big fan of knit skirts with yoga-style waistbands. When you wear them, you look stylish and pulled together, but you feel like you’re wearing your PJs!
 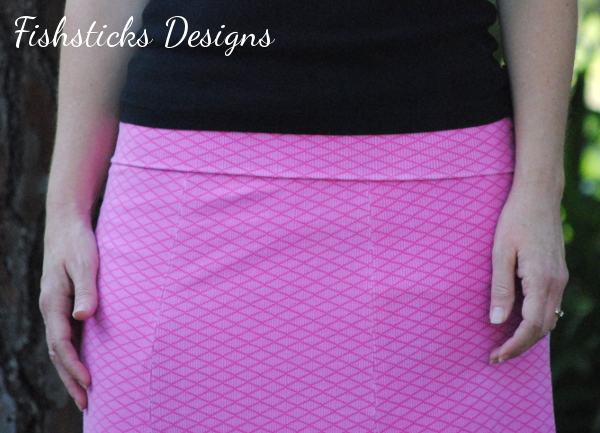 The Lovely Long Skirt is a gored skirt that has a slim fit at the waist and through the hips with a flattering flare at the bottom.
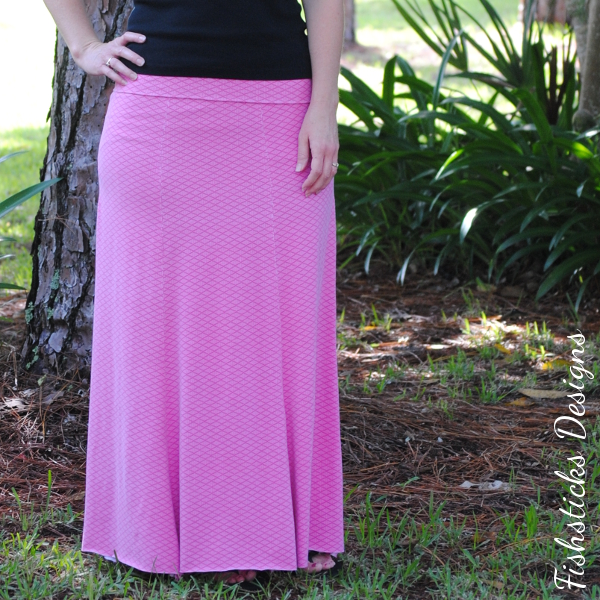 The rolled hem takes advantage of that roll-y nature of jersey knits. You just leave the hem unfinished, then wash and dry it! Easy peasy!
 My pink skirt is sewn with a Michael Miller jersey.
 Samantha’s dotted skirt is made with Riley Blake jerseys. I love how a simple change in fabric completely changes the look of the skirt. Mine is sophisticated. Samantha’s is fun! (I adore the extra splash of color in the yellow waistband.)
 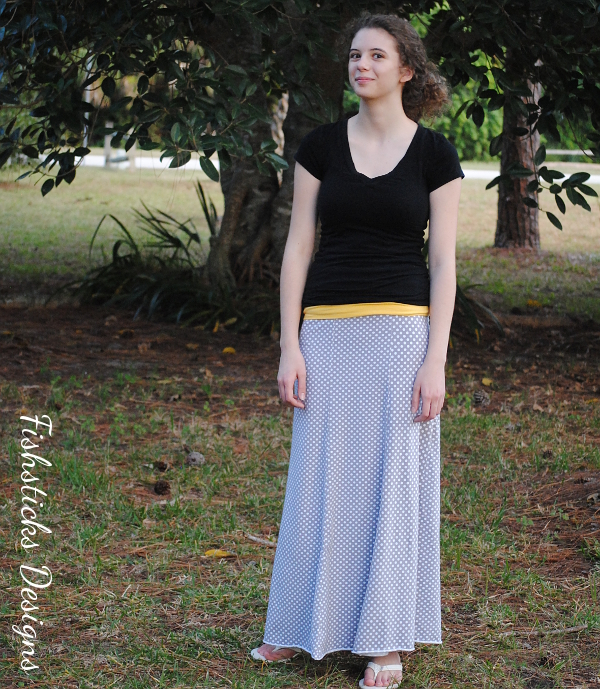 Now for the giveaways! First, I get to giveaway a copy of the book! US winners will receive their very own paperback copy, including full-size paper patterns, courtesy of Stash Books. International winners will receive the eBook version with patterns that you print from your home computer. To enter, just leave a comment on this post, then come back up to the Rafflecopter and register your entry. (Don’t forget to do the second part, or you won’t actually be entered!)
a Rafflecopter giveaway
Second, Caroline is giving away a prize package which includes a copy of the book AND fabric to sew the Chevron Shrug, the Lace Infinity Scarf, the Bella Pouch and my Lovely Long Skirt! To find out how to enter Caroline’s giveaway, just click the collage below: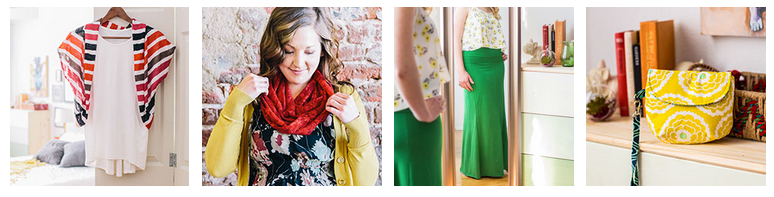 Finally, don’t miss the rest of the blog tour! Each designer will be introducing and sharing a bit about her project from the book and giving away a copy. There’s plenty of inspiration and more chances to win coming up! The link list below will fill up as the posts and giveaways go live.
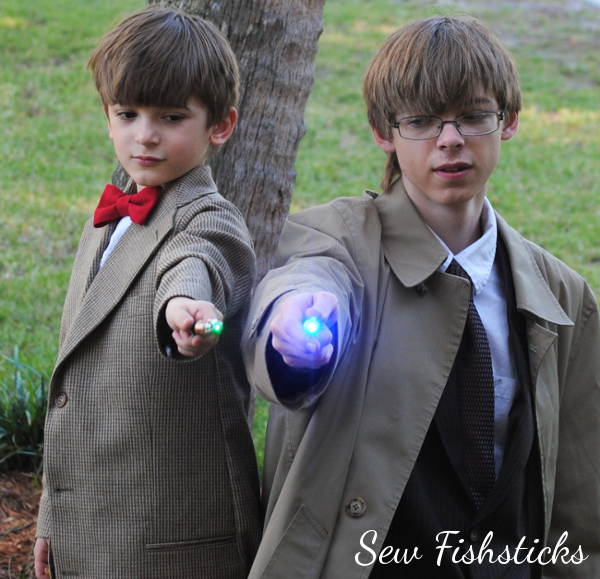
Halloween with the Doctor & His Companions
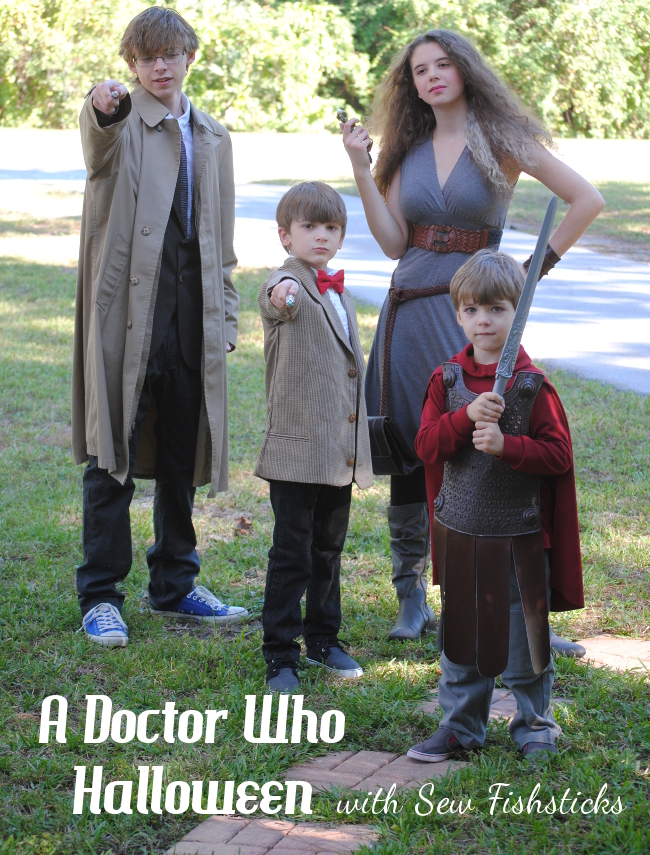 Happy Halloween from our family of Doctor Who fans! This is the first time in a very long time that we’ve dressed up the whole family with a theme. We had so much fun with it, though, I think we might try to keep doing it, at least for the next few years … until another one of my kiddos is all grown up.
If you’ve read this blog over the last few months, then you probably already know that we love the Doctor. One of my favorite things about how this all came together is that our teenagers chose the theme themselves and divided up all of the characters before they even came to me. I didn’t have to mediate any disagreements, I just got to help pull everything together!
We’ll go in age order since that’s the easiest for me: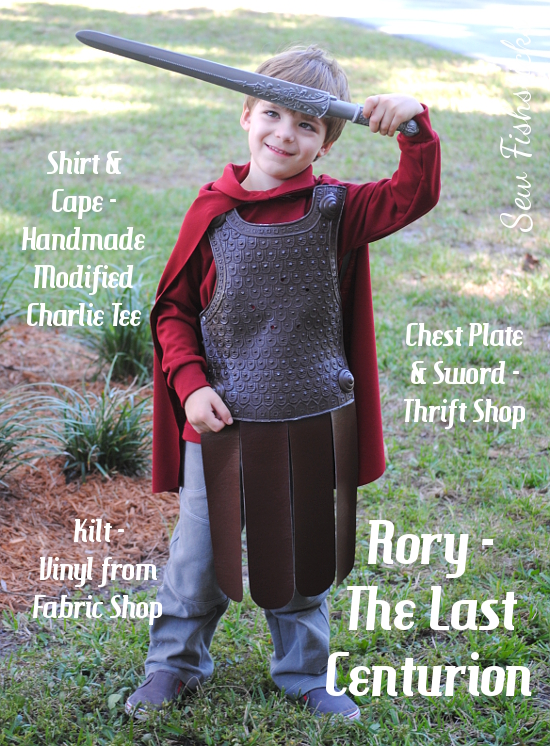 First up is Charlie as Rory – the Last Centurion. On our first thrift-shopping-for-Halloween excursion, we found a plastic chest plate and sword for $2.99 at Goodwill, and I knew that it would be perfect. The chest plate was the wrong color, though, and it had a big lion emblem attached.
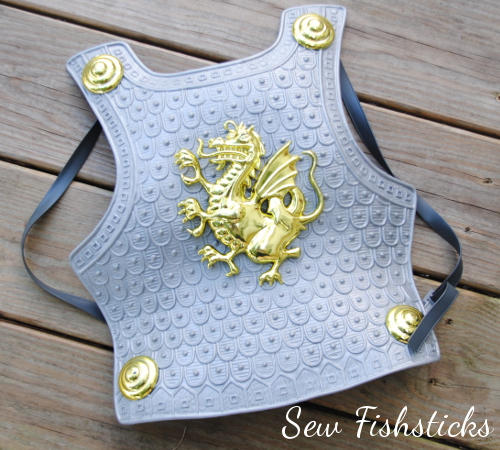 We solved that problem easily by pulling off the lion and spray-painting the shield. (This paint did start to chip off right away, so I wouldn’t use it for an application that needed to be permanent. For Charlie’s Last Centurion costume it worked just fine, though. The chipping gives it a pretty cool aged look.)
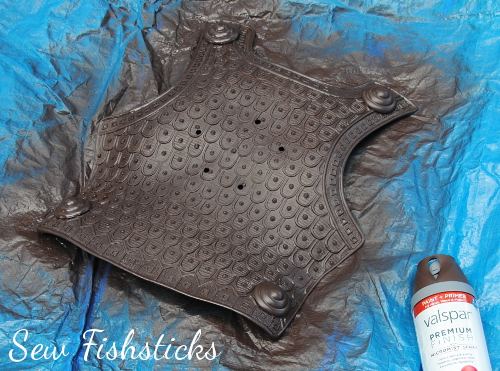 For the “kilt” part of the Roman centurion uniform, I cut pieces from vinyl that I purchased at Joann’s and then used duct tape to secure them to the back of the chest plate. We also added an additional strap to the back of the plate because the original shoulder straps didn’t keep it on very securely.
 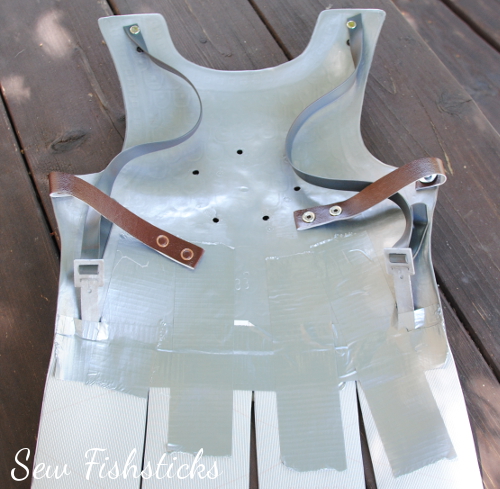 For the shirt and cape, I modified my Charlie Tee pattern. I replaced the original collar with a higher, wider version that folds down, and I sewed the self-drafted cape into the back and sides of the collar. I used a polyester blend interlock, also from Joann’s, primarily because it was the right color, but I love the drape that it has. It’s perfect for our little Last Centurion. (He was so cute at our church’s fall festival when he would try to explain who he was!)
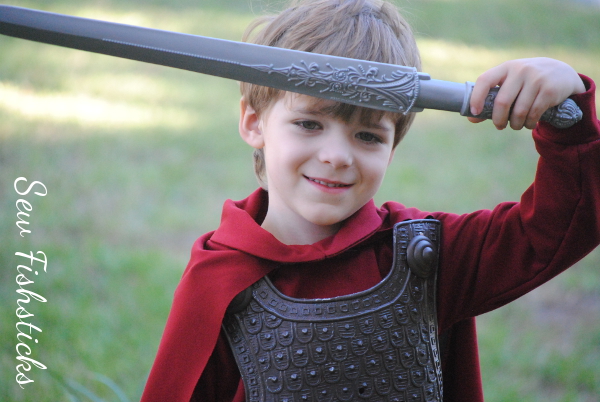
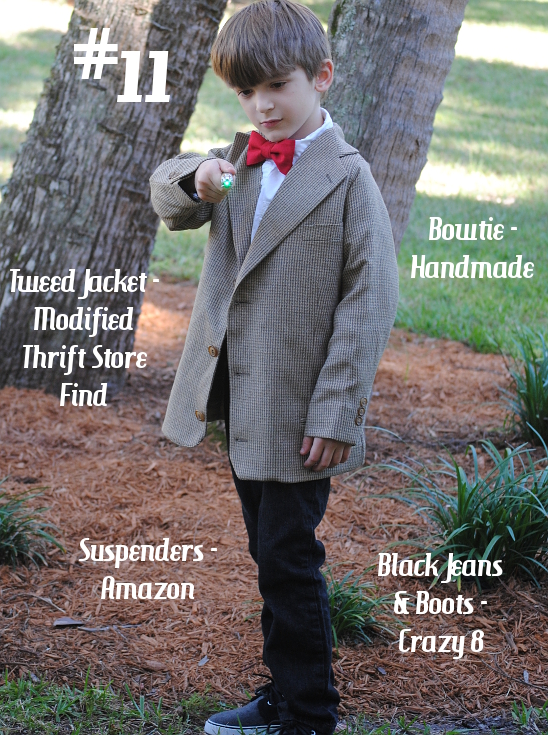 Next up, is Jamie as the 11th Doctor. I just adore little boys in bow ties! We found Jamie’s black skinny jeans and canvas boots at Crazy 8, and I love that he can wear them everyday. I purchased the suspenders at Amazon, and I sewed up the bow tie from red Kona cotton to match.
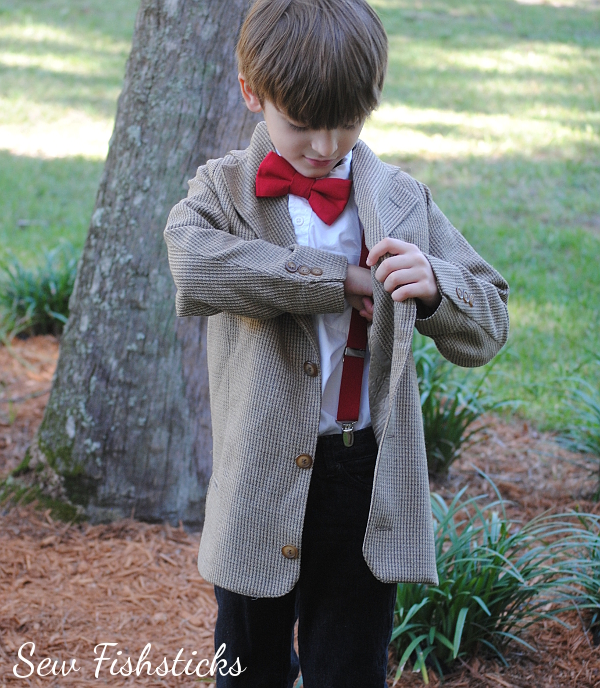 The hardest part for Jamie’s costume was the tweed jacket. We searched every thrift shop and resale store within easy driving distance, and just couldn’t find something that didn’t require some significant alterations. Soooo …. we brought home this:
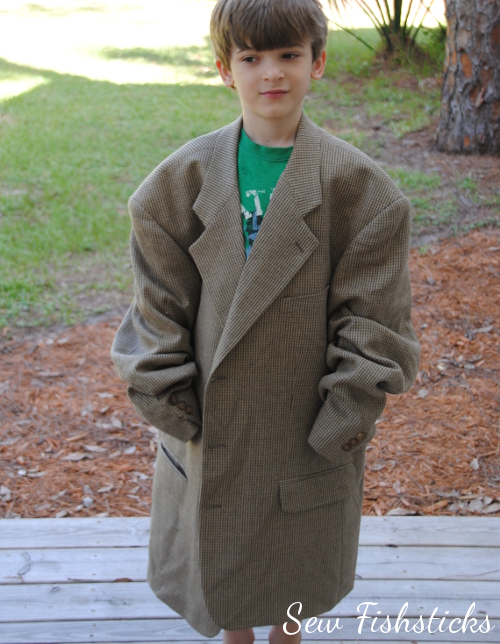 It’s just a little big, isn’t it? I’ll start by saying that since this was a costume, I didn’t worry too much about making the jacket look perfect. I used my Which Way Out Jacket pattern sort of placed on top of the original jacket to get an idea what the sizing should look like, then I chopped it all up. I forgot, though, that I needed to add a seam allowance in the back because I was using two pieces, so the back is a bit narrow. I sewed the lining pieces back together, then the outer pieces, just sewing the pockets where they fell. Rather than trying to completely re-do the collar, I just cut it in half in the back, serged the edges, and stitched it back together. Then I pressed the seam allowance open and stitched down each side to keep those edges tucked under. It actually turned out pretty well for a few hours worth of work!
 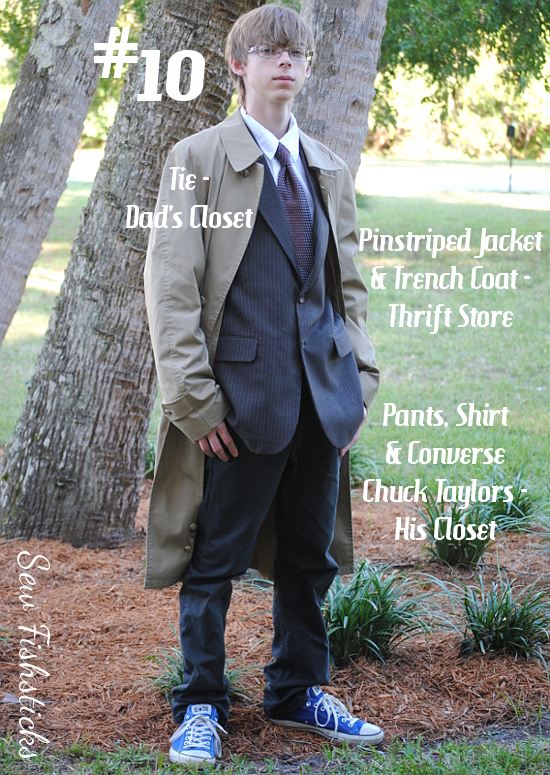 Allen’s 10th Doctor costume was by far the easiest! He already had the Chucks, the dress shirt and the dress pants. We found the pinstriped jacket and the trench coat at local thrift stores, and he borrowed one of Ray’s ties to pull everything together. I didn’t think I would have to do anything crafty at all to his outfit … until he wore the jacket to youth group and came home with a huge rip down one of the front seams. Urgh. Boys. So, I ripped the lining open to stitch the jacket back together, and then I just slipstitched the lining back in. Maybe he felt left out of the whole creative process?
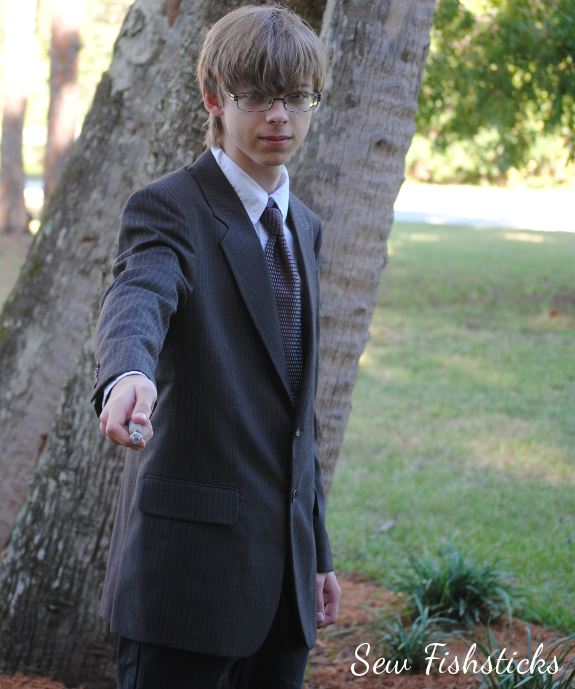
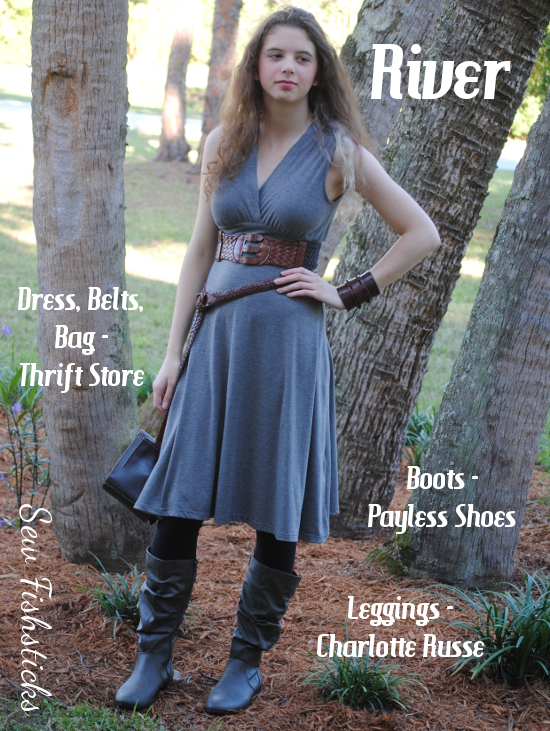 Finally, Samantha as River Song. This costume took the most time, but Samantha and Ray did most of the work on it. Except for the shopping and a few suggestions here and there, all I did was hem the arms after Samantha ripped the sleeves off of her thrift shop dress find. Here’s the before:
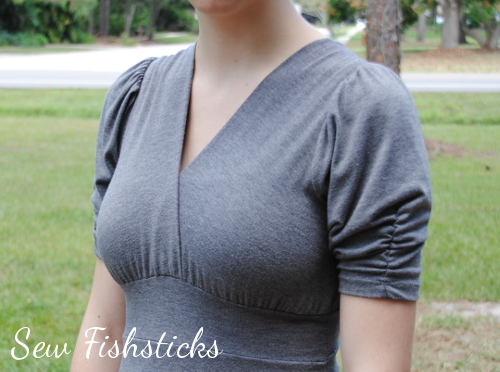 Both belts came from thrift stores. Actually, three thrift shop belts are a part of this outfit.
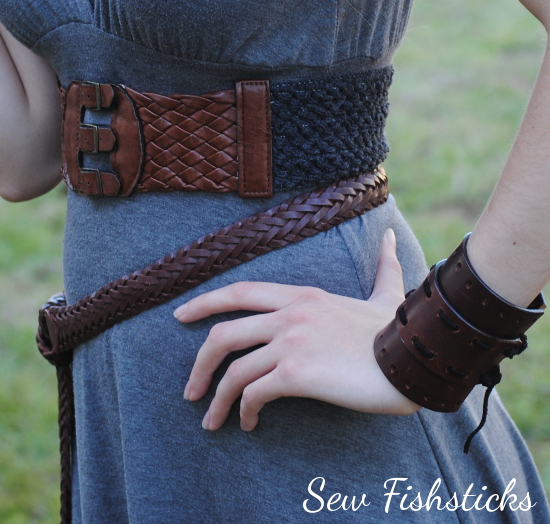 The top belt was a bit too big, and it was the wrong color, so Samantha stitched a seam down the middle using yarn and a darning needle, then she dyed it the perfect dark grey.
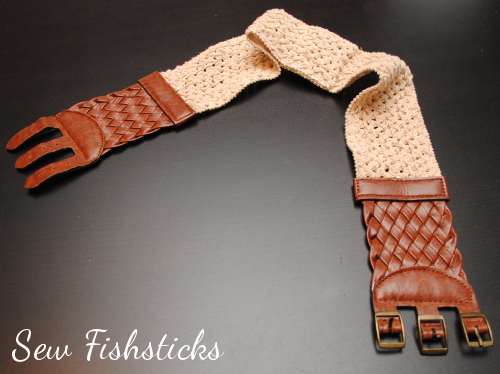 For River’s bag, Ray bolted this leather bag – another thrifted find – to a super-long men’s braided belt.
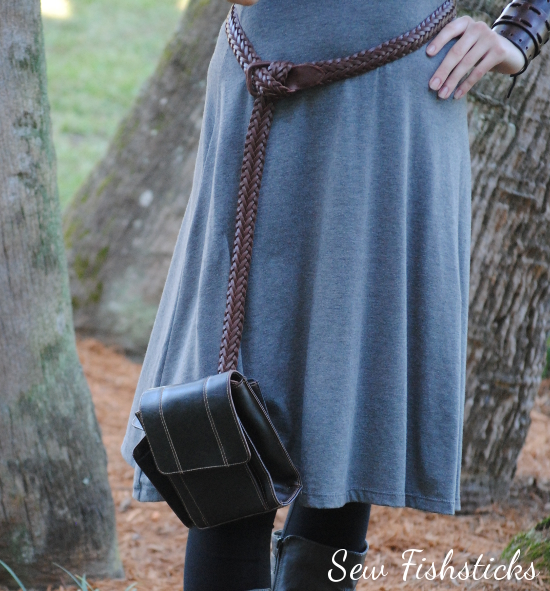 That third belt that I mentioned above?
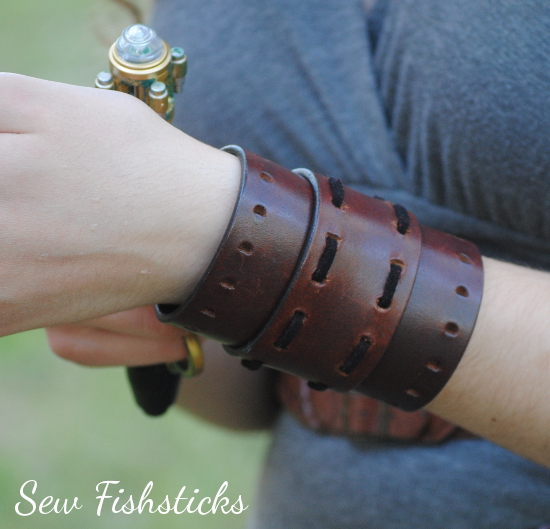 It became River’s Vortex Manipulator! Samantha cut up a belt that had holes running the full length, and Ray used a punch and hammer to make the holes bigger (with a large audience on the back porch), so that Samantha could sew the pieces together with suede lacing strands.
 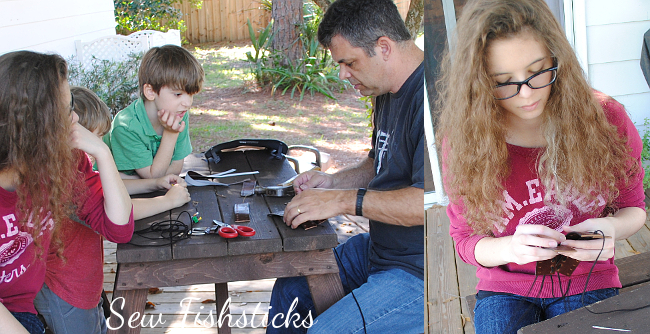 Ray and I couldn’t possibly let the kids have all the fun, though! So, we dressed as the Doctor’s 9th regeneration and Rose Tyler!
 Ray’s costume is all pieces that he’ll wear over and over. Mine pretty much consists of things that I already owned plus a Union Jack tank top that I found at a little local store called Julie’s British Shoppe. (Except for River’s sonic screwdriver which came from Barnes & Noble, all the sonic screwdrivers also came from Julie’s!)
We had a blast wearing these costumes to two different Trunk or Treating events last weekend, and we’re excited to get to wear them again tonight for some Halloween fun! We hope you and yours have a great night filled with memories and laughter and only as much scary stuff as you want to enjoy!
Tips for Sewing Children’s Outerwear
This post originally appeared at Get Your Crap Together in September 2013. With fall and winter sewing well underway, this is a great time to revisit some of these tips for sewing outerwear!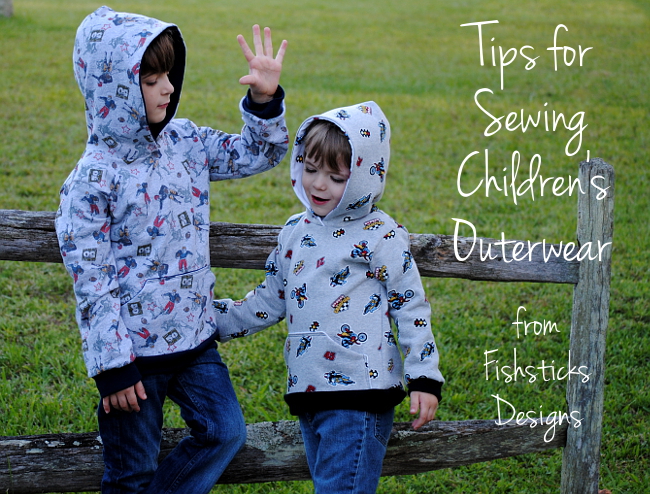 I’m so excited that Chelsea invited me to share some tips and ideas for sewing children’s outerwear. Honestly, outerwear just might be my favorite thing to sew for little ones. As moms of little ones, our days are full! When I’m able to carve out a few spare minutes to sew for my children, I want to spend that time sewing something that will get a lot of use! I want to see the finished work of my hands be enjoyed over and over again. Outerwear accomplishes that goal so well!
Think about it. If you sew a shirt or a pair of pants, they get worn once and tossed in the wash. We don’t treat jackets or hoodies that way at all. We throw a jacket on our child as we head out the door, then hang it up to be worn the next day when we get home. Isn’t that cool?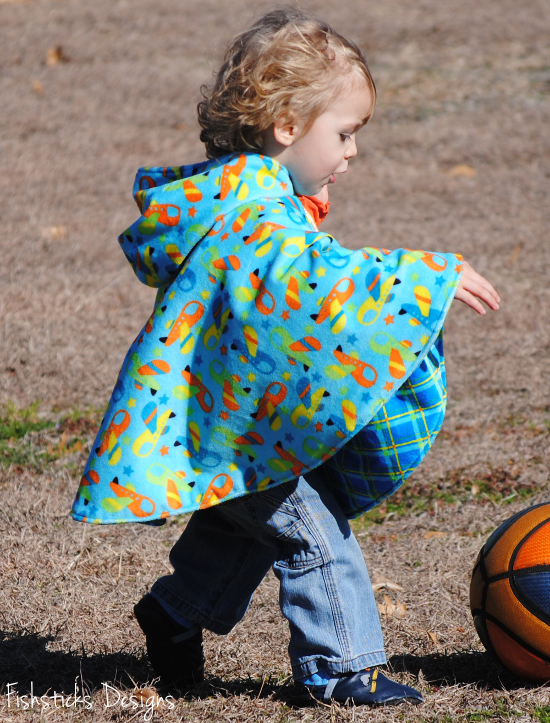 My family and I live in Florida, so I tend to make mostly lighter-weight outerwear that for those of you up north would work best for fall or spring or for layering in the winter. Since Chelsea is working on fall wardrobes for her littles, that’s what I’m going to share today. (You can definitely sew coats for colder climates, just do your research and make sure that you’re using the best materials. Also, as I’m a bit of a stickler for car-seat safety, please don’t ever put your child in a car-seat wearing a heavy coat! A poncho that you can pull on after your child is buckled securely is a great choice, though.)
There are some wonderful independent designer patterns available for boys and girls. I really recommend working with independent designers — I’m all about supporting small businesses, and it’s an amazing thing to be able to contact the designer if you get hung up somewhere! Since I design patterns myself, those are the ones that I’m featuring here. The hoodie pattern is my Charlie Tee and Hoodie and the Which Way Out Jacket is the zip-up jacket. The poncho is one that has yet to be released.
 When choosing a pattern, keep your personal needs and tastes in mind, of course, but be sure to look for those things that make a jacket practical! Pockets are really a necessity, and a hood is great for keeping little ears warm without having to keep track of a hat.
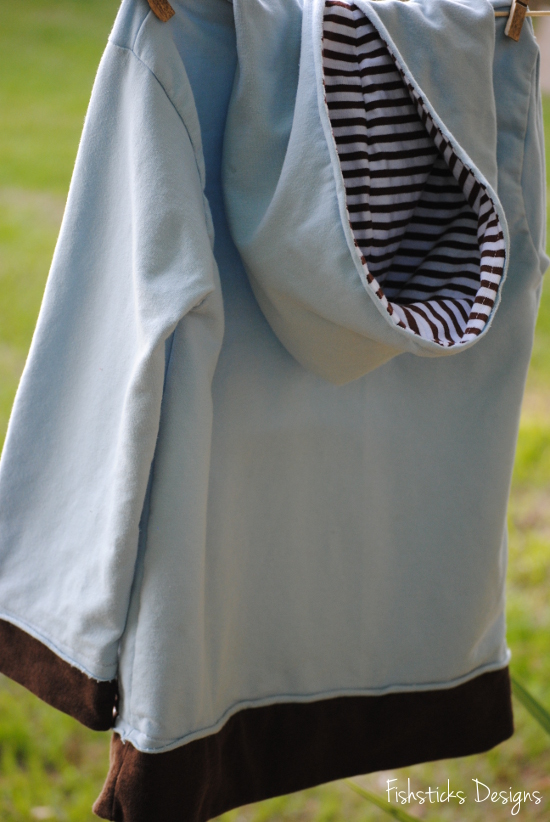
I mentioned already that I love the amount of use that you get from outerwear, but you get even more bang for your buck if you choose a pattern that is reversible like my Which Way Out Jacket! It’s so cool to have a piece of clothing that is fun and playful on one side while it’s dressy and a bit more reserved on the other. It can be a huge blessing, too, when chocolate ice cream happens to drip down one side, and you can just wipe it off and flip it over!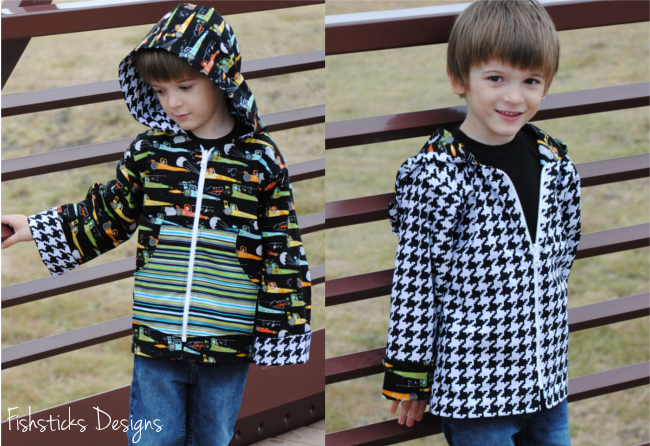 Once you have your pattern chosen, you need to decide on the fabric that you’ll use, and there are so many choices!
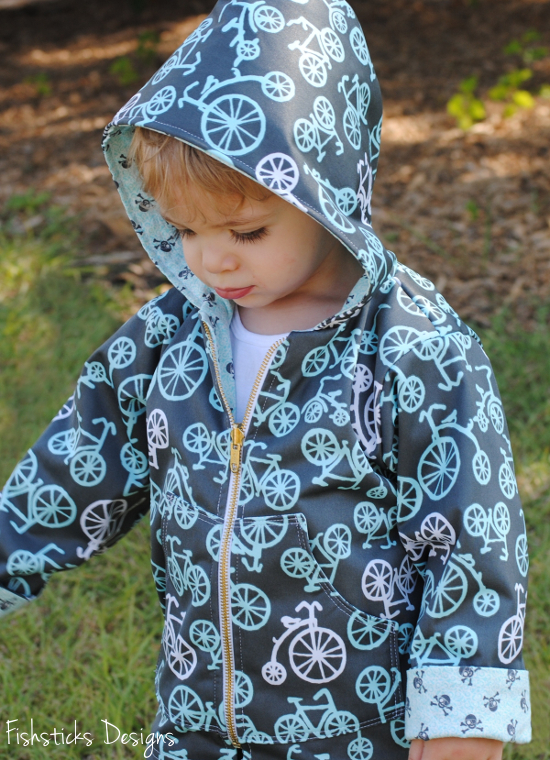 The poncho at the top of this post is sewn with Cuddle Fabric, commonly referred to as Minky. Minky is a polyester fabric that is very warm and fairly heavy, and it has a teeny, tiny bit of stretch. The WWO Jacket just above this paragraph is sewn with cotton flannel on the inside and PUL (polyurethane laminate) on the outside. PUL is a polyester fabric that has a laminate fused to the wrong side. It’s commonly used by cloth diaper makers, and is completely waterproof. It makes a perfect rain coat or windbreaker!
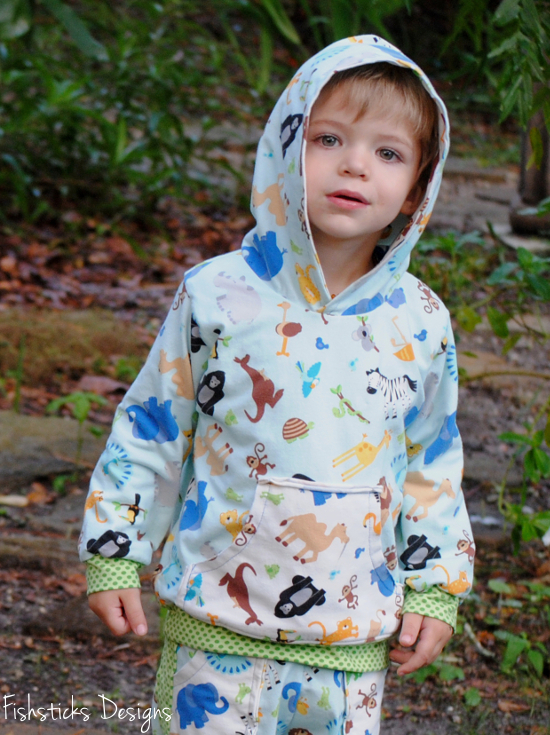 The hoodie above is a great lightweight choice sewn with cotton stretch jersey. Other t-shirt knits are good choices for that little extra layer when the air is just a bit crisp, too. Cotton interlock tends to be my personal go-to since it’s a bit thicker than jersey but not sweatshirt-heavy.
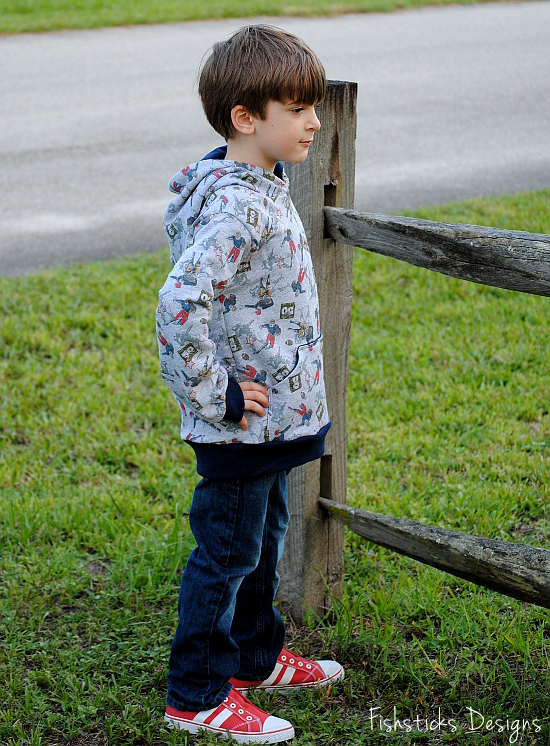 The hoodie above is sewn with cotton french terry. French terry has a right side that is smooth and a wrong side with little loops on it. You can find it in 100% cotton and in a cotton/spandex blend, usually referred to as stretch french terry. The first has a little bit of stretch, while the second has a good amount of stretch and recovery. French terry is heavier than the other knits mentioned above, but not quite as heavy as sweatshirt fleece. It’s a perfect choice for a hoodie for fall or spring . . . or winter if you live in my neighborhood!
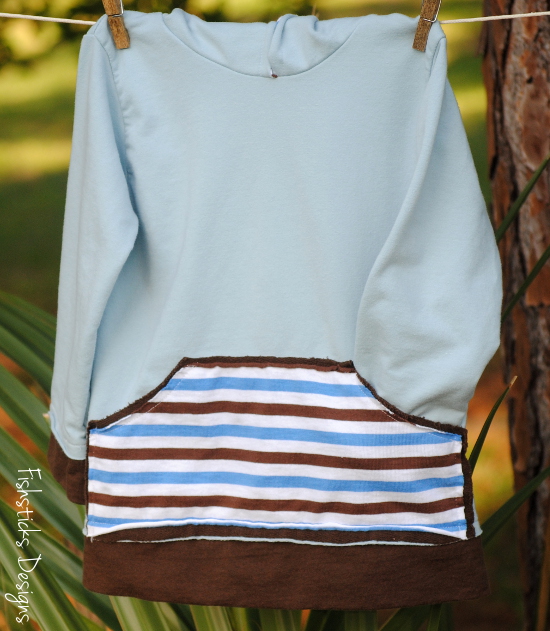
The hoodie below is made with cotton sweatshirt fleece. This is the traditional hooded sweatshirt fabric, smooth on the outside, fluffy on the inside. Sweatshirt fleece is generally 100% cotton, and does not have much stretch to it. That makes it easier to sew, but sometimes harder to pull over the head! (A little tip if you’re sewing a traditional hoodie for a child with a larger than average head, cut your hood slightly taller — about 1/4″ — than the pattern calls for, and then increase your seam allowance by about 1/8″ of an inch when sewing in the hood. You’ll be amazed at the difference that little bit makes!)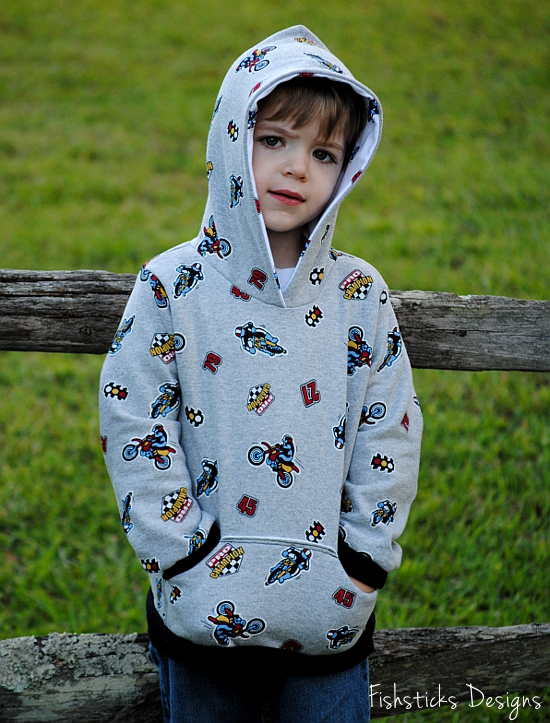 Other good fabric choices for outerwear include cotton quilting fabrics — the reversible cars/houndstooth jacket above is sewn with two layers of quilters cotton, flannel — flannel is a great choice for lining a double-layer jacket, and polyester fleece is another good choice — it comes in tons of colors and prints!
I think many of us look at outerwear as being more difficult or more complicated to sew than other clothing, but it’s really not! There are sometimes a few more steps involved, but I think the extra time is worth the end result. Choose fabrics and a pattern that you love, and go for it. Chances are, you’ll be smiling all season, every time you see your hard work put to use!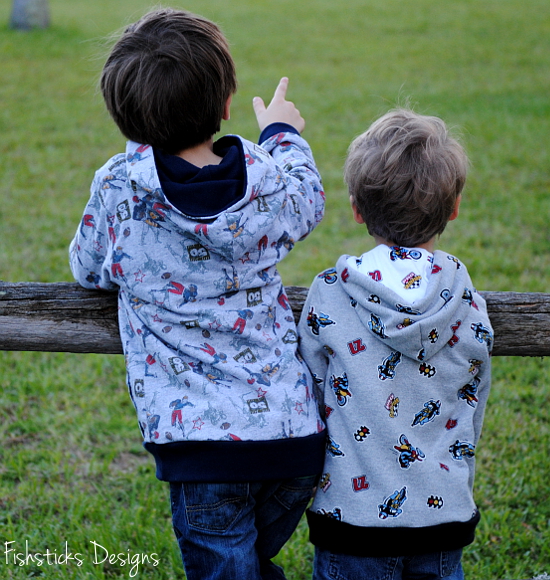
Pattern Extra: Add a Zippered Pocket to the Sand & Sidewalk Boardshorts
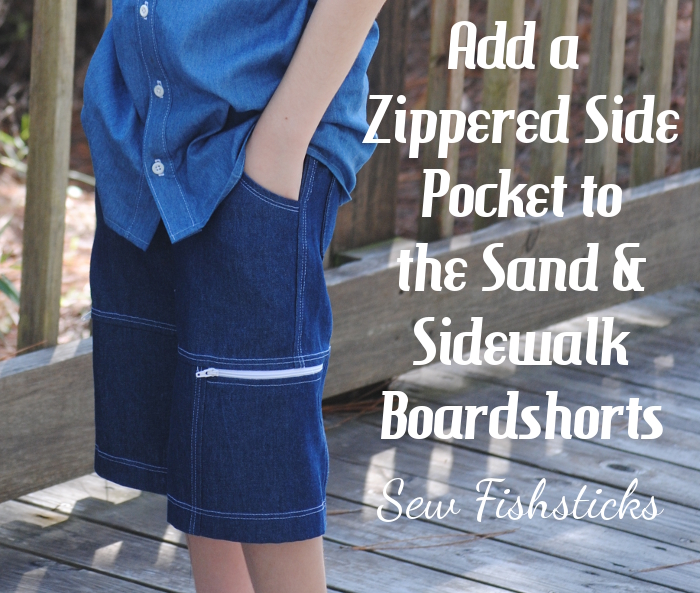 Because you asked, and it makes me happy to make you happy … here are the instructions for incorporating a zippered pocket into the side of the Sand & Sidewalk Boardshorts. Those of us who live in the deep south or in the southern hemisphere will be using this tutorial right away — I promise that I’ll remind those of you up north about it in the spring! In case you’re not familiar with the Sand & Sidewalk Boardshorts and Skate Pants pattern, a front knee panel is incorporated into both the shorts and the pants. This tutorial is only for the shorts. (The curve at the bottom of the knee panel on the pants would make this more difficult.) This tutorial is a little long but the most complicated step is drawing in the back portion of the wrap-around knee panel, and that’s not really hard at all! I’ll walk you through each step, and if you have a question, just ask!
Start by printing and assembling your pattern.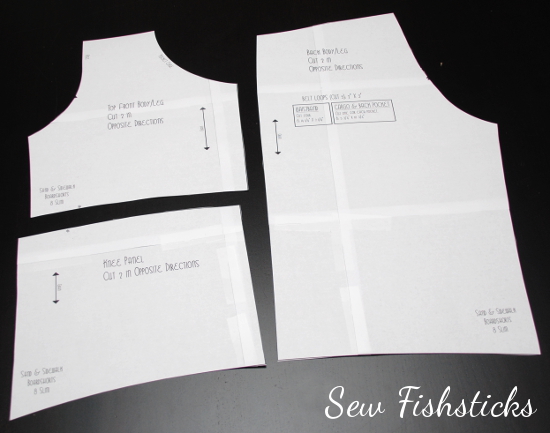 Flip the knee panel pattern piece over onto the bottom edge of the back pattern piece so that their right sides are facing. Line the bottom edges up on the right hand side as you’re facing the pattern pieces. Mark where the top edge of the knee panel hits on the right hand side. (Doing this will assure that the sides of your knee panel will line up properly.)
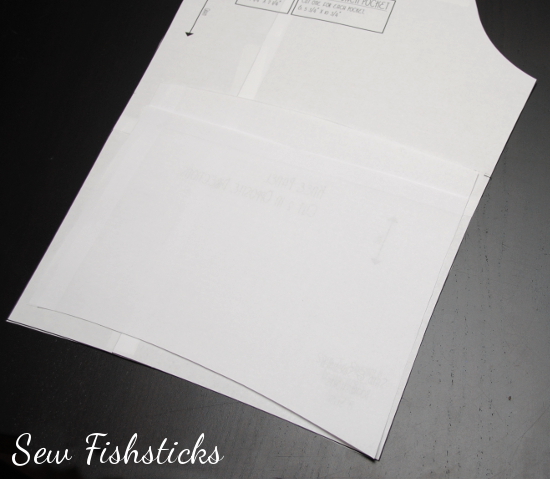 Flip the knee panel back over and place the right hand edge of it so that it’s overlapping the left side of the back pattern piece by 1″ with the bottom edges aligned, as shown. Tape this in place.
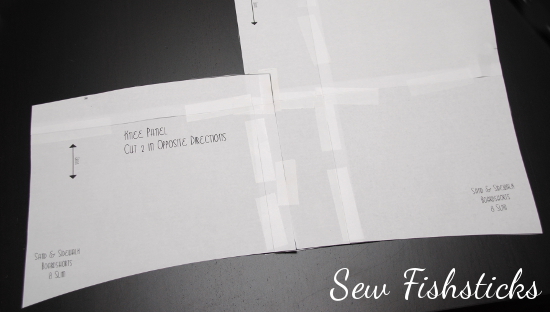 Now comes the slightly tricky part. You’re going to have to draw in a slight, gentle curve from the overlapped edge to the far side of your back pattern piece where you made that mark before. (I’ve found that it’s easier to get a nice curve when I cut than when I’m drawing, so if your curve isn’t perfect now, you may be able to “fix it” when you cut in a minute.) You can see here that I drew the curve starting at the very edge of the back piece, rather than starting at the edge of the overlapped knee panel. This will give you a smooth finish on the top of your pocket.
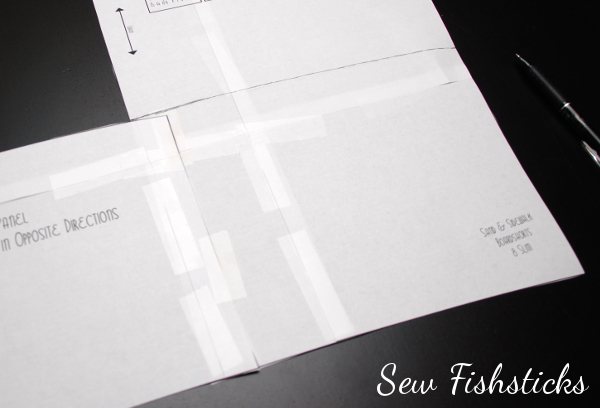 Still with me? Now cut along that curve that you just drew.
 Before you move on, make a notation on the top back pattern piece that you just cut away that says, “Add 1 inch,” with an arrow pointing to the bottom edge. (You’ll need to add an inch when you trace this later to accommodate the seam allowance.)
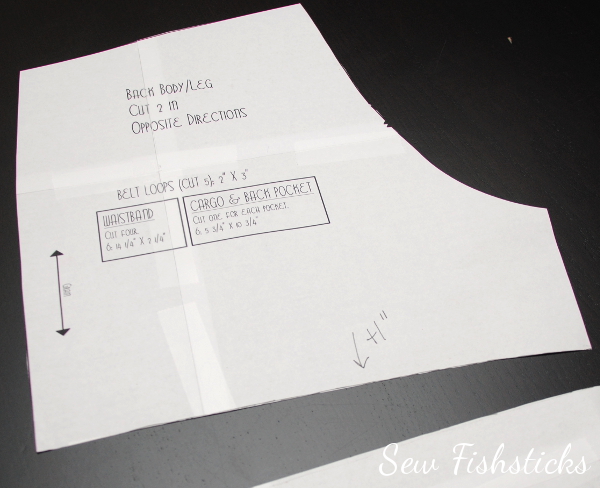 Deep breath. When you finish this, you’ll be ready to modify all sorts of patterns to do fun things like this! Okay, now we need to draw in the pocket. On the size 5 that I did for Charlie, I made the pocket 5″ wide. On the size 7/8 that I sewed for Jamie, I made the pocket 6″ wide. You sort of have to decide what size works best for the size shorts that you’re sewing. (And, you’ll need a zipper slightly longer than the length you decide. Any length will work, as long as it’s at least a bit longer than the width of the pocket.) The center of your wrap-around panel is going to be at the center of that overlap. Draw a line there, then draw straight lines 1/2 the distance of the width of your pocket on each side. In this case, since my pocket is going to be 6″ wide, my lines are both 3″ out from the center. (The center line says, “Seam line”, on my copy because that is where the seam on the upper part of the shorts will line up.)
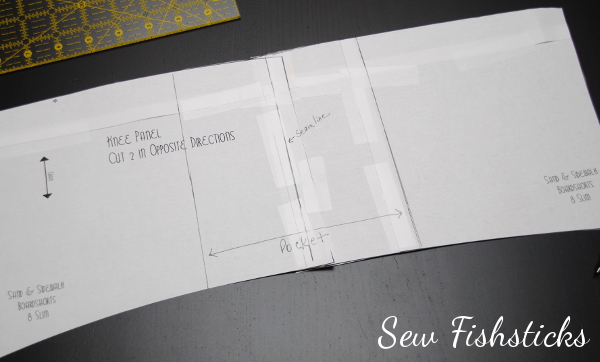 The lines that you just drew in will end up being the finished seam lines, but you need seam allowances drawn in before you can cut out your fabric. If you have different color pens on hand, some color-coding may help keep things clear in this step. I generally use a 1/2″ seam allowance on all of my patterns, so that’s what I’m going with here. To get the width that I’ll cut the pocket, I drew new lines 1/2″ on the outside of the original lines. Those are the blue lines in the following two pictures. For the front and back pieces of my wrap-around panel, I added lines 1/2″ to the inside of the pocket seam lines. Those are the red lines that you see here. I like to draw in arrows and note which part is cut to which line when I draw in these seam allowances. Otherwise, it’s really easy to get mixed up!
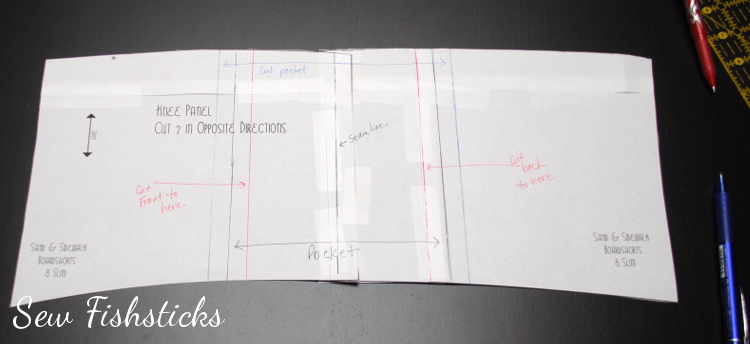
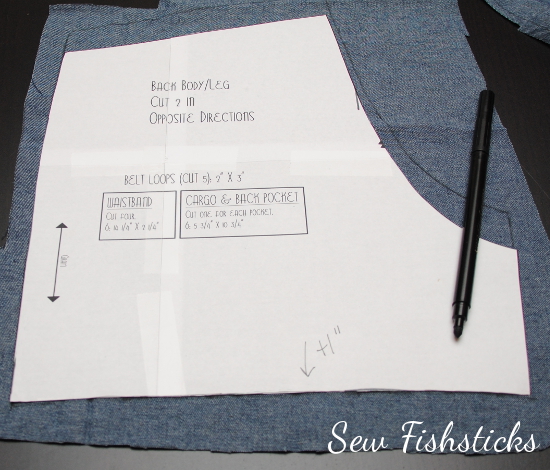
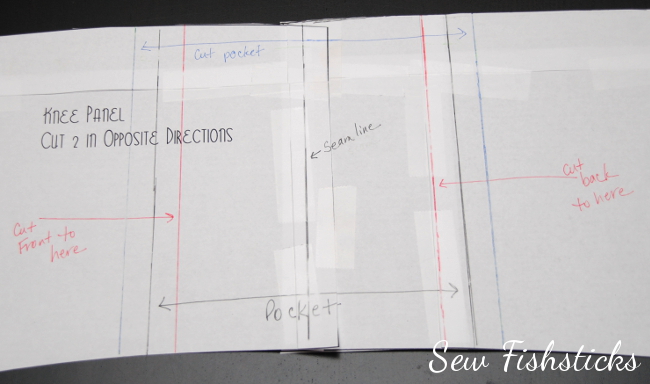 You’re ready to cut out your fabric pieces! What I usually do is place the pattern on the fabric, trace the outside of the pattern up to the lines that I’ve drawn in …
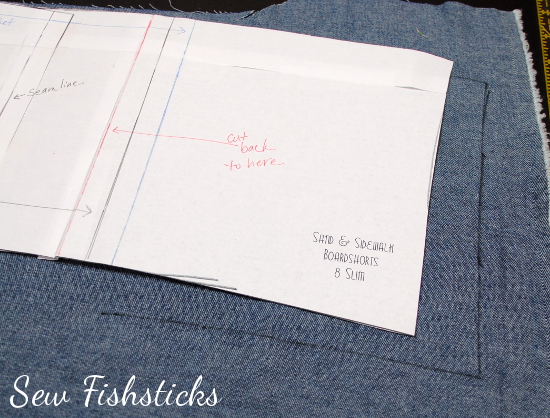 Then, I either fold the pattern back on the line, or I use a straight-edge to draw in the straight line.
 Be sure that you’re tracing your pattern pieces to the correct seam allowance line. You’ll need four pocket pieces (two, then two reversed), and you’ll need two each of the front and back pieces (one, then one reversed). Label your pieces when you trace them!!! I put a letter “B” for the back, a letter “F” for the front and a letter “P” for the pocket using a washable marker at the inside edge. (If you don’t label these, you may end up with a mess.)
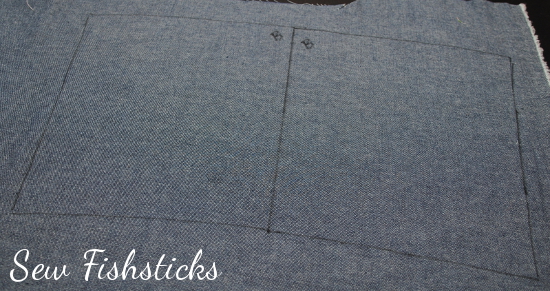 Now that your wrap-around/pocket pieces are all cut out, you’ll need to cut out the rest of your pieces. When you cut out the upper back, you’ll need to add 1″ for the seam allowance. (Since you didn’t add 1/2″ to the back knee panel that you created, you’re adding the seam allowance for it and the seam allowance for the back at the same time. Just trust me, that you need an inch. You do not need to add seam allowance to the front piece, since it has the seam allowance already added in.)
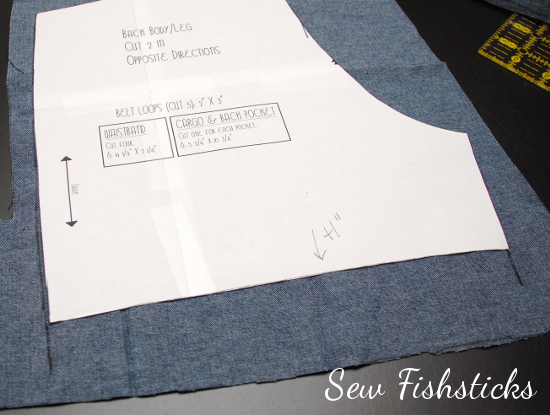
 Time to sew in the zipper! Are you ready? Lay out the pattern pieces for the wrap-around on one leg, and arrange them in order. This photo shows the pieces for the left leg. The front piece is all the way to your left, the two pocket pieces are in the middle (both with right sides facing up) and the back piece all the way to your right. You want your zipper to close with the pull towards the front of the pants.
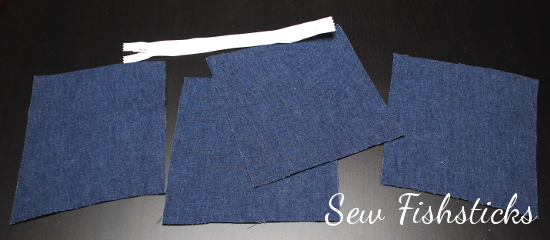 Set everything to the side except for the front pocket piece. Turn your zipper face down, as shown, on the top edge of this piece and line up the edges. Pin the zipper so that the pin heads will be facing you as you guide the zipper through your machine. That will allow you to remove them as you get to them.
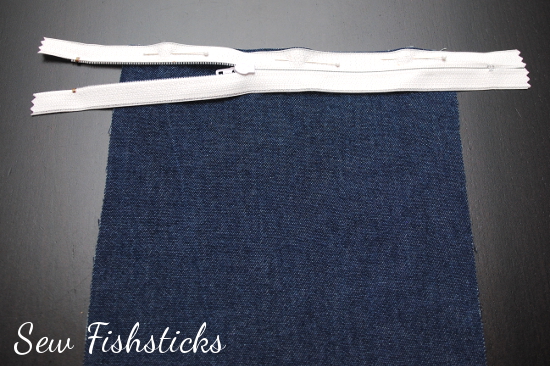 Put the zipper foot on your machine and adjust the needle so that it falls 1/4″ from the zipper’s outside edge. (Remember this setting because when you sew the other side of the zipper, it will be hidden between two layers of fabric, and you want both sides to be even.) Stitch the zipper in. When you get to zipper pull, backstitch, remove the fabric from the machine, pull the zipper pull past and start stitching again where you left off.
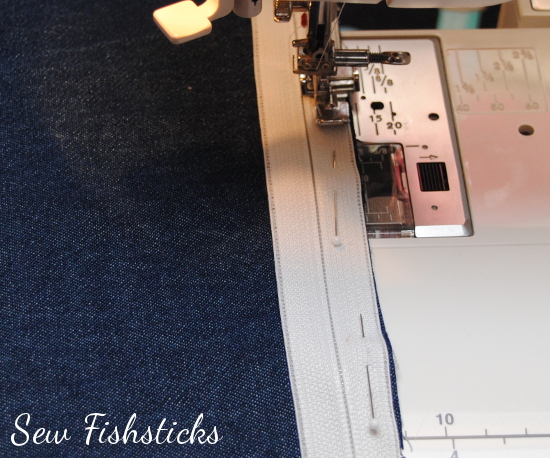 Once you have this side of the zipper stitched in, I like to flip over to the back and trim away some of the fabric so that those raw edges will end up sewn neatly under the zipper when it’s topstitched. (If you don’t do this, those edges may fray with washing and end up getting caught in the zipper teeth. You won’t have to do this on the other side of the zipper since it will be sewn between two layers of fabric.)
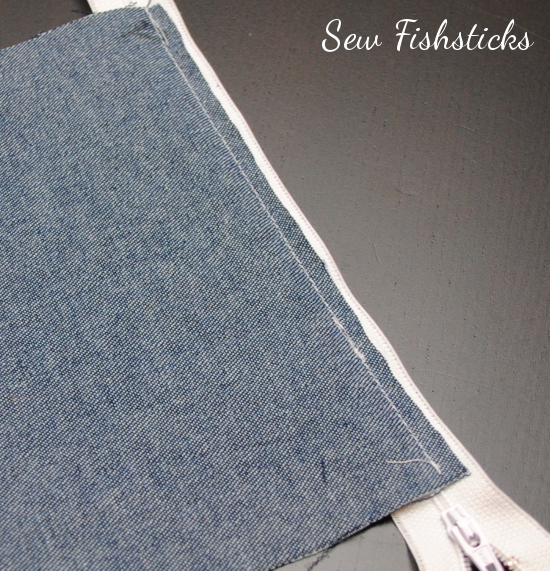
Flip the pocket down away from the zipper and press it lightly. (Be careful because plastic zippers can melt!) Topstitch 1/4″ from the seam.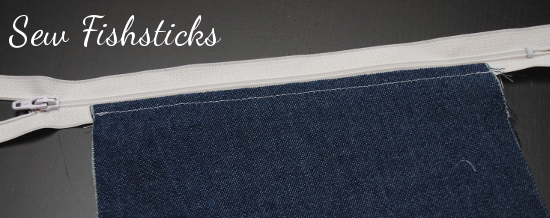 Pull the zipper pull over so that it’s above the pocket and cut away the extra zipper.
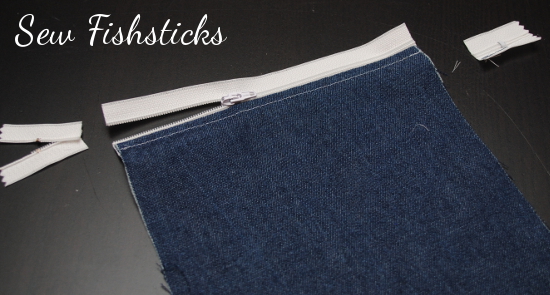 Place the second pocket piece behind the front. Line up the top edge of this piece with the top edge of the zipper and pin. Flip the front piece up at the bottom edge and trim away enough of the bottom pocket piece so that it falls 1/2″ shorter than the front piece. (This will reduce the bulk when you hem the shorts.)
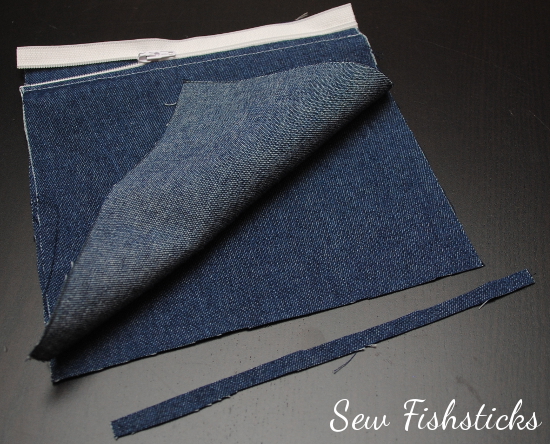 Sew the back wrap-around panel piece to the back side of the pocket. Serge or overcast your seam allowance to prevent fraying. Before sewing the front of the wrap-around to the pocket, pull the zipper pull back and pin the zipper teeth close together.
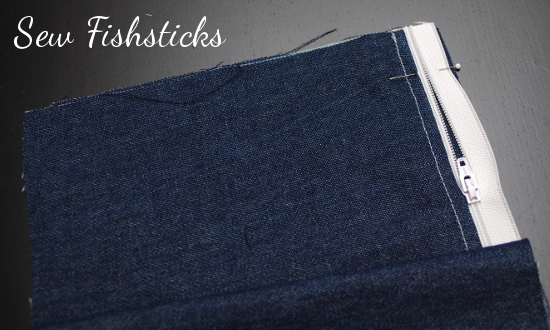 Sew the front of the wrap-around piece to the pocket. Serge or overcast the seam allowances.
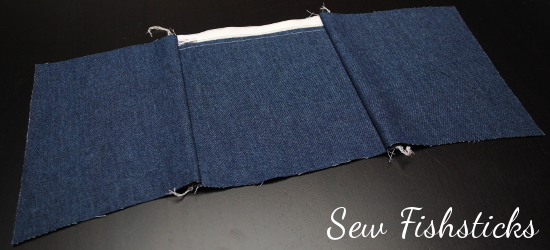 Pull out that twin needle and topstitch down both sides of the zipper. (Or just sew two rows of side-by-side topstitching.)
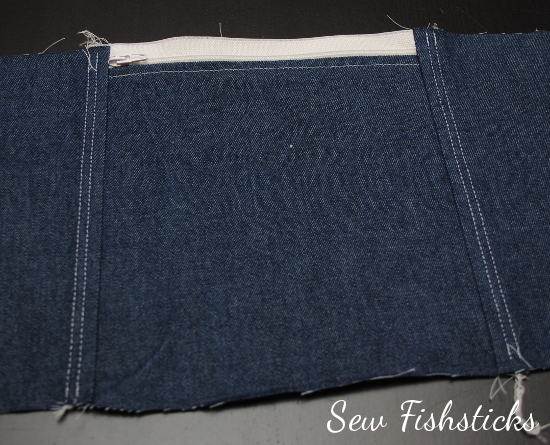 If you haven’t already assembling the top portion of this leg, do so now. (This top portion looks slightly different than the pattern because it’s the modified version that I did for Project Run & Play.)
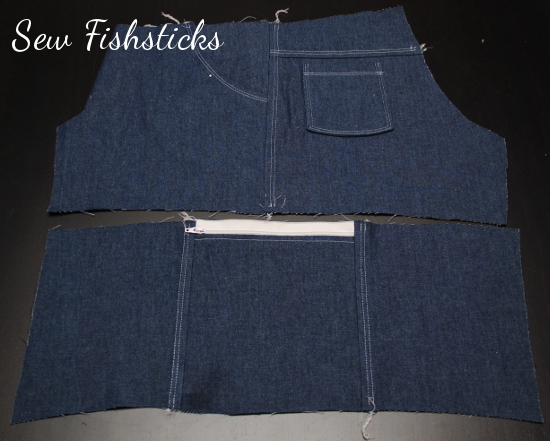 When you pin the wrap-around panel to the bottom edge of the top portion of the leg, pin the top edge of the zipper in the same way that you pinned the bottom edge of the zipper earlier. This time the zipper will be sandwiched between two layers of fabric, so be careful to line up the three edges evenly. Sew the pieces together using your zipper foot with the same settings you used for the bottom of the zipper.
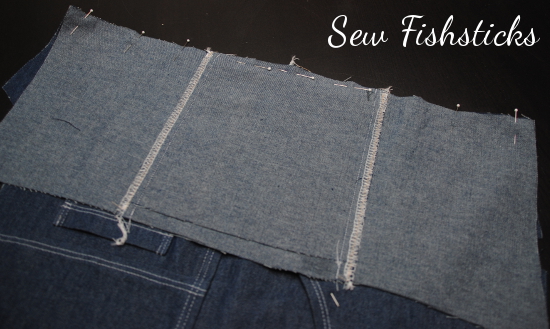 When you overcast or serge this seam allowance, you’ll need to open the zipper, go part-way, stop, pull the zipper past and start again where you left off.
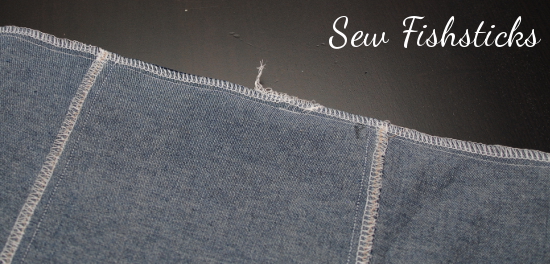 Topstitch above the seam using a twin needle or stitching two rows of side-by-side stitching.
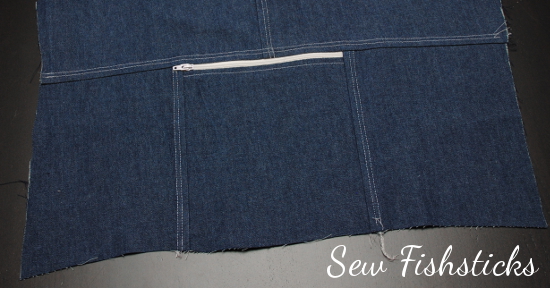 From here, you’ll do the other leg, then follow the instructions in the pattern to complete the shorts. Be careful, though, when you line up the inseams the make sure that the wrap-around seams are lined up as closely as possible.
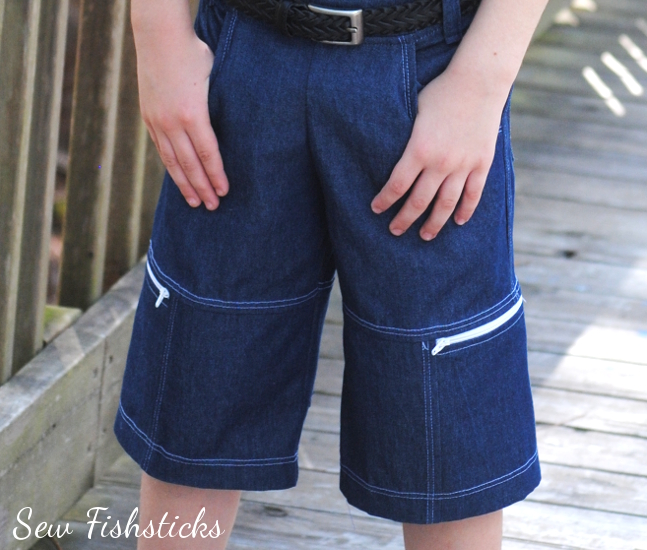 That wasn’t too hard, was it? A few little tips/notes: first, I didn’t put this together in a PDF, but my blog has Print-friendly button at the bottom of each post, that will make it easier for you to print if you prefer. Second, because you’re basically drawing in your pattern and you’re not a computer, you may get edges that don’t quite line up. As long as they’re small pieces, just trim them so that they do line up and move on. Those little tiny misalignments aren’t going to affect the fit of the final piece.
Go sew some cool shorts! And, then share them with us! We would love to see them in the Fishsticks Sewing Group or on the Fishsticks Fan Page or tag me on Instagram!
Bowties are Cool ~ Denim is Cool, Too!
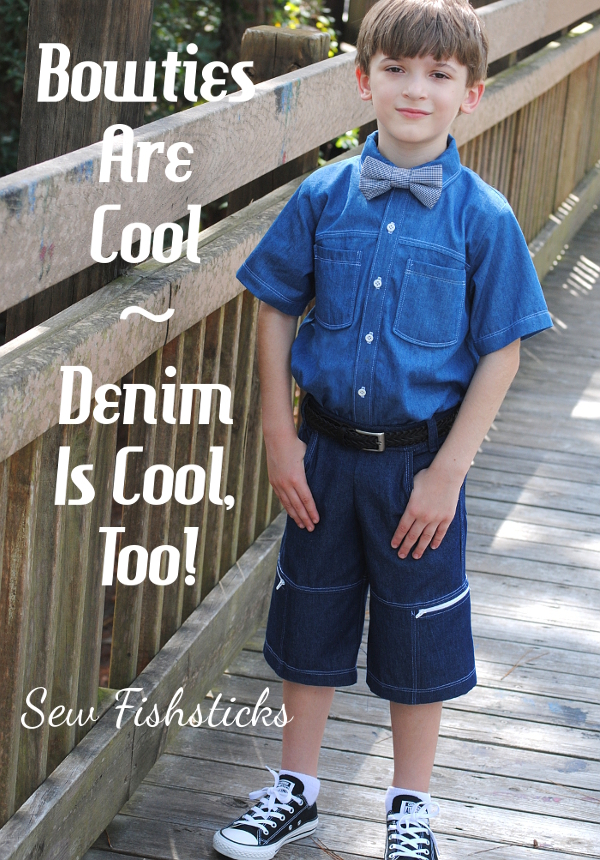 I know – Denim Week at PR&P is over! I’m running behind. I spent quite a bit of last week working on upcoming new patterns and Quilt Market samples, and then my site was down unexpectedly for a little while. I am happy to report that I did finish up Jamie’s outfit, though, and he got the bowtie that he wanted!
We’re sort of big Doctor Who fans around here. The 11th Doctor is my personal favorite … “I will always remember when the Doctor was me.” I love that Jamie thinks bowties are cool. For the record, though, I asked him which Doctor was his favorite. “David Tennant,” he said. I tried to convince him that surely he was mistaken, “But, Matt Smith wore the bowtie!” “Well, David Tennant is my favorite, but I really like Matt Smith’s bowtie!”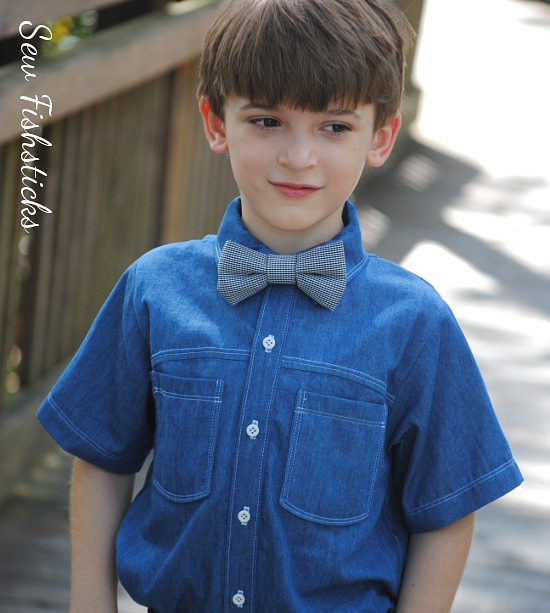 Since I’m still sewing along with the Project Run & Play challenges, and last week was the Denim Challenge, Jamie got a whole denim outfit. I did a quick Pinterest search when I was first starting on this outfit, and I found tons of denim shirts with jeans … even a few with bowties! That was great encouragement to go with my plan of a denim button-down top with jean shorts.
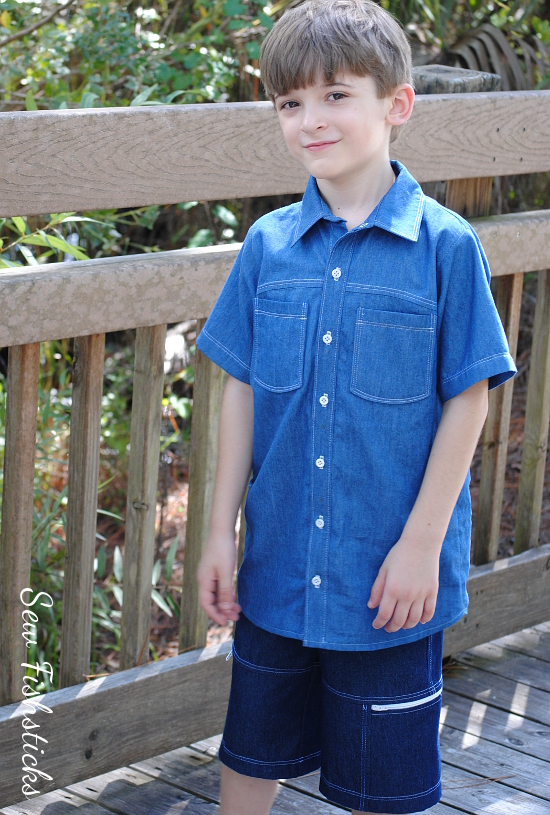 For the top, I started again with my Everyday Camp Shirt. This time I added a high curved yoke and pockets with curved bottoms on the front. I narrowed the collar like I did with Charlie’s shirt last week, and put in that same collar stand, too. I cut the button placket separately to give it more definition, and added a curved yoke on the back. I also gave the top a shirt-tail hem.
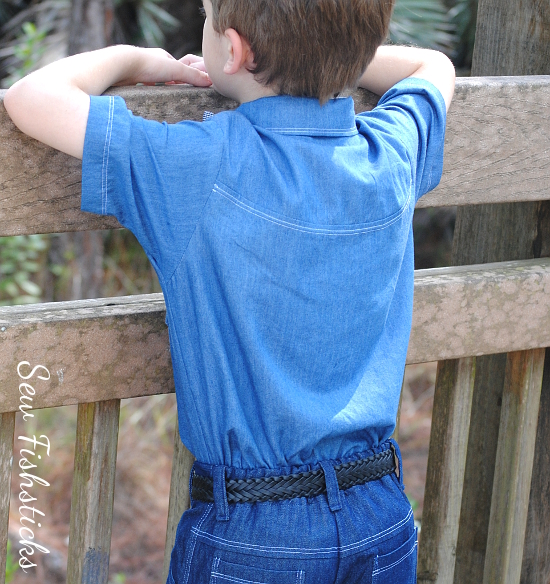 This button-down has a ton of topstitching. Topstitching seems to be my personal theme for this PR&P season!
 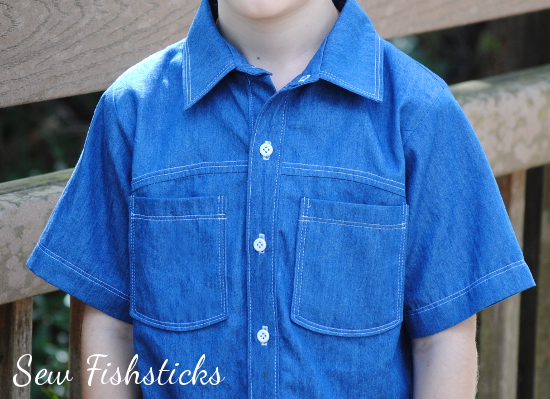 Because my sweet Australian followers so kindly asked me to go ahead with doing a tutorial for that side zipper-pocket on the Sand & Sidewalk Boardshorts, I used that pattern again, primarily because I wanted to take photos of the pocket process, but also because I really love this pattern! I added the belt loops this time, but skipped the extra topstitching on the front pockets. On the back, I added a curved yoke to mimic those on the shirt, and I used those same curved-bottom pockets. I really like all the curves in this outfit!
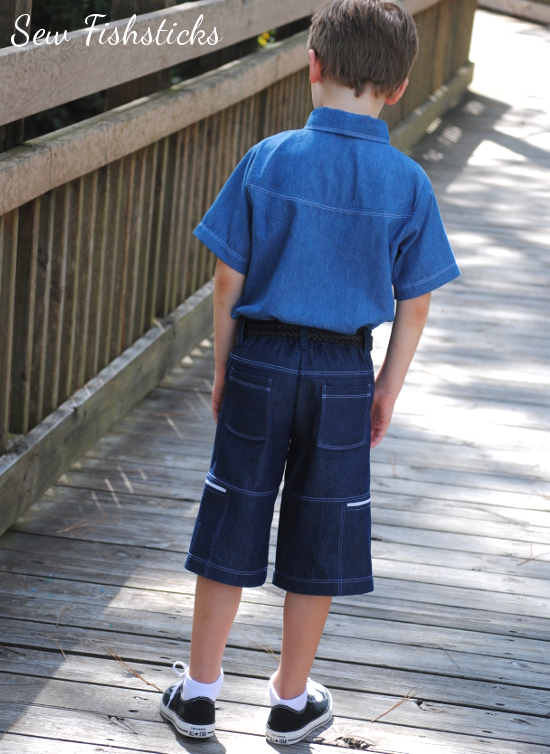 I have all the photos done, so hopefully, I’ll have that pocket tutorial ready for you in the next few days!
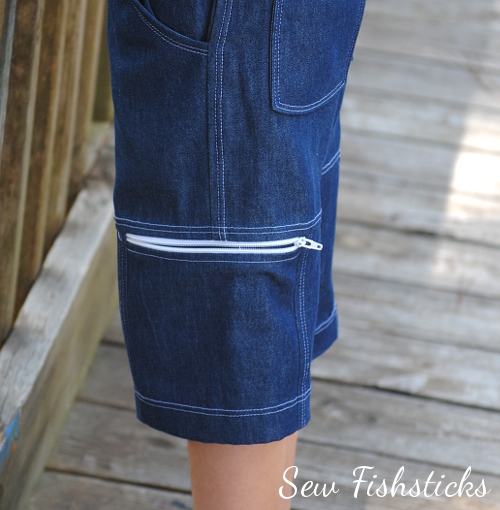 Of course, this outfit works really well without the bowtie, too. And, I think that it’ll be worn far more often this way than with the tie … maybe? Hmmm … I suppose I’ll have to wait and see what Jamie decides!
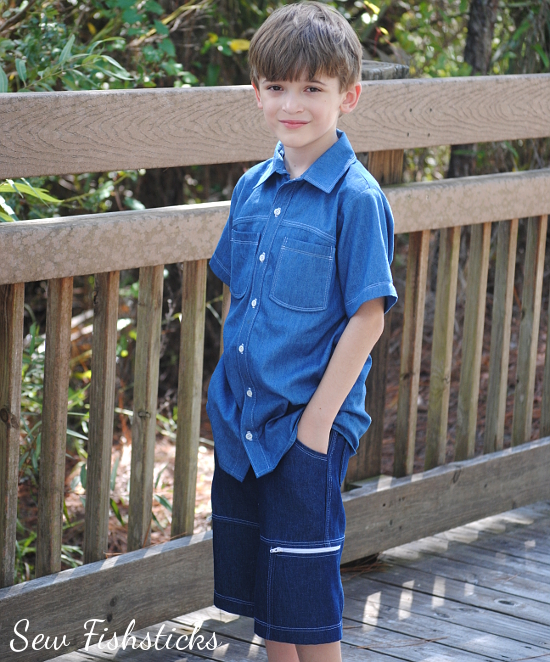 You may be able to tell from my pictures that Jamie is almost always very serious and thoughtful. Getting him to smile for pictures is nearly impossible! (Isn’t it cool how children from the same family can be so different?)
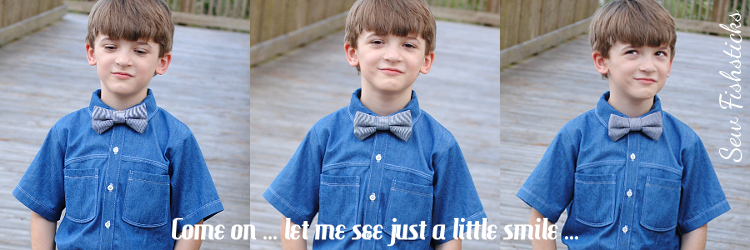 On to my signature look. Hopefully, I’ll have that one done and posted before the week is up!
Fabric in the top is from Joann fabrics.
Fabric in the shorts is from Robert Kaufman Fabrics.
The bowtie fabric and the buttons on the shirt are upcycled from thrifted men’s tops. (The buttons are from one of the shirts that I used for last week’s look!)
Go Fish Extra:
Make the OTG Travel Pillow with a Wonky House Pocket
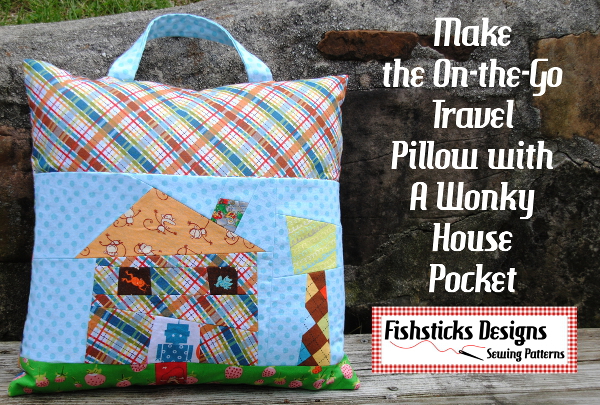 Ready for the next in my Go Fish Pattern “Extras”? This one pairs my Wonky House Quilt block with the On-the-Go Travel Pillow for some extra detail and fun! Find the pattern template and instructions right here: Wonky House Travel Pillow.


